Admin Welcome Kit
Welcome to MyTravelport!
You have been selected as an administrator for your organization in one of two ways:
-
Travelport designated you to act as an administrator for your organization, or
-
Another administrator within your organization assigned the role to you.
This welcome kit provides the tools you need to prepare your organization to use MyTravelport.
STEP 1: Access MyTravelport
To start using MyTravelport, go to My.Travelport.com and login with your organizational email and password.
Hints
If you need to determine your Agency PCC (Pseudo City Code), then do the following:
For Apollo customers:
-
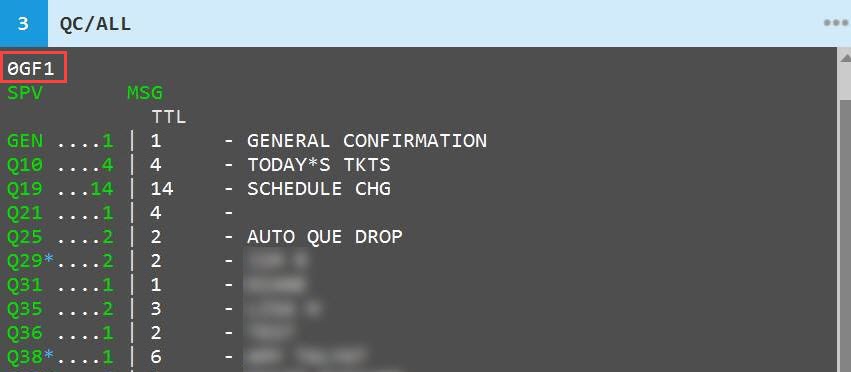
If your sign-on is not locked, then enter: QC/ALL
-
The pseudo displays.
For Galileo customers:
-
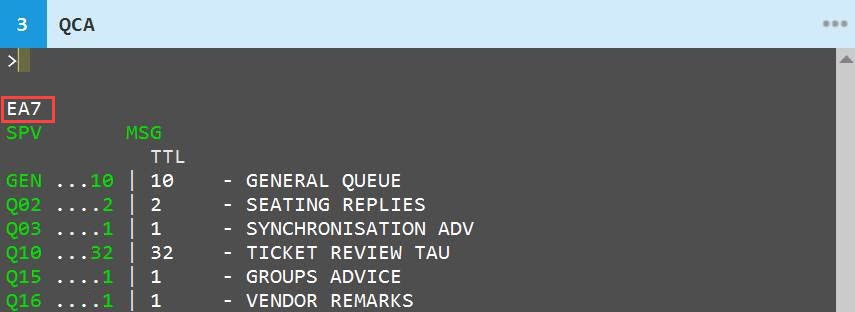
If your sign-on is not locked, then enter: QCA
-
The pseudo displays.
For Worldspan customers:
-
If your sign-on is not locked, then enter on the command line: B$
-
The pseudo displays.
If you need to determine your agency customer number (CIDB number), then do the following:
For Apollo customers:
-
If your sign-on is not locked, then enter: C*CIDBNUMBER
-
The system responds with the message: YOUR UNIQUE CIDB NUMBER TO BE USED WHEN CALLING THE TRAVELPORT HELPDESK IS: 0123456.
Note: If a CIDB number is not available, the system returns: NO CIDB NUMBER CAN BE FOUND AT THIS TIME. PLEASE CONTACT YOUR LOCAL SALES CONTACT FOR ASSISTANCE.
For Galileo customers:
-
If your sign-on is not locked, then enter: C*CIDBNUMBER
-
The system responds with the message: YOUR UNIQUE CIDB NUMBER TO BE USED WHEN CALLING THE TRAVELPORT HELPDESK IS: 0123456.
Note: If a CIDB number is not available, the system returns: NO CIDB NUMBER CAN BE FOUND AT THIS TIME. PLEASE CONTACT YOUR LOCAL SALES CONTACT FOR ASSISTANCE.
For Worldspan customers:
-
Log on to Travelport Worldspan.
-
Select Settings then choose System.
-
Your customer number is shown on the right-hand side.
STEP 2: Explore MyTravelport
Review the MyTravelport Dashboard topic.
To learn more, view the following topics:
-
Learn about notifications and service alerts
-
Change your profile settings and reset your MyTravelport password
-
Update your notification and email settings
STEP 3: Set Up Your Organization
For federated customers, users are set up in your identity provider.
Non-federated customers can follow the steps below to configure your organization.
Decide the user roles
Features in MyTravelport are controlled by the role assigned to a user. The available roles are User, Agent, Manager, Analyst, and Administrator. These roles can view alerts and shortcuts; access the knowledge base; and modify some profile settings. The following roles have additional capabilities:
-
Agents can create cases.
-
Managers can modify other user’s roles and create cases for the agency.
-
Analysts can create and view automation requests as well as cases.
-
Administrators can add or modify other users and can grant access to users outside his/her organization, and create cases.
Before adding any users to your organization, consider what roles you will assign to your users.
Add your users
Available to: Non-federated administrators
Method 1: Manually Add Users
If you have a small organization or need to add a small number of users, the manual process is most efficient. You may manually add a single user to your organization by following the steps in the help topic Add a user.
Method 2: Bulk Upload Users
If you have a large organization or want to onboard users in groups, then the bulk upload process may be the best method to follow. The batch upload process allows you to create multiple users at one time. Follow the steps in the help topic Bulk upload users.
Manage your users
Once your users are created, you may need to change settings for a specific user. Please consult the following help topics to manage your users:
-
Change a user’s status
-
Manage suspension/termination of users
STEP 4: Communicate to your organization
After setting up your organization’s users, Travelport recommends you communicate the next steps with your users.
Send an Internal Welcome Letter
Start by informing your users about their new MyTravelport access and role assignments. Feel free to edit the e-mail sample below as an initial communication:
Hello,
Exciting news! Our organization will be enrolling in MyTravelport, Travelport’s new self-service portal.
MyTravelport is Travelport’s new single-entry point for you to self-serve and use your Travelport products and services. You will be able to:
View notifications and service alerts
Search the knowledge base for helpful articles
View product advisories
Raise and manage cases
Chat with Travelport
Manage your profile settings
[If adding users manually or through bulk upload, add this text]
You will receive an e-mail confirming your enrollment. It will contain a link to a Welcome Kit which serves as a quick start guide.
[End of manual or bulk upload text]
Get started by exploring your Welcome Kit now!
STEP 5: Support your organization
When your organization requires help, MyTravelport has tools you can use to resolve your needs.
Knowledge Base
Find solutions quickly using the knowledge base.
Advisories
Product advisories notify you of important product enhancements.
Chat
Chat services provide fast contact with Travelport.
Raise a case
Raise a case to obtain assistance.
- Search/View cases
- Create a case
- Update a case
-
Some users are permitted to grant access of their organization's cases to users outside of their organization. This access allows these external users to create and edit cases under your organization's CIDB.
STEP 6: Still Have Questions?
By now, you are on your way to becoming a MyTravelport expert. If you still have questions, please consult the troubleshooting guide and frequently asked questions (FAQs):
We are happy to have you on this journey with us, and we welcome your feedback as you use MyTravelport!
All the best,
Your Travelport team