Fare Shopping
Selling Flights with Branded Fares
Fare Shopping results may be returned with branded fares, which provide specific service offerings are associated to each brand.
Viewing Branded Fares
Depending on the airline and route, some Fare Shopping results may return branded Fares.
-
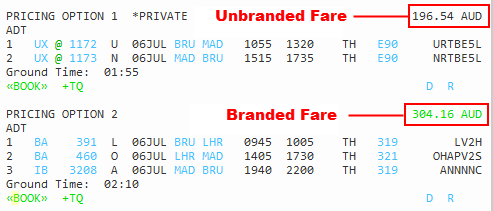
Branded fares are displayed with a green fare total, while unbranded fares are displayed in plain text. (The color of the unbranded fare varies depending on your selected color scheme.)
-
Some Fare Shopping results may contain both Network (GDS) and Direct Payment Carrier fare options. However, Network and Direct Payment Carrier segments are never combined within the same branded fares option.
-
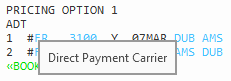
Direct Payment Carriers display a pound sign/hash tag # to the left of the carrier code. See Selling Flights from Fare Shopping: Direct Payment Carriers for more information.
-
Network/GDS Carriers do not display a pound sign/hash tag #. See Selling Flights from Fare Shopping: Network (GDS) Carriers for more information.
-
Booking Branded Fares
To book a branded fare:
-
Make a Fare Shopping search.
Tip! If you add supported pricing modifiers, these modifiers are retained throughout the shopping and booking process for the branded fare, including upsell changes. More Information
The following pricing modifiers are supported for branded fares. Additional modifiers will be added in future releases of Travelport Smartpoint.
- PTC (Passenger Type Code)
- Currency cverride
- Segment Select
- Penalty modifiers
- Account code
- Fare type
- Tax exempt modifier, tax exempt with specific tax code (TE)
- Discount pricing modifiers
- Plating carrier
- Exclude economy unbundled fares (/FXD)
- Fare family
-
For Network (GDS) carriers, add passenger names and corresponding Passenger Type Codes (PTC) to the itinerary.
More Information
You can view branded fares without passenger names, however, you cannot complete the fare quote/air pricing without adding names. Passenger names are not required for fare quote/air pricing for Direct Payment Carriers.
-
For the selected Pricing Option, click the green TOTAL AMOUNT fare.

-
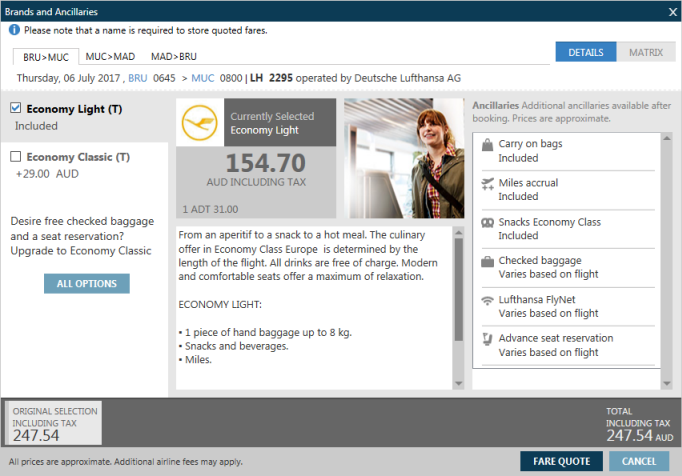
The Brands and Ancillaries window is displayed for the first segment in the itinerary.
-
Information in the Brands and Ancillaries window may vary depending on the type of fare.
More Information
- Private Fares are indicated by a Lock icon to the left of the fare. For example:

A Private Fare can be an Airline Private Fare, Agency Private Fare, Net Fare, any other loaded Private Fare.
If fares that cannot be combined are selected, such as a Private Fare for an outbound flight and a Public Fare for an inbound flight, a warning message is displayed:

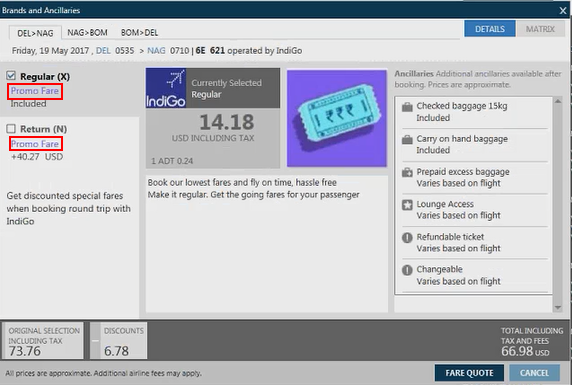
- If a promotional code is sent in the Fare Shopping request, applicable branded fares are indicated with Promo Fare.
- Information such as detailed flight descriptions, ancillary options, and graphics, may be returned in the language indicated in your General Application Settings. Please note that translated text or graphics are provided directly by each airline, and are separate from translations of the Smartpoint user interface. Therefore, the availability of text or graphics in a specific language may vary by airline and individual flight.
- Private Fares are indicated by a Lock icon to the left of the fare. For example:
-
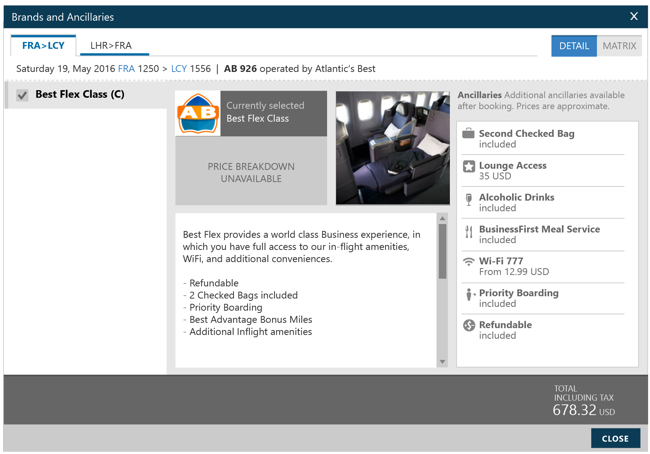
Optional. Select a brand option from the Fare Family list.
More Information
- The additional upsell fee is listed below each Fare Family and added to the estimated fare when selected.
- The description of the brand in the center pane and the available ancillaries in the right pane change to reflect your selected brand.
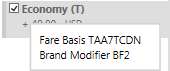
Tip! Hover over the class of service to see the fare basis code, brand modifier, and ticket designator (if present).
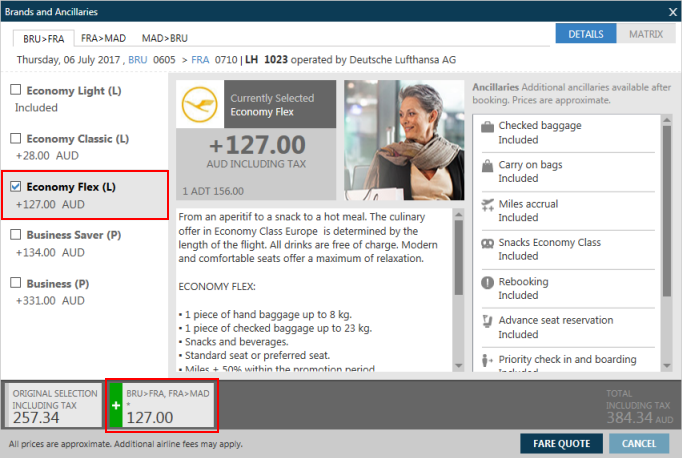
 Network (GDS) Carrier Example
For Network (GDS) Carriers, the cost of the upsell to a more expensive brand is indicated. The fare remains estimated until a second fare quote/air pricing is made after branded fares and ancillaries are selected.
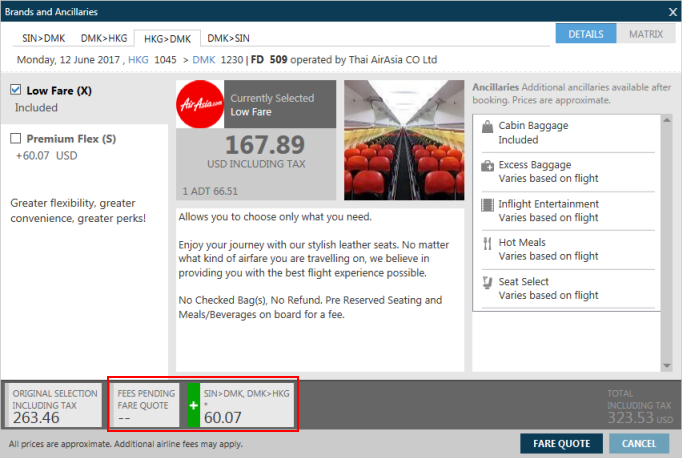
 Direct Payment Carrier Example
For Direct Payment Carriers, the cost of the upsell to a more expensive brand is indicated. The fare and fees are estimated. A FEES PENDING FARE QUOTE message indicates that fees cannot be finalized until the first fare quote/air pricing is made after branded fares and ancillaries are selected
-
Optional. In Ancillaries, click on an ancillary icon to view details about that service. See Ancillary Service Shopping for more information about selecting ancillaries for both branded and unbranded fares.
-
For Network (GDS) Carriers, ancillaries can be added only after booking.
-
For Direct Payment Carriers, ancillaries can be added before booking.
Example
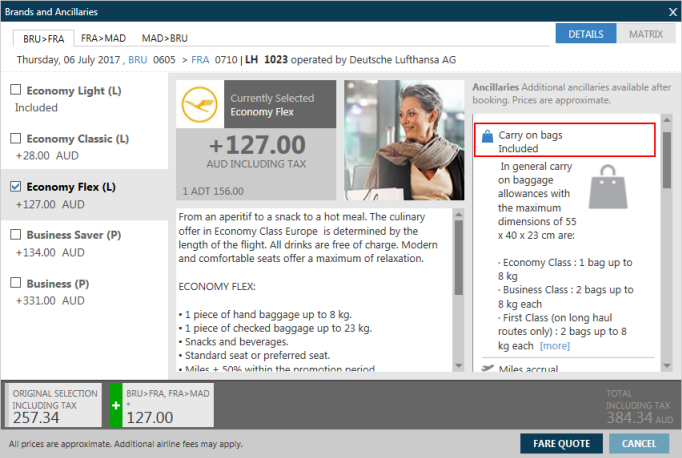
Click the ancillary icon again to close the description text.
-
-
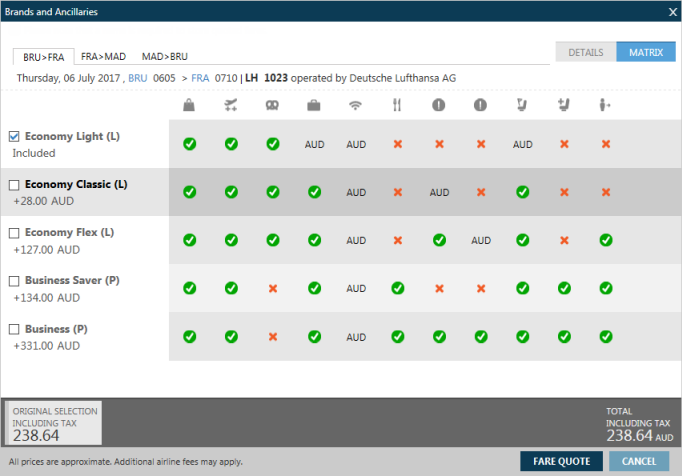
Optional. Select the MATRIX tab to view a comparison of the available Fare Families in a table format.
 More Information
Icon
Description 
The feature or ancillary service is not available for the brand.

The feature or ancillary service is available included in the brand.

The feature or ancillary service is available not included in the brand, but is available for an additional charge. The currency code displayed is based on the point of sale.
- Hover over each icon a the top of the matrix to view a description of that item.

Note that the same icon may display more than once for related information. For example, Rebooking and Refunds use the same icon.

- Click the DETAILS tab to return to Branding Information.
-
Optional in Smartpoint 11.7 and later. Select the AMENITIES tab to view a comparison of the available amenities for a selected cabin class or brand.
Tip! Amenities icons are displayed for the upper right corner if amenities information is available for the selected flight and cabin class. More Information
A list of amenities may be available for a specific cabin class or brand. The availability of amenities varies by carrier and flight, and also depending on how you access the Brands and Ancillaries window.
Access Information
Amenities information is also available when the Brands and Ancillaries window is opened from:
-
This fare quote (pricing) display from availability.
-
A fare shopping display.
Amenities information is not displayed if the Brands and Ancillaries window is opened from:
-
A Filed Fare (stored fare) display.
-
An air availability display for an unbooked itinerary.
-
-
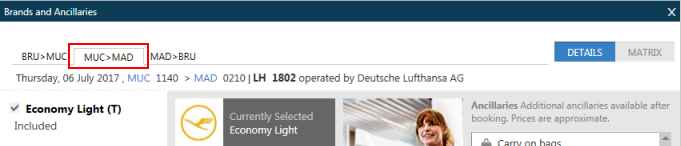
If applicable, select the tabs for additional segments in the itinerary and select a fare brand. As best practice, the same brand should be selected for all segments, if possible.
 More Information
Note: If segments have the same fare basis code because they are stops or connections in the same flight, you cannot select a different brand for each segment.
The fare information changes to reflect the additional selections. If present, discount or increase modifiers, are also displayed.

-
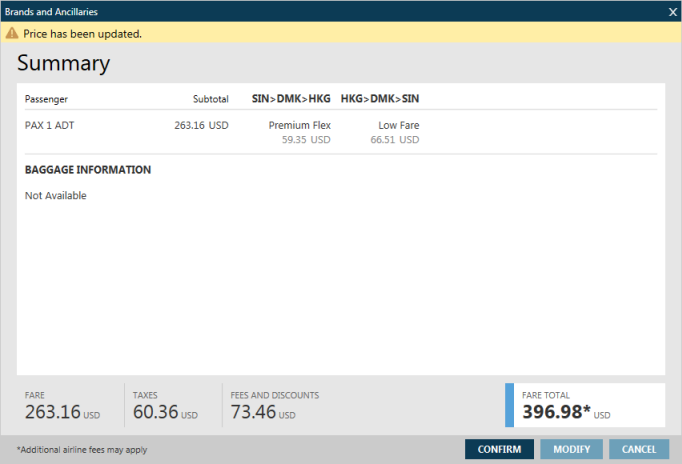
After your selections are complete, click FARE QUOTE to display the Summary window.
-
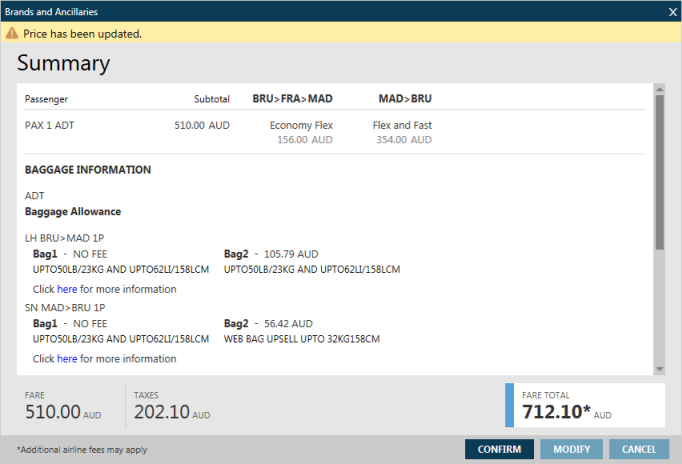
Scroll through the Summary to view the details for your selected brands.
More Information
- A Price has been updated message indicates that the fare has changed since the initial estimate. For example, this message displays if you selected an upsell fare.
- A Best fare for *PTC message indicates that the PTC for the booking option does not match the requested PTC. For example, if a passenger is listed with a Youth (YTH) PTC in the PNR/Booking File, but the carrier books only Adult (ADT) PTCs.
Network (GDS) Carriers and Direct Payment Carriers vary with booking requirements and handle fare breakdowns differently.
Network (GDS) Summary
Network Carriers typically include certain fees in the baseline fare and provide a separate amount for taxes.
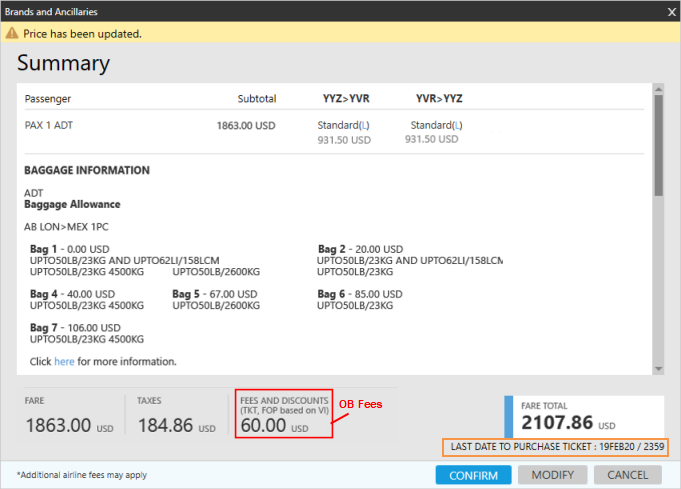
- If present, OB Fees (Carrier Ticketing Fees), which are added at ticketing, are displayed as a separate subtotal item in the Branded Fares screen for Fare Shopping.
- Advance purchase requirements from the Category 5 filing are noted below the fare total.
Direct Payment Carrier Summary
Direct Payment Carriers typically separate fees from the baseline fare. In this example, FEES PENDING FARE QUOTE indicates that fees cannot be determined until the first fare quote after brands and ancillaries are selected.
The message Additional fees may apply, is noted because there may be other fees, including OB Fees, that are not part of the fare may not be returned until ticketing.
-
Click CONFIRM to approve the brand selections and fare information. The air segments and associated fare quote/pricing are added to the itinerary.
-
Price the itinerary. The base entry is FQ (Travelport+ - 1G) or $B (Apollo - 1V). You can also price by a specific brand level.
Tip! This step is required for Direct Payment Carrier to confirm the initial fare. However, pricing is also recommended as best practice for all carriers to confirm the fare.Entries for Fare Price by Brand
Where BF4 is Branded Fare Tier Level 4.
Travelport+ (1G) Format Apollo (1V) Format Price by Brand
FQ*:BF4
$B*:BF4
Price by Brand using segment select
FQS1*:BF2.2*:BF4
$BS1*:BF2+2*:BF4
Best Buy by Brand
FQBB*:BF4
$BB*:BF4
Price by Brand with private/account code only fares
FQ*:BF4-:CORP1
$B-:ACCTCODE*:BF4
Fare Quote Alternate
FQA*:BF4
-- Store Price with Brand (ATFQ)
-- T:$B*:BF4
The pricing information is displayed. This example shows an Apollo PNR, but the same data is available for a fare quote in a Travelport+ (1G) Booking File.
 More Information
In this example, the same fare brand was not available for both segments:
- The outbound segment is priced at the first tier level (BF1), which is Economy Basic in this carrier's fare family.
- The inbound segment is priced at third tier level (BF3), which is Economy Flex in this carrier's fare family.
Next Steps
- Optional.. After booking, you can open a view-only version of the Brands and Ancillaries screen from the stored fare in the PNR/Booking File.
To view brand details:
- From a retrieved PNR/Booking File, display the stored fare.
- Travelport+ (1G) Fare Quote: *FF
- Apollo (1V) Linear Fare: *LF
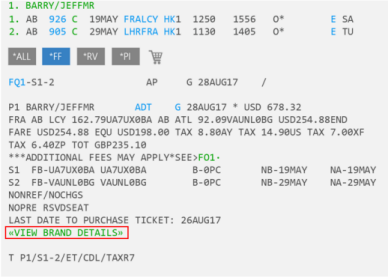
- Click VIEW BRAND DETAILS from the booked PNR/Booking File to display a view-only version of the Brands and Ancillaries screen.
- Optional. If brand tiers are available for the selected fare family, you may have the option to upsell to another tier.
See Selling Flights from Fare Shopping: Network (GDS) Carriers or Selling Flights from Fare Shopping: Direct Payment Carriers for more information about the booking process for each type of carrier.