Using the Account ID Screen
You can use the Account ID screen to:
- Search for accounts – See Searching for Accounts below.
- Create accounts – See Adding Accounts.
- Tagging accounts – See Tagging Accounts.
- Modify accounts – See Editing Accounts.
- Add interests to customer accounts – See Managing Customer Interests.
- Print a list of accounts – See Printing a List of Accounts.
- Export account data – See Exporting Data.
- Delete accounts – See Deleting Accounts.
- Create mail merges for direct mailings and e-mail blasts – See Mail Merge.
- Create mailing labels for direct mailings – See Creating Mailing Labels.
Accessing the Account ID Screen
To access the Account ID screen, on the Accounts submenu, click Account ID. Alternatively, click the Account ID (![]() ) icon on the GlobalWare icon toolbar.
) icon on the GlobalWare icon toolbar.
The Account ID screen appears. The Account ID screen varies based on the account type selected in the Account Type field (Customer, Employee, Provider, or Vendor). The example below shows what the screen looks like for the Customer account type.
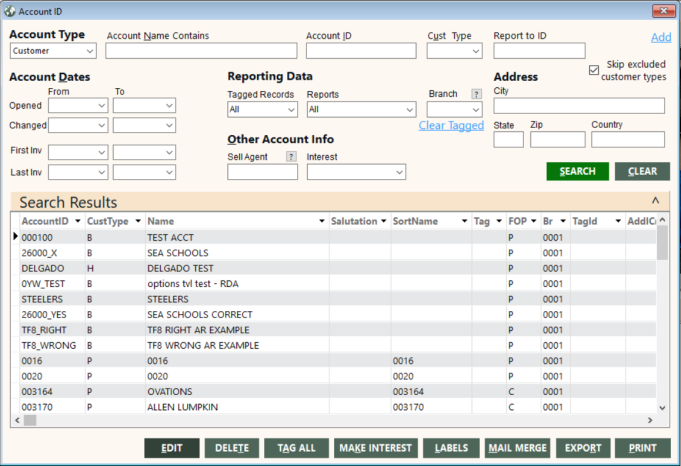
The top area of the screen displays the fields used for finding accounts. After you provide search criteria and click SEARCH, accounts that match the search criteria appear in the Search Results grid. For descriptions of fields, buttons, and links on this screen, see Field, Button, and Link Descriptions below. If only one account matches the search criteria, the edit account screen appears with information for that account displayed. For more information, see Using the Edit Account Screens.
Tip: You can increase the size of the Account ID screen by dragging an edge or corner to the desired size. This enables you to more efficiently view and work with data in the Search Results grid.
Field, Button, and Link Descriptions
The following table describes the fields on the Account ID screen.
Note: The first section in the table lists fields that apply to all account types. Each of the other sections lists fields that apply to a specific account type (Customer, Employee, Provider, or Vendor).
| Field | Description | ||||||
|---|---|---|---|---|---|---|---|
|
All Account Types |
|||||||
|
Account Type |
Type of account (Customer, Employee, Provider, or Vendor). The Search Results grid will display account records that match the account type. |
||||||
|
Account Name Contains |
Full or partial account name. If you specify a full account name, the Search Results grid will display the account record that matches the account name. If you specify a partial account name, such as "tra", the grid will display account records that contain "tra" in the account name (for example, "Train Services" and "XYZ Travel"). |
||||||
|
Account ID |
Full or partial account ID. If you specify a full account ID, the Search Results grid will display the account record for this account ID only. Use the wildcard character (*) to specify a partial account ID, as shown in the following examples:
|
||||||
|
Opened From |
Beginning date of a range of dates when accounts were opened. The Search Results grid will display account records that match the specified range of dates. Use this date in conjunction with the Opened To date to define a range. If you specify only the Opened From date, the range includes all dates from this date to the current date. |
||||||
|
Opened To |
Ending date of a range of dates when accounts were opened. The Search Results grid will display account records that match the specified range of dates. Use this date in conjunction with the Opened From date to define a range. If you specify only the Opened To date, the range includes all dates before and including this date. |
||||||
|
Changed From |
Beginning date of a range of dates when accounts were last changed. The Search Results grid will display account records that match the specified range of dates. Use this date in conjunction with the Changed To date to define a range. If you specify only the Changed From date, the range includes all dates from this date to the current date. |
||||||
|
Changed To |
Ending date of a range of dates when accounts were last changed. The Search Results grid will display account records that match the specified range of dates. Use this date in conjunction with the Changed From date to define a range. If you specify only the Changed To date, the range includes all dates before and including this date. |
||||||
|
Tagged Records |
Specifies the account records to display in the Search Results grid based on tagged status. Select one of the following options from the drop-down list:
|
||||||
|
City |
Enter city name. This field allows up to 30 alphanumeric characters. |
||||||
|
State |
Enter state code. This field allows up to 30 alphanumeric characters. |
||||||
|
Zip |
Zip plus four. This field allows up to 30 numeric characters. |
||||||
|
Country |
Enter the country code or name. This field allows up to 20 alphanumeric characters. |
||||||
|
Account ID (in Search Results grid) |
Identifier of the account. |
||||||
|
Name |
Name of the account. This field allows up to 60 alphanumeric characters. |
||||||
|
|
E-mail address. This field allows up to 30 alphanumeric characters. |
||||||
|
BusPhone |
Full business number, including any extension. This field allows up to 15 alphanumeric characters. |
||||||
|
SortName |
Sort name for the account. This field allows up to 13 alphanumeric characters. |
||||||
|
Customer Account Type |
|||||||
|
Cust Type |
Type of customer. Enter the Customer Type code or choose from the drop-down list. These are defined by the user. |
||||||
|
Report to ID |
What you enter as a Report To ID must be a valid account ID. If the account ID does not exist, you must create it. |
||||||
|
Skip excluded customer types |
Indicates whether customer accounts should not display in the Search Results grid if they have a customer type that is flagged for exclusion. To display all customer accounts regardless of exclusion, clear this check box. For information about excluding customer types from display on the Account ID screen, see Setting Up Market IDs. |
||||||
|
First Inv From |
Beginning date of a range of dates when accounts were first invoiced. The Search Results grid will display account records that match the range of dates. Use this date in conjunction with the First Inv To date to define the range. If you specify only the First Inv From date, the range includes all dates from this date to the current date. |
||||||
|
First Inv To |
Ending date of a range of dates when accounts were first invoiced. The Search Results grid will display account records that match the range of dates. Use this date in conjunction with the First Inv From date to define the range. If you specify only the First Inv To date, the range includes all dates before and including this date. |
||||||
|
Last Inv From |
Beginning date of a range of dates when accounts were last invoiced. The Search Results grid will display account records that match the range of dates. Use this date in conjunction with the Last Inv To date to define the range. If you specify only the Last Inv From date, the range includes all dates from this date to the current date. |
||||||
|
Last Inv To |
Ending date of a range of dates when accounts were last invoiced. The Search Results grid will display account records that match the range of dates. Use this date in conjunction with the Last Inv From date to define the range. If you specify only the Last Inv To date, the range includes all dates before and including this date. |
||||||
|
Reports |
Specifies the account records to display in the Search Results grid based on history reporting status. Select one of the following options from the drop-down list:
For details about selecting accounts for reporting, see the description of the Reporting option in the Edit Customer Screen topic. |
||||||
|
Branch |
Branch or location group that this account is associated with. To find and select a branch or location group, click
the lookup ( |
||||||
|
Sell Agent |
Selling agent code. To find and select a selling agent, click
the lookup ( |
||||||
|
Interest |
Grouping for customer interests (for example, SKI). |
||||||
|
CustType (in Search Results grid) |
Enter the Customer Type code or choose from the drop down list. These are defined by the user. |
||||||
|
Mr/s |
This field is for the mail merge salutation. Type the salutation as it should appear in mail merge documents. |
||||||
|
Rpt to ID |
What you enter as a Report To ID must be a valid account ID. If the account ID does not exist, you must create it. |
||||||
|
Employee Account Type |
|||||||
|
Exclude No Access Employees |
When checked, the results exclude employees that have NO/BLANK “Sign in”. |
||||||
|
Marked for 1099 |
Indicates whether to limit query results in the Search Results grid to employees requiring a 1099 form at the end of the year. Leave this check box unmarked to query on employees regardless of 1099 form requirements. Note: With this option selected, you can run a general ledger query that filters on employee records that are marked for 1099. For details, see General Ledger Transactions. |
||||||
|
Mr/s |
This field is for the mail merge salutation. Type the salutation as it should appear in mail merge documents. |
||||||
|
HomePhone |
Enter the full home phone number. |
||||||
|
Provider Account Type |
|||||||
|
Travel Type |
Travel type for this provider. Enter the travel type or select one from the drop-down list. |
||||||
|
Property ID |
Identifier of a hotel property. This identifier corresponds to the Worldspan or Apollo Hotel Description (HOD) number, which was imported from Worldspan or Apollo by using the Property Import function. For more information, see Property Import. The Search Results grid will display account records that match the property ID. This field is available only if Travel Type is blank or set to H. Note: Duplicate records could appear in the Search Results grid if both Worldspan and Apollo have the same HOD number for a hotel property. |
||||||
|
A/L (Short Code) |
Alpha airline code (for example, UA, AA, and CO). If the account is a hotel property, enter the hotel chain code (for example, HH, HY, or BW). To find and select a provider short code, click
the lookup ( |
||||||
|
TravType (in Search Results grid) |
Travel type for this provider. You can edit the travel type for the provider directly in the Search Results grid. Enter the travel type or select one from the drop-down list. |
||||||
|
ShortCode |
Alpha airline code (for example, UA, AA, and CO). If the account is a hotel property, enter the hotel chain code (for example, HH, HY, or BW). |
||||||
|
Comm% |
Percent of commission usually paid by this provider. |
||||||
|
Vendor Account Type |
|||||||
|
Marked for 1099 |
Indicates whether to limit query results in the Search Results grid to vendors requiring a 1099 form at the end of the year. Leave this check box unmarked to query on vendors regardless of 1099 form requirements. Note: With this option selected, you can run general ledger queries on the GL Edit & Query screen that filter on vendor records marked for 1099. For details, see General Ledger Transactions. |
||||||
|
GLChart |
Expense chart number. |
||||||
|
DueDay |
Day of the month when the vendor bill is due. |
||||||
 ) button. The Find Branch screen appears. For details, see
 The following table describes the buttons and links on the Account ID screen.
| Button or Link | Description |
|---|---|
|
Add |
Opens the Add New Account screen. Use this screen to create a new account. See Adding an Account. |
|
Clear Tagged |
Untags all tagged accounts in GlobalWare, regardless of the account type. |
|
SEARCH |
Searches for account IDs that match the specified search criteria and displays them in the Search Results grid. For details, see Searching for Accounts below. |
|
CLEAR |
Resets the search criteria fields in the top area of the screen to their default settings. |
|
EDIT |
Opens the edit account screen. The name of this screen varies based on account type (Customer, Employee, Provider, or Vendor). For example, if you open the screen for a customer-type account, it is named Edit Customer. For more information, see Using the Edit Account Screens. |
|
DELETE |
Deletes the tagged accounts. For more information, see Deleting Accounts. |
|
TAG ALL |
Tags all accounts displayed in the Search Results grid. After clicking this button, the button changes to UN-TAG ALL. The UN-TAG ALL button is also displayed if any search result in the grid was previously tagged. Clicking UN-TAG ALL removes tags from all accounts displayed in the grid. For more information, see Tagging Accounts. |
|
MAKE INTEREST |
Opens the Make Interest dialog box. For more information, see Adding Interests. |
|
LABELS |
Opens the Label Parameters dialog box. Use this dialog box to create mailing labels for a group of selected accounts. For more information, see Creating Mailing Labels. |
|
MAIL MERGE |
For more information about the Mail Merge function, see Mail Merge. |
|
EXPORT |
Opens the Export Type dialog box. Use this dialog box to export names and addresses from the Account ID (AccountId) table. For more information, see Exporting Data. |
|
|
Opens the Send to dialog box. Use this dialog box to immediately print a report that lists accounts tagged in the Search Results grid. For more information, see Printing a List of Accounts. |
Searching for Accounts
Enter the criteria to perform a search in the Account ID (AccountId) table. Enter any of the following criteria for your search, being as general or as specific as you wish: Account ID, Account Type, Customer or Provider Type, Account Name Contains (enter part of an Account Name), Sales Agent, Branch, History Reports (Yes/No/Either), Tagged Records (Yes/No/Either), Interest, Short Code, City, State, Zip, Country, Report To ID , First/Last Invoice Dates, or Opened/Changed Dates.
Clear the Skip excluded customer types check box if you want all customer accounts to display, regardless of whether the customer type has been flagged to be excluded. (For more information about excluding customer types, see Setting Up Market IDs.)
After you have entered criteria, click SEARCH.
Searches that match only one account display that particular account ID on an edit account screen (Edit Customer, Edit Employee, Edit Provider, or Edit Vendor). Searches that match more than one account display a list of the account IDs in the Search Results grid on the Account ID screen.
Accessing a specific account ID: To retrieve an account when you know the complete account ID, type the account ID in the Account ID field on the Account ID screen, and then press Enter. (You do not need to specify an account type on the Account ID screen.) An edit account screen (Edit Customer, Edit Employee, Edit Provider, or Edit Vendor) appears with the account ID displayed.