Edit Customer Screen
This topic describes the Edit Customer screen.
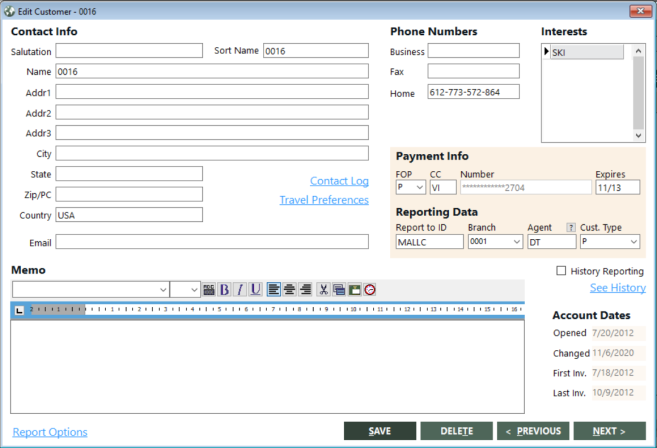
Field, Button, and Link Descriptions
The following table describes the fields on the Edit Customer screen.
| Field | Description |
|---|---|
|
Salutation |
Salutation as it should appear in mail merge documents. This field allows up to 24 alphanumeric characters. |
|
Sort Name |
Sort name for the account. This field allows up to 13 alphanumeric characters. |
|
Name |
Name for the account. This field allows up to 60 alphanumeric characters. |
|
Addr1 |
Account's first address line. This field allows up to 60 alphanumeric characters. |
|
Addr2 |
Account's second address line. This field allows up to 60 alphanumeric characters. |
|
Addr3 |
Account's third address line. This field allows up to 60 alphanumeric characters. |
|
City |
City name. This field allows up to 30 alphabetic characters. |
|
State |
State code. This field allows up to 30 alphabetic characters. |
|
Zip/PC |
Zip plus four. This field allows up to 30 numeric characters. |
|
Country |
Country code or name. This field allows up to 20 alphanumeric characters. |
|
|
E-mail address. This field allows up to 30 alphanumeric characters. |
|
Business |
Full business number, including any extension. This field allows up to 15 alphanumeric characters. |
|
Fax |
Full fax number, including any extension. This field allows up to 15 alphanumeric characters. |
|
Home |
Full home phone number. This field allows up to 15 alphanumeric characters. |
|
Interests |
Grouping for customer interests (for example, SKI). |
|
FOP |
Default form of payment for the account’s invoices. A Agency Plastic (agency is merchant) C Cash/Check P Plastic (credit card) R Accounts Receivable If you entered P or A for Plastic, enter the credit card company code, account number, and expiration date in the Co., Card Number, and Expires fields for their most commonly used card. |
|
CC |
Credit card type (for example, MasterCard). |
|
Number |
Credit card number. It is encrypted in the database for PCI security compliance. |
|
Expires |
Expiration date. Format MM/YY. |
|
Report to ID |
10 character Report To ID. What you enter as a Report To ID must be a valid account ID. If the account ID does not exist, you must create it. |
|
Branch |
4 character Branch Number that this account is associated with. |
|
Agent |
2 or 3 character sales agent code. To find and select a sales agent, click
the lookup ( |
|
Cust. Type |
Enter the Customer Type code or choose from the drop down list. These are defined by the user. |
|
Memo |
Variable length alpha numeric. This field allows up to approximately 30,000 alphanumeric characters. |
|
History Reporting |
Enables you to include the account on the Client History Report without having to tag the record first. If the account is one that you will want to view often, select this option to save time. You will need to select the Only History IDs option on the Client History Report dialog box to include the account on the report. For details, see Client History Report. |
|
Opened |
Date on which the account was opened. |
|
Changed |
Date on which the account was last changed. |
|
First Inv. |
Date on which the first invoice was created for this account. |
|
Last Inv. |
Date on which the most recent invoice was created for this account. |
 ) button. The Agent screen appears. For details, see
 The following table describes the buttons and links on the Edit Customer screen.
| Button or Link | Description |
|---|---|
|
Contact Log |
Opens the Contact Manager screen. This screen enables you to enter the contacts that an agent has made or needs to make with an account. For more information, see Managing Contacts. |
|
Travel Preferences |
Opens the Customer Preferences dialog box. This dialog box enables you to indicate which providers the customer prefers to use or is discouraged from using, based on corporate policies rather than your agency's policies. For more information, see Contacts and Provider Preferences. |
|
See History |
Opens the Account History dialog box. This dialog box enables you to review the customer’s monthly purchase totals in a specific year. To view a different year, select the year in the See History for field. The item count is calculated as follows: If the document type is AAD, CRE, DCM, or DAR, 0 is added to the count. If the document type is REF, 1 is subtracted from the count. For all other values of document type, 1 is added to the count. For more information, see Account History. |
|
Report Options |
Opens the Report Options screen. This screen enables you to add information for customizing accounts receivable statements. For more information, see Report Options (for Customer Accounts). |
|
SAVE |
Saves the account and any changes made. |
|
DELETE |
Deletes the displayed account. For more information, see Deleting Accounts. |
|
< PREVIOUS |
Displays the account immediately preceding the currently displayed account as listed in the Search Results grid. |
|
NEXT > |
Displays the account immediately following the currently displayed account as listed in the Search Results grid. |