General Ledger Transactions
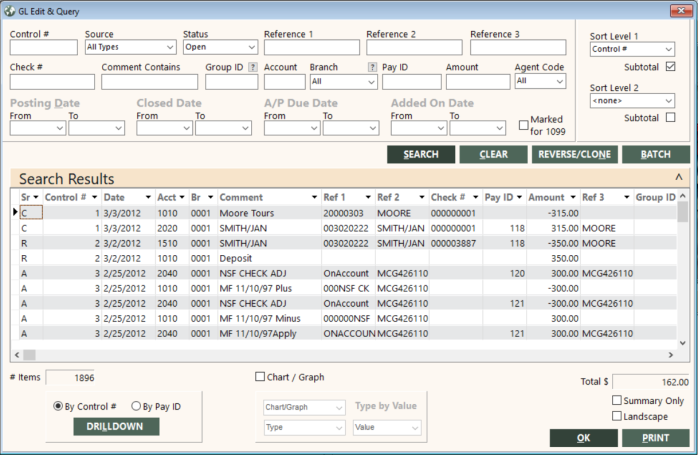
The GL Edit & Query function enables you to review transactions in the general ledger. Selection criteria and sort/subtotal options provide many ways to look at your data. By using different search criteria, you can make the search as general or as specific as needed.
You can also change and delete transactions that do not have a pay ID (which means that they are not related to subledger transactions). This enables you to make the updates necessary without confusing adjustments. For details, see Editing and Deleting General Ledger Transactions. In addition, you can add transactions to a control. For details, see Adding General Ledger Transactions. If you want to add or delete transactions, you must specify the control number.
You can view and print details for batch posts of gross sales, commissions, and ARC/BSP entries. For details, see Viewing and Printing Batch Post Details below.
Reviewing General Ledger Transactions
To review general ledger transactions:
-
On the GL submenu, click GL Edit & Query. Alternatively, click the GL Edit & Query (
 ) icon on the GlobalWare icon toolbar.
The GL Edit & Query screen appears.
Tip: You can increase the size of this screen by dragging an edge or corner to the desired size. This enables you to more efficiently view and work with data in the Search Results grid.
-
Complete the screen as follows. All criteria are optional, but you must select at least one.
Field Description Control #
Specify the control number to query. If you specify a control number, dates are ignored.
Note: If you specify a control number in this field, and then press Enter, GlobalWare populates the Search Results grid with matching results. You do not need to click the SEARCH button. This also occurs if you specify information in the Control # field, then specify information in any other search criteria fields, and then press Enter.
Source
Select the source to query:
All Types
All sources
Arc Xfers
ARC and Direct items posted in Settlement (cash-basis only)
Checks
Checks and voided checks
Group Adjust
All activity in Group Adjust
Inv Adjust
Items unapplied in Invoice, cash-basis items edited in Settlement
Jrnl Entry
Journal Entries, Create Expense Payables, Commission Reconciliation Bank JE, and Reverse/Clone entries
Pmt Adjust
All activity in Adjust Accounts
Receipts
Cash receipts and voided cash receipts
Sale Xfers
Post Invoices to GL (accrual); Gross Sales to Accounting (cash-basis)
Status
Select the status to query: All, Closed, or Open.
Reference 1
Specify the reference 1 to query. You do not need to enter leading zeros for invoice numbers.
A wildcard (*) can be used before (e.g., *E), after (e.g., M*), or between (e.g., *U*). This change makes it easier to search for voids, as in the past voids sometimes has leading zeros.
For example, if you enter 12*5 in the Reference 1 field, a possible result would be a GL with a Reference 1 value of 120110305.
Reference 2
Specify a full or partial value for reference 2. If you specify a full reference value, the Search Results grid will display general ledger transaction records for the reference value. Use the wildcard character (*) to specify a partial reference value, as shown in the following examples:
71*
Displays transaction records for reference values that begin with "71" (for example, "7126" and "7153").
*71
Displays transaction records for reference values that end with "71" (for example, "2071" and "10071").
*71*
Displays transaction records for reference values that contain "71" anywhere (for example, "7126", "10713", and "10071").
Reference 3
Specify a full or partial account ID for reference 3. If you specify a full account ID, the Search Results grid will display general ledger transaction records for the account ID. Use the wildcard character (*) to specify a partial account ID, as shown in the following examples:
71*
Displays transaction records for account IDs that begin with "71" (for example, "7126" and "7153").
*71
Displays transaction records for account IDs that end with "71" (for example, "2071" and "10071").
*71*
Displays transaction records for account IDs that contain "71" anywhere (for example, "7126", "10713", and "10071").
Check #
Specify the check number to query. You can enter a partial number (with an asterisk). For numeric check numbers, you do not need to enter the leading zeros.
Comment Contains
Type a portion or all of the comment to query. (Do not include an asterisk on a partial comment.)
Group ID
Specify the group ID to query. You can enter a partial code (without an asterisk).
A wildcard (*) can be used before (e.g., *E), after (e.g., M*), or between (e.g., *U*).
To find and select a group ID, click the lookup (
 ) button. The Find Group screen appears. For details, see Using the Lookup Buttons and Screens.
Account
Specify a full or partial general ledger account ID. If you specify a full general ledger account ID, the Search Results grid will display general ledger transaction records for this general ledger account only. Use the wildcard character (*) to specify a general ledger account ID, as shown in the following examples:
2*
Displays transaction records for general ledger account IDs that begin with "2" (for example, "2010" and "2040").
*2
Displays transaction records for general ledger account IDs that end with "2" (for example, "1512" and "4092").
*2*
Displays transaction records for general ledger account IDs that contain "2" anywhere (for example, "2010", "4092", and "6025").
Enter a range by typing the first account, a dash, and the last account (for example, 2010-2120).
You can also enter non-consecutive accounts by separating them by commas. The wildcard character is allowed. Examples:
1500-1599, 2020,2040,2045, or
1010,*2
You can select the account. See Locating/Selecting General Ledger Chart Numbers.
Branch
Select the branch or location group to query, or select All for all branches to which the user has access.
To find and select a branch or location group, click the lookup (
) button. The Find Branch screen appears. For details, see Using the Lookup Buttons and Screens.Pay ID
Specify the pay ID number to query. You can specify "BLANK" to query on transactions that do not have a pay ID. This can help quickly find errors when balancing subledger accounts and equivalent charts in the general ledger.
Note: If you specify a pay ID in this field, and then press Enter, GlobalWare populates the Search Results grid with matching results. You do not need to click the SEARCH button. This also occurs if you specify information in the Pay ID field, then specify information in any other search criteria fields, and then press Enter.
Specify the amount to query with or without commas.
-
Enter a positive (+) or negative (-) amount or both. For example, to return results for amounts of both +100 and -100, enter +-100 in the Amount field. You can also enter -+100.
-
Enter > to search for amounts greater than or < to find amounts less than the value entered.
-
Enter >= or => to search for amounts greater than or equal to the value entered.
-
Enter <= or =< to search for amount less than or equal to the value entered.
-
Enter <> to search for amounts not equal to the value entered.
-
To search for amounts between two values, enter * between the values. For example, to return amounts between 500 and 1000, enter 500*1000.
From (for posting date)
Beginning date of a range of dates when transactions were posted. The Search Results grid will display transactions with posting dates that match the specified range of dates. Use this date in conjunction with the To date to define a range. If you specify only the From date, the range includes all dates from this date to the current date.
To (for posting date
Ending date of a range of dates when transactions were posted. The Search Results grid will display transactions with posting dates that match the specified range of dates. Use this date in conjunction with the From date to define a range. If you specify only the To date, the range includes all dates before and including this date.
From (for closed date)
Beginning date of a range of dates when transactions were closed. The Search Results grid will display transactions with closed dates that match the specified range of dates. Use this date in conjunction with the To date to define a range. If you specify only the From date, the range includes all dates from this date to the current date.
To (for closed date)
Ending date of a range of dates when transactions were closed. The Search Results grid will display transactions with closed dates that match the specified range of dates. Use this date in conjunction with the From date to define a range. If you specify only the To date, the range includes all dates before and including this date.
From (for A/P due date)
Beginning date of a range of dates when transaction accounts payable payments are due (applicable to expense payables only). The Search Results grid will display transactions with accounts payable due dates that match the specified range of dates. Use this date in conjunction with the To date to define a range. If you specify only the From date, the range includes all dates from this date to the current date.
To (for A/P due date)
Ending date of a range of dates when transaction accounts payable payments are due (applicable to expense payables only). The Search Results grid will display transactions with accounts payable due dates that match the specified range of dates. Use this date in conjunction with the From date to define a range. If you specify only the To date, the range includes all dates before and including this date.
From (for added on date)
Beginning date of a range of dates when transactions were added. The Search Results grid will display transactions with added dates that match the specified range of dates. Use this date in conjunction with the To date to define a range. If you specify only the From date, the range includes all dates from this date to the current date.
To (for added on date)
Ending date of a range of dates when transactions were added. The Search Results grid will display transactions with added dates that match the specified range of dates. Use this date in conjunction with the From date to define a range. If you specify only the To date, the range includes all dates before and including this date.
Marked for 1099
Indicates whether to limit query results in the Search Results grid to transactions associated with employees and vendors who require a 1099 form at the end of the year. Leave this check box unmarked to query on transactions regardless of 1099 form requirements.
IMPORTANT: If using this option, make sure that the Marked for 1099 option is selected on employee and vendor account on the Account ID screen before you run the general ledger query.
Sort Level 1, 2
Select the fields to sort by. You can choose from the following in the drop-down list: <none>, Account #, Amount, Branch, Check #, Close Date, Comment, Control #, Group ID, Post Date, Ref 1, Ref 2, Ref 3, Source, PayId, SubSource, or Added By.
To subtotal the report when the primary or secondary sort field changes, select the Subtotal option associated with the respective sort selection.
-
-
After you have entered the appropriate criteria for your query, click SEARCH. The Search Results grid lists the transactions that match your search criteria.
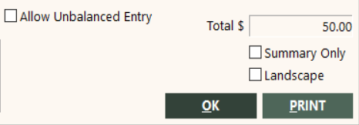
If you need to enter an unbalanced entry, pressing Shift+F5 while on the GL Edit & Query screen displays the Allow Unbalanced Entry check box, which must be checked before deleting, adding, or editing line items in the general ledger to make an entry unbalanced.
Drilling Down by Control Number or Pay ID
Click the DRILLDOWN button to drill down on either the control number or pay ID that is associated with the selected transaction in the Search Results grid. When the GL Drilldown screen appears, it lists all items that share the same control number or pay ID. To drill down, select a transaction in the grid, select either By Control # or By Pay ID, and then click DRILLDOWN.
Subsource
The way GlobalWare populates the Sub Sr (subsource) field in the Search Results grid on the GL Edit & Query screen (and also in the grid on the GL Drilldown screen) depends on whether the source is a receipt, a check, or something else.
Subsources for receipt sources reflect the deposit codes you have set up by using the Edit Deposit Codes function. See Edit Deposit Codes. Deposit codes represent the types of cash transactions used for bank deposit receipts, such as PayPal or wire transfer. The Sub Sr field will be blank if you have not set up deposit codes.
Note: When you enter a bank deposit, if all associated receipts have the same deposit type (subsource), GlobalWare will also use the deposit code for that offsetting bank entry in the Sub Sr field in the grid on the GL Edit & Query screen. However, if multiple deposit types are indicated for receipts associated with a bank deposit, the Sub Sr field will be blank.
Subsources for check sources are A for ACH and E for EFT.
Possible subsources for all other sources follow:
|
A |
Apply in Adjust Accounts |
|
C |
Create an adjustment in Adjust Accounts |
|
M |
Move an adjustment in Adjust Accounts |
|
U |
Unapply in Adjust Accounts |
|
CR |
Create a bank journal entry in Commission Reconciliation |
Note: You can change subsources for receipt sources only. To do this, see Editing and Deleting General Ledger Transactions.
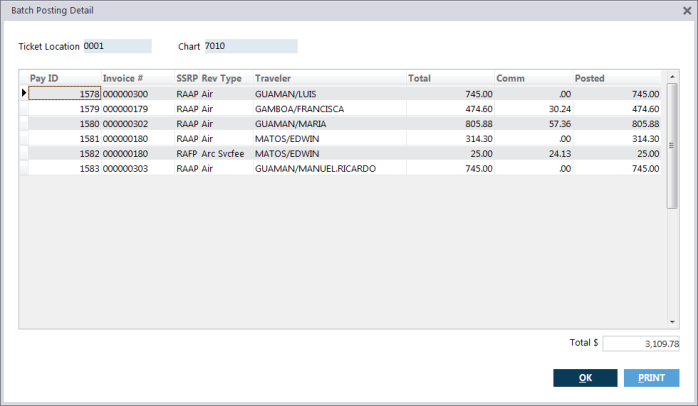
Viewing or Printing Batch Post Details
You can view or print details for batch posts of gross sales, commissions, and ARC/BSP entries listed in the Search Results grid on the GL Edit & Query screen.
To view or print batch posting details:
-
On the GL Edit & Query screen, search for the general ledger transaction (a batch post item) for which you want to examine detail. Batch post items have one of the following comments:
- Batch Post of Gross Sales
- Batch Post of Commissions
- Batch Post of Arc/Bsp Entry
For details about searching for transactions, see Reviewing or Editing General Ledger Transactions above.
The following GL Edit & Query screen shows batch post items that would qualify.
- In the Search Results grid, select the line for which you want to view or print detail.
-
Press F5.
The Batch Posting Detail screen appears.
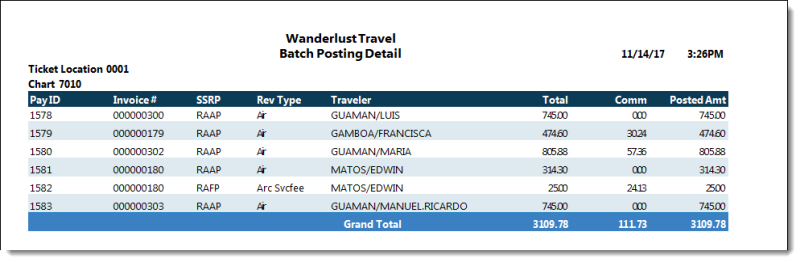
-
To print the Batch Posting Detail report, click PRINT.
The Send to dialog box appears. Select a report destination. For more information, see Printing Overview.
_637x414.png)