Adding General Ledger Transactions
By using the GL Edit & Query function, you can add transactions to an existing control, and you can also create a new journal entry with multiple items by cloning or reverse-cloning an existing control.
To create a new journal entry that is not a clone or reverse-clone, use Journal Entries.
Add a Transaction to an Existing Control
To add a transaction to a control, move the cursor to the last line in the browse grid and then press the Down Arrow key. At the Add a new entry prompt, click Yes. Enter the data for the new transaction (you can use F10).
When you have finished editing, click OK to save the new transaction, or click Exit to discard it.
Reverse or Clone an Existing Journal Entry
You can clone an existing journal entry or create a complete reversing entry of it. A reversing journal entry is a copy of the data except the amounts are the opposite of the original amounts.
To reverse or clone an entry:
-
Click REVERSE/CLONE.
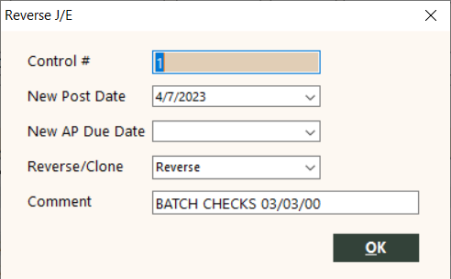
The Reverse J/E dialog box appears.
-
Complete the dialog box as follows:
Field Description Control #
Enter the control number to clone or reverse. This defaults to the control of the currently selected record in the Search Results grid on the GL Edit & Query screen.
New Post Date
Enter the post date for the new journal entry.
New AP Due Date
If this is an expense payable, enter the new accounts payable due date if desired.
Reverse/Clone
Select Reverse to make a reversing entry, or Clone to clone the exact amounts.
Comment
Enter a comment for the journal entry. This appears on the Journal Entry Register report.
- To create the new journal entry, click OK.
- If you need to make changes to the new journal entry, note its control number and retrieve it from the GL query dialog box.
Notes:
- The new journal entry has source J (manual journal entry) regardless of the source of the journal entry that was cloned.
- Pay ID and receipt number are not cloned.