Schedules: Add Actions Using Standard Handlers
Note: Queue Control Console Lite users have access to the Move to Queue and Remove from Queue handlers only. For access to additional handlers please contact your Travelport Account Manager.
Once a schedule is created, the New Action and/or Refile fares or Ticketing action functions becomes activated, depending on the handlers selected for the particular agency. If advanced robotic ticketing handler is selected on the agency details page, then the Refile fares or Ticketing action button is displayed. If other standard handlers are selected, the New Action button displays. If any standard handler and the advanced robotic ticketing handler combination is selected, both buttons display (as shown below).

Creating an action differs depending on the type of action selected:
-
New Action – Provides access to standard handlers (instructions provided below). Once a New Action has been created, you can define queues for monitoring, edit criteria, and define handlers.
-
Refile fares or Ticketing action – Provides access to the advanced robotic ticketing handler. The Access Method for Galileo must also be configured. Part of defining a new ticketing action includes identifying the monitored queue. You can also use Criteria to include/exclude carriers or itinerary types and customize the Commissions table.
You can copy an existing action existing action to quickly duplicate an action with the same attributes, criteria, monitoring queues, and handlers.
Create New Action Using Standard Handlers
-
Click the Schedules tab, then click the Details button for the schedule to which you want to add a standard handler.
-
Click the New action button.
-
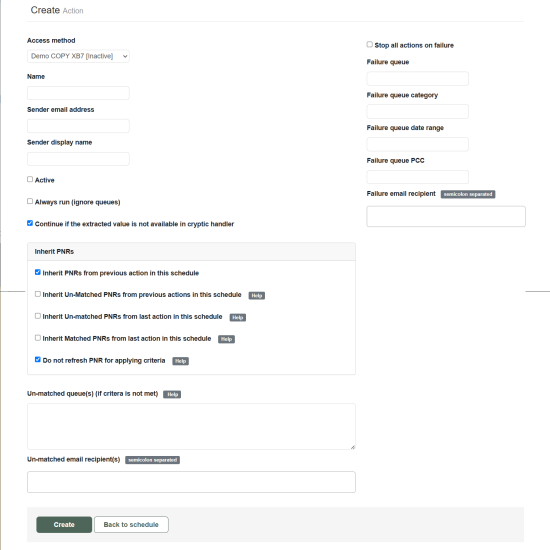
Select an access method (refer to Access Method for information on creating an access method). Any inactive access methods are in red text.
-
Specify a name for the action.
-
Enter the email address and display name for Schedule change email notifications.
-
Select Always run (ignore queues) to run the action without specifying queues or criteria. This option will always run the action once during a scheduled run.
-
If Continue if the extracted value is not available in cryptic handler is selected, the action will continue processing the booking files even if the value of the property mentioned in the extraction could not be obtained. When unchecked and if the extraction fails, QCC will ignore the current booking before processing the next booking file. This avoids host errors from the failed booking from cascading to the next booking.
-
By selecting Inherit PNRs from previous action in this schedule, Queue Control Console will not check queues and will work on PNRs retrieved from previous action(s). Do not select this option if this action is the first action created in the schedule, as there is nothing yet to inherit. Use this option to create actions where jobs are related to each other and you do not want to process a newly added PNR where it was not processed by previous actions.
Note: Only one of the "inherit" options can be selected. -
By selecting Inherit unmatched PNRs from previous action in this schedule, all PNRs that have not been matched by the criteria in earlier actions will be available for the action to monitor.
Note: Only one of the "inherit" options can be selected.
-
By selecting Inherit unmatched PNRs from last action in this schedule, unmatched PNRs identified by the criteria engine in the last action (the action just prior to the current one) are selected.
-
By selecting Inherit matched PNRs from last action in this schedule, matched PNRs identified by the criteria engine in the last action (the action just prior to the current one) are selected.
-
If the Do not refresh PNR for applying criteria option is selected, the PNRs that are inherited will not be retrieved again in the action, which improves performance by avoiding extra retrievals. However, any changes made to the PNR prior to this action will not be reflected when the criteria is executed against this action.
-
In the Un-matched queue(s) (if criteria not met) section, indicate where you would like booking to be placed when the criteria has not been matched. Entries should be separated by semicolons in the format:
PCC/QueueNo*category*date range (category and date range optional)
For example: X0G/30*DM*1;X0G/10*DM
-
In the Un-matched email recipient(s) section, enter email recipient(s) separated by a semicolon. The email fields can contain special characters ! # $ % & ' * + - / = ? ^ _ ` { | - as part of the allowed syntax.
-
Select Stop all actions on failure if you want all actions to be stopped if this action fails.
-
Enter the queue number where the PNR will be placed if the action fails.
-
(Optional) Enter the queue category to be used if the action fails.
-
(Optional) Enter the queue date range to be used if the action fails.
-
(Optional) Enter the PCC to be used if the action fails.
-
Enter the email address(es) that will be sent a notification if the booking fails. Multiple addresses should be separated by a semicolon.
-
Click Create to save the action. Click Back to schedule to ignore the action and return to the Schedule page.
Next Steps