Schedules: Create a New Schedule
Schedules are used to create and maintain booking file actions based on specific times or time frequency. It is the control that will be used most frequently by an agency administrator and/or agency user. Agency administrators can create and modify schedules. Agency users can view the details of a particular handler. Refer to View and Sort Schedules for information about viewing and sorting the Schedules table.
Creating a Schedule consists of:
-
Defining the name and when the Schedule will run (instructions provided below).
-
Defining the Actions to be taken when the Schedule runs. Two types of actions are available (depending on how your agency is set up):
-
New Action – Provides access to standard handlers. As part of the action, specify the time/frequency at which the schedule runs. Once a New Action has been created, you can define queues for monitoring, edit criteria, and define handlers.
-
Refile fares or Ticketing action – Provides access to the advanced robotic ticketing handler. The Access Method for Galileo must also be configured. Part of defining a New Ticketing Action includes identifying the monitored queue. You can also use Criteria to include/exclude carriers or itinerary types and customize the Commissions table.
You can copy an existing schedule to quickly duplicate a schedule, including the associated actions, criteria, monitoring queues, handlers, and advanced robotic ticketing actions (if applicable). Monitoring queues and commissions are not duplicated.
Create a Schedule
-
Click the Schedules tab. The Schedules table displays all the schedules created by all users of Queue Control Console.
-
Click the New schedule button.
Note: The Queue manager migration wizard button only displays if your agency is set up with the Queue migration wizard.
-
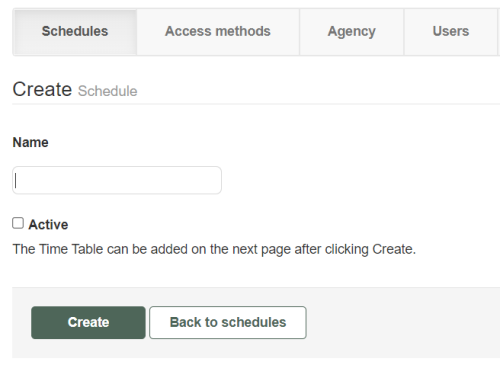
Enter a name for the schedule.
-
It is recommended that you do not click Active until all actions have been completed.
-
Depending on your agency’s settings, you can select Run on specific times (located below the Active option) to indicate when the Schedule will run (specified by date and time). If you do not select Run on specific times, you must specify the days on which the schedule will run, the frequency of the schedule, the start time, and the end time of schedules on selected days.
-
Click Create.
Add Schedule Time/Frequency
-
Click the Add new item button in the Time table section.
-
Specify when the Schedule should run.
-
Complete the Schedule time dialog.
-
If Run on specific times is checked,
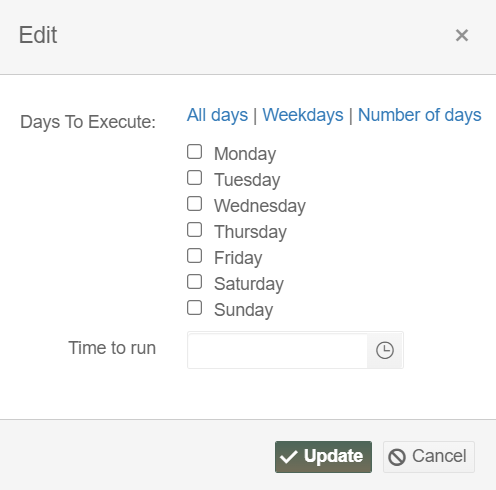
- Select the day(s) on which the Schedule will run.
- Select or enter the time at which the Schedule will run. Time is in 24-hour (HH:MM) format.
-
If Run on specific times is not checked,
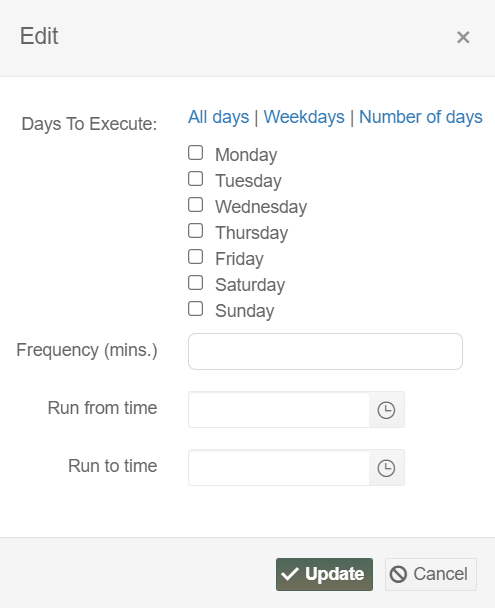
- Select the days on which the Schedule will run.
- Indicate the frequency in minutes when the schedule should run. Each Schedule should be set to a minimum of 15 minutes, nothing less.
- Select or enter the start and end times during which the Schedule should run. Time is in 24-hour (HH:MM) format. If the Run from/to field is left blank, the Schedule runs 24 hours per day.
-
Click Update.
-
Click the Save button on the Schedule page to save your changes.
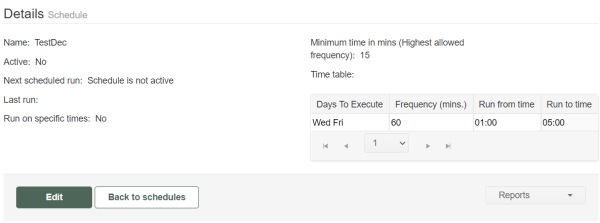
Once your Schedule time/frequency are saved, the List Actions section displays for you to create actions.
Next Steps
-
Create an action using standard handlers.
-
Create an action using Advanced Robotic Ticketing.
-
Modify an existing Schedule.