Advanced Robotic Ticketing Handler
Worldspan: Not available to Worldspan users.
Note: Queue Control Console Lite users have access to the Move to Queue and Remove from Queue handlers only. For access to additional handlers please contact your Travelport Account Manager.
Once a Schedule has been created, you can create a new ticketing action using Advanced Robotic Ticketing. This option is available across all regions. However, this option is only available if it has been enabled for your agency and the access method configured for the agency is Galileo.
Create an Advanced Robotic Ticketing Action
-
Click the Schedules tab, then click the Details button for the schedule to which you want to add an advanced ticketing handler.
-
Click the Refile fares or Ticketing action button.
-
Complete the Queue Configuration fields.
-
Enter the name of the queue instance. The suggested naming convention is Agency Name-PCC.
-
Select an Access Method.
-
Enter the email address of the person who will receive the error emails. Separate multiple emails with a semicolon.
-
(Optional) Enter an alternate email address of the person who will also receive the error emails.
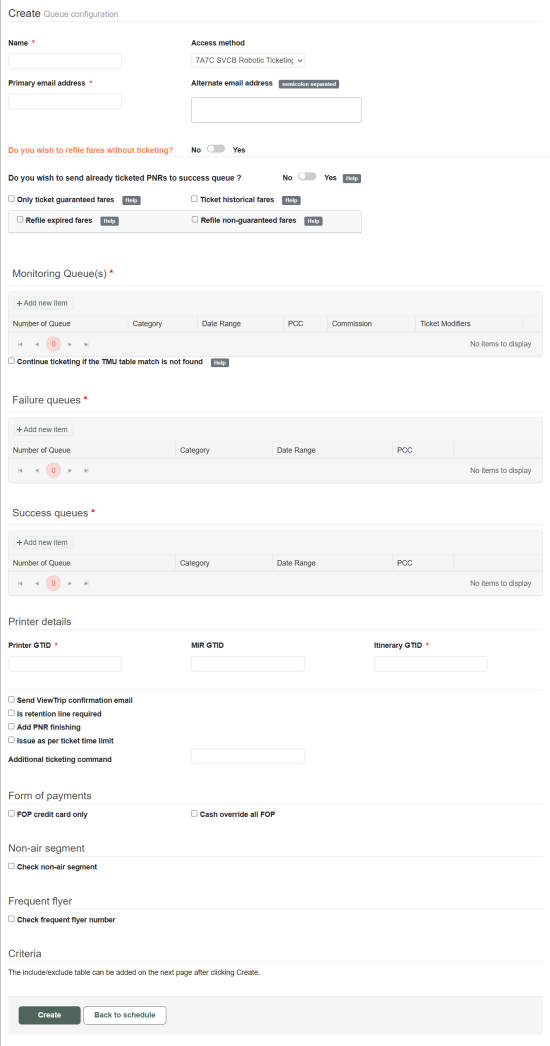
Refiling fares section
-
Agencies can refile expired fares without needing to ticket them by selecting the option for refiling without ticketing. This gives them all the options that are currently available as part of the refiling logic for robotic ticketing but will exclude all the ticketing specific options. No is selected by default.
-
When the Refile fares without ticketing option is set to No, the following options display.

-
For Do you wish to send already ticketed PNRs to success queue?, select Yes to move already ticketed PNRs to the success queue. Select No to remove already ticketed PNRs from the monitoring queue.
-
Select Only ticket guaranteed fares if you require Robotic Ticketing to only issue guaranteed fares. If this option is selected, the Refile non-guaranteed fares option displays in the Refiling options section.
-
Select Ticket historical fares to ticket fares specified with .H or .T in the fare quote. If unselected, no historical filed fares are ticketed – both existing historical filed fares as well as new fares filed historically through the historical refiling option (both .H or .T).
-
For existing advanced robotic ticketing handler actions, the Ticket historical fares checkbox will be selected. For new advanced robotic ticketing handler actions, the Ticket historical fares checkbox will not be selected.
-
Not available for Apollo (1V) users.
-
-
-
If Yes is selected for Refile fares without ticketing, the Do you wish to send PNRs with already valid fares to success queue? option displays.

-
Select Yes to move PNRs with already valid (non-expired) fares to the success queue.
-
Select No to remove PNRs with already valid (non-expired) fares from the monitoring queue.
-
-
When ticketing occurs some time after a fare is filed, the fare may no longer be available. The Refiling options section lets you specify when to refile a fare. See scenarios below.
-
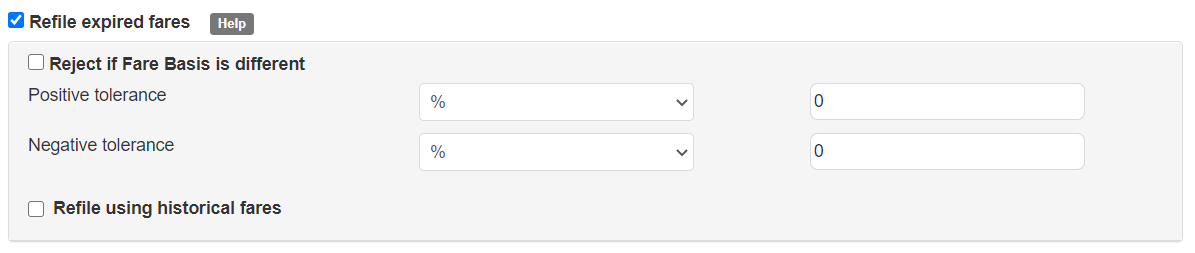
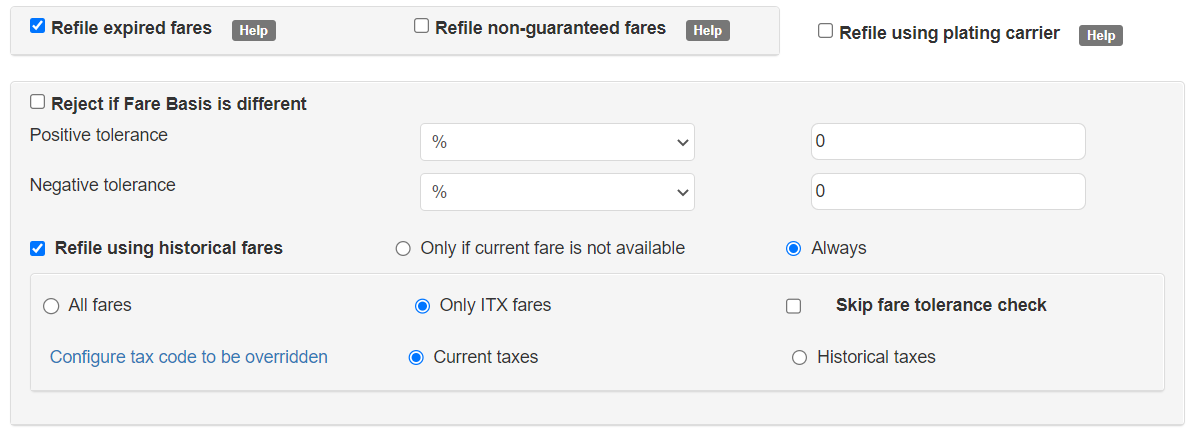
Select Refile expired fares if you require Robotic Ticketing to refile the fare if the ticket time limit of the stored fare has expired. When this option is selected, fares that have a status of X or fares where the last date to purchase the ticket is in the past will be refiled.
Note: Click the thumbnail image to view it at full size. Click again to return to thumbnail size. -
Select Refile non-guaranteed fares if you require Robotic Ticketing to refile the fare if the stored fare is no longer guaranteed. When selected without selecting Only ticket guaranteed fares, QCC attempts to ticket the fare even if it is not guaranteed after refiling. If the Only ticket guaranteed fares option is checked, QCC will not ticket the non-guaranteed fares but will ticket the guaranteed fares. Note: Not available for Apollo (1V) users.
-
Select Refile using plating carrier if you require Robotic Ticketing to refile the fare using a specified plating carrier irrespective of the current fare status. When selected, a plating carrier field displays.
Note: This option is only available for Travelport+ (1G). Also, an agency must be provisioned for this feature. Please contact your Travelport account manager for more information.
 Refile options and scenarios
The table shows the outcome in Advanced Robotic ticketing for fares based on the refiling options selected.
Refile expired fares
Only ticket guaranteed fares Refile non-guaranteed fares Refile using historical fares Outcome Yes
No
No
No
Expired filed fares are refiled and continue to be ticketed
If the current fare is already filed as historical, it will continue to be ticketed.
Yes
Yes
No
No
Expired filed fares are refiled and guaranteed filed fares are ticketed.
If the current fare is already filed as historical, it will continue to be ticketed.
Yes
Yes
Yes
No
Expired fares and non-guaranteed fares are refiled. Guaranteed filed fares are ticketed.
If the current fare is already filed as historical, it will continue to be ticketed.
Yes
No
No
Yes
Expired filed fares are refiled using the historical fare quote if current fare is not available or if the Always option is selected.
If the current fare is already filed as historical, it will continue to be ticketed.
No
Yes
Yes
Yes
Non-guaranteed fares are refiled using the historical fare quote if current fare is not available or if the Always option is selected.
If the current fare is already filed as historical, it will continue to be ticketed.
-
-
If any refile option is selected, the following fields display for you to choose whether to reject the refiling if the fare basis is different.
-
Select Reject if Fare Basis is different if the expired fare should not be refiled if the fare basis has changed. Enter the positive and negative tolerance, specified as either a percentage or a value. The tolerance for refiling fares is based on the total amount.
-
-
You can choose to Refile using historical fares.
Important: If the Skip fare tolerance check option is selected, the fare tolerance check is skipped while refiling using historical fares. You are warned that there is a risk of potential ADMs if this option is chosen.
Select the conditions under which to refile using historical fares.
-
If Always is selected, the system does not check if the filed fare is available; instead, it will refile with the historical fare.
-
If Only if current fare is not available is selected, the system first checks if a current fare is available.
Once you have defined the conditions for using historical fares, select which fares and which taxes should be used. Queue Control Console allows ticketing based on historical fares with current or historical taxes based on the user’s preference. It also can automate the amendment of the historical or current taxes within specific tolerance limits should the user choose to.
-
Select whether to refile All fares or Only ITX fares.
-
Select whether to use Current taxes or Historical taxes.
You have the option to override tax amounts for current or historical taxes and set a tolerance limit. Select the Configure tax code to be overridden link to display more tax options. Click Add new item to define the tax code and tolerance values that are used to evaluate whether or not to override the tax code.
Refer to the refiling example for details and examples for using historical fares with current/historical taxes and defining tolerances for overriding taxes.
-
Choose the Current taxes option to refile using the historical fare with current tax codes (.H) for all tax codes and override the YQ tax code with the historical (existing) value.
-
Choose the Historical taxes option to refile using the historical fare with historical tax codes (. T) for all tax codes and override the tax code amounts with the current value (.H) as required.
-
-
Queues section
-
In the Monitoring Queues section, specify the queues for Robotic Ticketing. You can define multiple monitoring queues. For each of these monitoring queues, you can specify a commission table and a date range.
- Click the Add new item button.
- Enter the queue number in which PNRs will be placed for Robotic Ticketing to action.
- (Optional) In Category, enter the category.
- (Optional) Enter the date range. Values are 1, 2, 3, 4, or empty.
- Enter the Monitoring Queue PCC.
- (Optional) Select a commission set. Commissions are defined by Agency Administrators on the Commission Tables page.
- Click Update.
If the booking file matches with the TMU table criteria, then the TMU value configured will apply for the booking file before ticketing. However, if there is no match, the advanced robotic ticketing handler can continue with the ticketing if the option to Continue ticketing if the TMU table match is not found is selected. If this option is not selected and the bookign does not match the TMU table, then the booking file is rejected and not ticketed. This option is only available if a TMU table is configured for the agency.
-
Define a failure queue by clicking Add new item.
- Enter the queue number in which PNRs will be placed if ticketing was unsuccessful.
- (Optional) Enter the queue category.
- (Optional) Enter the date range. Values are 1, 2, 3, 4, or empty.
- Enter the PCC to which the PNR will be queued. This PCC is usually the same as the ticketing PCC.
- Click Update.
-
Define a success queue by clicking Add new item.
- Enter the queue number which PNRs will be placed once the ticket is successfully issued.
- (Optional) Enter the queue category.
- (Optional) Enter the date range. Values are 1, 2, 3, 4, or empty.
- Enter the PCC to which the PNR will be queued. This PCC is usually the same as the ticketing PCC.
- Click Update.
Note: The following sections are only available if the Refile fares without ticketing option is set to No.
-
Enter printer details.
- Printer GTID is required.
- MIR GTID is optional. Leave blank if you do not have a MIR GTID.
- Enter the itinerary GTID. If you do not have an itinerary GTID, enter the printer GTID in this field.
-
Select Send ViewTrip confirmation email if you require Robotic Ticketing to send a ViewTrip itinerary email to the email address in PNR.
-
Select Is retention line required if you require Robotic Ticketing to enter a retention line into every itinerary once processed. This will display a text field where you need to enter the number of days from ticketing date.
Note: Maximum of 338 can be entered into this field. Robotic ticketing will calculate the date and add the retention line accordingly. -
Select Add PNR finishing if you require Robotic Ticketing to enter notepad or remark into every PNR once processed. This will display a text field where you need to enter the required host entries.
-
Select Issue as per ticket time limit if you require Robotic Ticketing to ticket as per the ticket time limit of the filed fare.
-
When Issue as per ticket time limit is selected, the Limit Future Queue Placements options becomes available. Select this option to limit the number of future queue placements, then enter the limit number.
Travelport Queue Control Console attempts to ticket each of the filed fares within the PNR within advanced robotic ticketing. If the ticketing time limit of at least one of the filed fares is not within the next three days at the time of advanced robotic ticketing, Queue Control Console places the PNR in the future queue and places a historical notepad entry namely “Future Q Placement”.
If the total number of historical notepad entries containing the future queue placement information (across all the filed fares) exceeds the limit specified for future queue placement, Queue Control Console continues with ticketing the filed fares regardless of the ticketing time limit.
Future Queue Placement Example
Assume a PNR has 5 filed fares and the current date of ticketing is 08 December. The user has specified the limit for future queue placement as 3. The ticket time limit and action taken for each of the filed fares follow.
Filed Fare Last date to purchase ticket Filed Fare 1
10-Dec
Filed Fare 2
19- Dec
Filed Fare 3
25- Dec
Filed Fare 4
30- Dec
Filed Fare 5
04-Jan
- Advanced robotic ticketing will attempt to ticket the filed fare 1 today (08 Dec), as it is within 72 hours of the ticket time limit and future queue place this PNR for ticketing the remaining filed fares on 18 Dec (one day before 19 Dec). The notepad entry NP.H**Future Q Placement is added in the PNR.
- On 18 Dec, advanced robotic ticketing will attempt to ticket filed fare 2 and will future queue place the PNR for ticketing the remaining filed fares on 24 Dec. A second notepad entry NP.H**Future Q Placement is added in the PNR.
- On 24 Dec, advanced robotic ticketing will attempt to ticket filed fare 3 and will future queue place the PNR for ticketing the remaining filed fares on 29 Dec. A third notepad entry NP.H**Future Q Placement is added in the PNR.
- On 29 Dec, advanced robotic ticketing will attempt to ticket all remaining filed fares (4 and 5) because the maximum limit for future queue placement (which is 3) has been reached already. Hence filed fare 5 will not be future queue placed.
An email notification is sent showing the filed fare that has been future queue placed.
-
Select Additional ticketing command if you require Robotic Ticketing to add additional qualifier(s) to every TKP command. Enter as standard host formats separated by a slash (/).
-
The Form of Payment section has two options:
- Select FOP credit card only if you require Robotic Ticketing to reject the PNR if Credit Card is not the Form of Payment.
Note: You cannot select this option if you have selected Cash override all FOP. - Select Cash override all FOP if you require Robotic Ticketing to issue the ticket as CASH Form of Payment irrespective if the Credit Card is evident in the PNR.
Note: You cannot select this option if you have selected FOP credit card only.
- Select FOP credit card only if you require Robotic Ticketing to reject the PNR if Credit Card is not the Form of Payment.
- Select Check non-Air segment if you require Robotic Ticketing to place the PNR on an alternate queue if a non-air segment is present in the itinerary. A text box displays for you to add the queue number and optional queue category.
- Select Check frequent flyer number if you require Robotic Ticketing to place the PNR on an alternate queue if a frequent flyer number is missing. A text box displays for you to add the queue number and optional queue category.
- Click Create to create the action. You can now add Criteria .
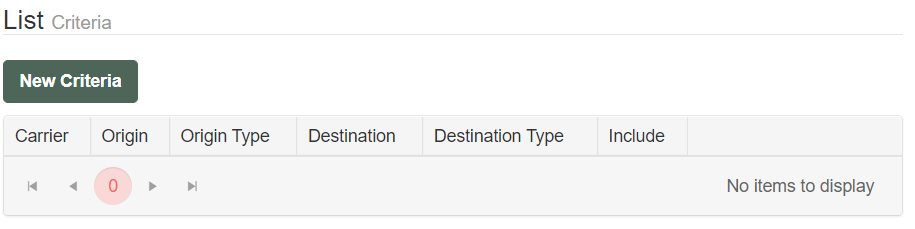
Criteria
The Criteria section allows a user to include or exclude a particular carrier and/or itinerary type when being processed by Travelport Advanced Robotic Ticketing.
-
Click the Configure include/exclude table link. The List Criteria section displays.
-
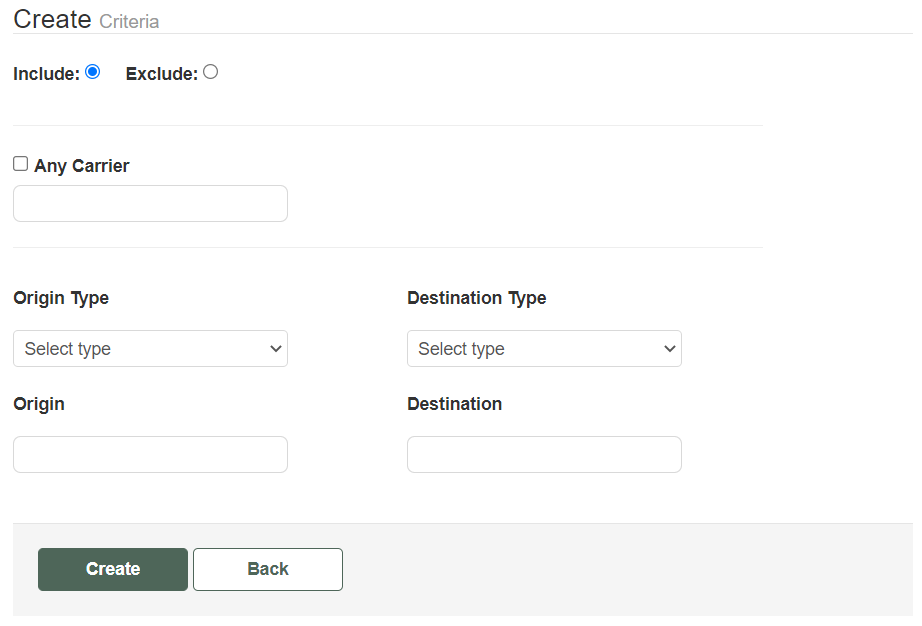
Click the New Criteria button.
-
The Create Criteria options display.
-
Select either Include or Exclude.
Important: Once you exclude a particular carrier and/or itinerary type, for Travelport Robotic Ticketing to process PNRs correctly, you must enter a line to Include Anything else and vise-versa. Refer to the example in step 10, which excludes an airline from two countries then includes all other airlines in all other countries.
- Select Any Carrier for all carriers; otherwise enter specific 2-character carrier code. If you have one or more instances of a specific carrier inclusion/exclusion line, the use of Any Carrier will mean any other carrier other than what is specified.
- Specify the origin type for the inclusion/exclusion to be applied for a specific itinerary.
- Specify the origin code applicable to the origin type selected.
-
If City was selected, enter the three-letter IATA city code.
-
If Country was selected, enter the two-letter country code.
-
If Region was selected, select from applicable default region.
-
If Agency Region was selected, select from applicable regions, which are created by the customer in the Region tab.
-
If Any was selected, enter any origin code. If you have one or more instances of an origin type, the use of Any will mean any origin code other than what is specified.
- Specify the destination type for the inclusion/exclusion to be applied for a specific itinerary.
- Specify the destination code applicable to the type selected, using the same rules that applied to the Origin code.
-
Click Create to save the inclusion/exclusion data and return to the Action Details page. If you do not want to save your criteria, click Back to return to the previous screen.
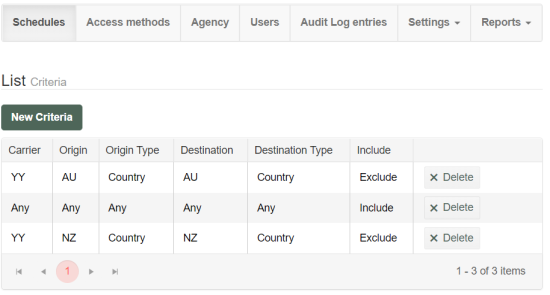
Example of Criteria
In the following example, exclude carrier YY on AU and NZ domestic flights. All other carriers will be ticketed for all other routings.
View Run Details
On an Action's Details page, below the list of Criteria, the Log Entries for Actions provides a list of when the actions for the Schedule have run. Click the Log entries link. Refer to View Run Details for more information.
You can also view the Audit Logs, which lists all events/schedules that Queue Control Console has performed. It will indicate Errors, Warnings, and Information that pertain to the active actions. Refer to Log Entries for more information.