Creating Deposits and Working with Existing Deposits
You can use the Bank Deposit function to:
- Create bank deposits – See Creating a Bank Deposit below.
- Add receipts to bank deposits – For receivables, see Adding Receipts to a Bank Deposit below. For cash receipts or agency plastic (that is, transactions for which your agency has a merchant credit card agreement with the bank), see Getting Agency Plastic Items and Cash Receipts.
- Void receipts for a bank deposit – See Voiding Receipts for a Bank Deposit below.
- Post bank deposit receipts – See Posting Receipts for a Bank Deposit below.
- Print deposit slips – See Printing a Deposit Slip below.
- Work with existing bank deposits – You might need to access a bank deposit because you have not finished adding receipts or have not posted them yet. See Working with an Existing Bank Deposit below.
Creating a Bank Deposit
To create a bank deposit:
-
On the A/R submenu, click Bank Deposit. Alternatively, click the Bank Deposit (
 ) icon on the GlobalWare icon toolbar.
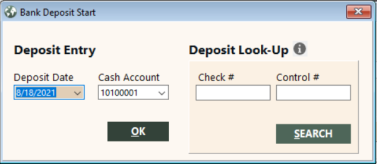
The Bank Deposit Start screen appears.
The Deposit Entry area on this screen enables you to create a bank deposit while the Deposit Look-Up area enables you to search for and work with existing bank deposits that fall within the month of the date specified in the Deposit Date field. To search for and work with existing bank deposits, see Working with an Existing Bank Deposit below.
 Field and button descriptions
The following table describes the fields on the Bank Deposit Start screen.
Field Description Deposit Date
Date for the bank deposit. The current date is the default.
Note: If you use the Deposit Look-Up area to search for existing bank deposits, GlobalWare retrieves only deposits that fall within the month of the date specified in this field.
Cash Account
Cash account to use for the deposit.
Note: This list is limited to only those branches to which the employee has access.
Check #
Check number associated with the bank deposit you want to search for and work with. When you click SEARCH, the Bank Deposit screen appears, displaying the bank deposit that matches the check number.
Note: The check number must match a bank deposit with a deposit date that falls within the month of the date specified in the Deposit Date field. Otherwise, the bank deposit will not be displayed.
Control #
Control number associated with the bank deposit you want to search for and work with. When you click SEARCH, the Bank Deposit screen appears, displaying the bank deposit that matches the control number.
Note: The control number must match a bank deposit with a deposit date that falls within the month of the date specified in the Deposit Date field. Otherwise, the bank deposit will not be displayed.
The following table describes the buttons on the Bank Deposit Start screen.
Button Description OK
Creates the bank deposit. This button opens the Bank Deposit screen. Use this screen to add receipts to the bank deposit, print a deposit slip, and post the bank deposit.
SEARCH
Searches for existing bank deposits that match the search criteria specified in the Check # or Control # fields and fall within the month of the date specified in the Deposit Date field. To search for all bank deposits within the month of the date specified in the Deposit Date field, leave the Check # and Control # fields blank.
If GlobalWare finds one match, the Bank Deposit screen opens with the bank deposit displayed. If GlobalWare finds multiple deposits, it lists them in the Select Deposit grid that appears on the Bank Deposit Start screen. Select the bank deposit you want to work with and click RE-ENTER DEPOSIT (or double-click the bank deposit you want to work with).
-
In the Deposit Date field, specify the date of the bank deposit.
-
In the Cash Account field, specify the appropriate cash account to use for the bank deposit.
-
Click OK.
The Bank Deposit screen appears. You can use this screen to add receipts to the bank deposit. After you add receipts, you can post the bank deposit and print a deposit slip. For a description of this screen and how to use it to add receipts, see Adding Receipts to a Bank Deposit below.
Adding Receipts to a Bank Deposit
After you create a bank deposit, use the Bank Deposit screen to add receipts to the bank deposit.
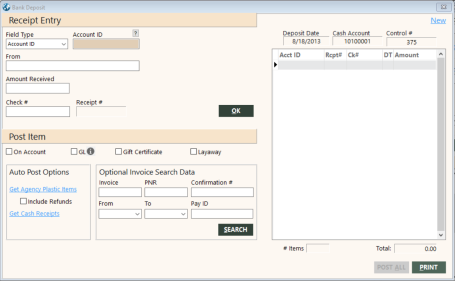
The Receipt Entry area of the screen enables you to add (or modify) receipts to the bank deposit. The grid on the right side of the screen shows the receipts that have been added to the bank deposit. The Post Item area enables you to post individual receipts while the POST ALL button enables you to post all receipts listed in the grid that have not been posted.
Note: Receipts appearing in the grid with a gray background have not been posted while receipts with a blue background have been posted. Receipts with a red background are locked. Locked receipts can result when the application is interrupted by using Ctrl+Alt+Delete, when a temporary disconnection from the Sybase database occurs, and during a power outage. To unlock a cash receipt, see Unlocking Cash Receipts.
The following table describes the fields on the Bank Deposit screen.
| Field | Description |
|---|---|
|
Field Type |
Choose the entity (customer, provider, vendor, or employee) from which you received payment.
To find and select an account ID, click
the lookup ( |
|
From |
Name of the entity from which you received payment. You can type a name in this field or GlobalWare can automatically supply the name of the account specified in the Account ID field. For GlobalWare to do this, specify the account ID in the Account ID field and press Enter. |
|
Amount Received |
Amount of the payment received. |
|
Check # |
Check number for the payment received, if applicable. Specify CASH if the payment was received in cash. Note: This field only accepts alphanumeric characters; do not use special characters. |
|
Receipt # |
Number that GlobalWare automatically assigns to the receipt. |
|
Deposit Type |
Type of cash payment received. This is the type of cash transaction used for the bank deposit receipt, such as PayPal or wire transfer. This field is available only if you have set up deposit codes in GlobalWare. To set up deposit codes, see Edit Deposit Codes. Note: When you enter a bank deposit, if all associated receipts have the same deposit type (subsource), GlobalWare will also use the deposit code for that offsetting bank entry in the Sub Sr field in the grid on the GL Edit & Query screen. However, if multiple deposit types are indicated for receipts associated with a bank deposit, the Sub Sr field will be blank. |
|
Deposit Date |
Date for the bank deposit. |
|
Cash Account |
Cash account for the deposit. |
|
Control # |
Control number for the deposit. |
|
Acct ID |
Account ID of the entity (customer, provider, vendor, or employee) from which you received payment. |
|
Rcpt# |
Number that GlobalWare automatically assigned to the receipt. |
|
Ck# |
Check number for the payment received, if applicable. CASH is indicated if the payment was received in cash. |
|
DT |
Deposit type. This is the deposit code representing the type of cash transaction used for the bank deposit receipt, such as PayPal or wire transfer. This field is blank if you have not set up deposit codes in GlobalWare. To set up deposit codes, see Edit Deposit Codes. |
|
Amount |
Amount of the payment received. |
|
# Items |
Total number of receipts associated with the bank deposit. |
|
Total |
Total amount of payments for receipts associated with the bank deposit. |
|
On Account |
Indicates whether to leave the amount on the account. Immediately after selecting this option, GlobalWare posts the payment to the customer unapplied funds account that is specified on the System tab of the System Control screen (typically 2040 for customer or 2045 for provider). See System Tab. The payment appears in the Search Results grid on the Adjust Accounts screen as an on-account item (as "ONACCOUNT" in the Invoice # field). |
|
GL |
Indicates whether to post the amount received directly to the general ledger. This option immediately opens the Posting screen with one offset transaction automatically provided in the Where to Apply This Item grid. You can specify one or more offset transactions for the receipt. For more information, see Post Deposit. IMPORTANT: Using this option could cause customer statements to be inaccurate. |
|
Gift Certificate |
Indicates whether the amount received is for the purchase of a gift certificate. This option immediately opens the Posting screen, which enables you to post the payment to the gift certificate account. For more information, see Post Deposit. |
|
Layaway |
Indicates whether the amount received is a layaway payment by a customer who wants to pay for a future trip on a layaway basis. This option immediately opens the Posting screen, which enables you to post the payment to the layaway account. For more information, see Post Deposit. |
|
Include Refunds |
Indicates whether to include refunds when you use the Get Agency Plastic Items link to retrieve all credit card merchant agreement invoice sale items that you need to deposit. To include refunds, be sure to select this option before you click the link. For more information, see Getting Agency Plastic Items and Cash Receipts. |
|
Invoice |
Number of the invoice you want to search for. You do not need to include leading zero characters when you type invoice numbers (for example, type 11160 rather than 000011160). In addition, you can specify more than one invoice in this field. Separate them with a comma and a space character (for example, 11160, 11183, 11202). When you click SEARCH, the Posting screen appears. The Where to Apply This Item grid displays the open items that match the invoice number. For details about this screen, see Post Deposit. |
|
PNR |
Passenger Name Record (PNR) number associated with the item you want to search for. When you click SEARCH, the Posting screen appears. The Where to Apply This Item grid displays the open items that match the PNR number. For details about this screen, see Post Deposit. |
|
Confirmation # |
The ticket or confirmation number associated with the item you want to search for. When you click SEARCH, the Posting screen appears. The Where to Apply This Item grid displays the open item that matches the ticket or confirmation number. For details about this screen, see Post Deposit. |
|
From |
Beginning date of a range of dates for the items you want to search for. Use the From date in conjunction with the To date to define a range. If you specify only the From date, the range includes all dates from this date to the current date. For car and hotel providers, use the commission due date (return date). For other invoices, use the invoice date. For non-invoice items, use the customer or provider due date. When you click SEARCH, the Posting screen appears. The Where to Apply This Item grid displays the open items that match the specified range of dates. For details about this screen, see Post Deposit. |
|
To |
Ending date of a range of dates for the items you want to search for. Use the To date in conjunction with the From date to define a range. If you specify only the To date, the range includes all dates before and including this date. For car and hotel providers, use the commission due date (return date). For other invoices, use the invoice date. For non-invoice items, use the customer or provider due date. When you click SEARCH, the Posting screen appears. The Where to Apply This Item grid displays the open items that match the specified range of dates. For details about this screen, see Post Deposit. |
|
Pay ID |
Pay ID associated with the item you want to search for. You can specify more than one pay ID in this field. Separate them with a comma and a space character (for example, 3235, 3245, 3248). When you click SEARCH, the Posting screen appears. The Where to Apply This Item grid displays the open items that match the pay ID. For details about this screen, see Post Deposit. |
 ) button. The Find an Account ID screen appears. For details, see
 The following table describes the buttons and links on the Bank Deposit screen.
| Button or Link | Description |
|---|---|
|
New |
Opens the Bank Deposit Start screen. Use this screen to create a new bank deposit. For details, see Creating a Bank Deposit above. |
|
OK |
Adds the receipt entered in the Account ID, From, Amount Received, and Check # fields to the bank deposit. The receipt appears in the receipts grid on the right side of the Bank Deposit screen. |
|
Get Agency Plastic Items |
Opens the Get Agency Plastic Items screen. Use this screen to retrieve all credit card merchant agreement invoice sale items that you need to deposit. If you want to include refunds, select Include Refunds before clicking this link. You can select items on this screen to have GlobalWare add them to the bank deposit and post receipts to the original invoices. For more information, see Getting Agency Plastic Items and Cash Receipts. |
|
Get Cash Receipts |
Opens the Get Cash Receipts screen. Use this screen to retrieve all cash or check transactions (that is, invoice items with cash and cash/check payments through the interface) that you need to deposit. You can select items on this screen to have GlobalWare add them to the bank deposit and post receipts to the original invoices. For more information, see Getting Agency Plastic Items and Cash Receipts. |
|
SEARCH |
Searches for open items that match the search criteria you specify in the Optional Search Data area of the screen and displays them in the Where to Apply This Item grid on the Posting screen. This screen enables you to post the payment to the open item you select. For details, see Post Deposit. |
|
POST ALL |
Opens the Posting screen. Use this screen to post all receipts listed in the receipts grid on the Bank Deposit screen. For details, see Posting Receipts for a Bank Deposit below. |
|
|
Opens the Send to dialog box. Use this dialog box to print a deposit slip for the bank deposit. For details, see Printing a Deposit Slip below. |
To add receipts to a bank deposit:
-
In the Account ID field, specify the account ID of the entity (customer, provider, vendor, or employee) from which you received payment.
Note: If no account ID is available, create one before continuing. See Adding Accounts.
-
In the Name field, specify the name of the entity from which you received payment.
You can type a name in this field or GlobalWare can automatically supply the name of the account specified in the Account ID field. For GlobalWare to do this, specify the account ID in the Account ID field and press Enter.
- In the Amount Received field, specify the amount of the payment received.
- In the Check # field, specify the check number for the payment received, if applicable. Specify CASH if the payment was received in cash.
-
In the Deposit Type field (if displayed), specify the type of cash payment received. This is the type of cash transaction used for the bank deposit receipt, such as PayPal or wire transfer.
Note: This field is available only if you have set up deposit codes in GlobalWare. To set up deposit codes, see Edit Deposit Codes.
-
Click OK.
The receipt appears as a row in the grid on the right side of the screen.
- Repeat the above steps for each receipt you want to add.
Verify that you have created the bank deposit correctly. Review all receipts for accuracy and check the total amount shown in the Total field under the grid. If you need to adjust or correct a receipt, double-click the receipt in the grid. The Receipt Entry area of the screen displays the receipt details for editing. To delete a receipt, select it in the grid and press Ctrl+Delete.
Posting Receipts for a Bank Deposit
You can post receipts immediately after adding them to the bank deposit, which this section describes, or you can post them later by using the Post Deposit function. To use the Post Deposit function, see Post Deposit.
To post all receipts for a bank deposit immediately after adding them:
-
With the deposit displayed on the Bank Deposit screen, click POST ALL.
The Posting screen appears with one of the deposit's receipts displayed.
-
Use this screen to post the receipt as appropriate (on account, to the general ledger, to the gift certificate account, to the layaway account, or to an open item on the account). For details about using the Posting screen, see Post Deposit.
Note: You can skip posting the currently displayed receipt and continue to the next one (if any) by clicking the Skip This Receipt link. However, you cannot skip a receipt if you have posted part of it.
After posting the receipt, the Posting screen displays the next receipt (if any) to post.
- Repeat the previous step for each receipt.
_522x122.png)
To post a particular receipt for a bank deposit:
-
With the deposit displayed on the Bank Deposit screen, double-click the row in the grid on the right side of the screen for the receipt you want to post.
The receipt's details appear in the Receipt Entry area of the screen.
-
Perform one of the following actions:
-
To leave the amount on the account, select On Account in the Post Item area of the screen. Immediately after selecting this option, GlobalWare posts the payment to the customer unapplied funds account that is specified on the System tab of the System Control screen (typically 2040 for customer or 2045 for provider). See System Tab.
The payment appears in the Search Results grid on the Adjust Accounts screen as an on-account item (as "ONACCOUNT" in the Invoice # field).
-
To post the amount directly to the general ledger, select GL. This option immediately opens the Posting screen with one offset transaction displayed in the Where to Apply This Item grid. You can specify one or more offset transactions for the receipt. For more information, see Post Deposit.
IMPORTANT: Using this option could cause customer statements to be inaccurate.
- To post the amount as a gift certificate payment, select Gift Certificate. This option immediately opens the Posting screen, which enables you to post the payment to the gift certificate account. By default, this standard chart number is 2050. For more information, see Post Deposit.
- To post the amount as a layaway payment by a customer who wants to pay for a future trip on a layaway basis, select Layaway. This option immediately opens the Posting screen, which enables you to post the payment to the layaway account. By default, the standard chart number is 2055. For more information, see Post Deposit.
- To post the amount to one or more open items, specify search criteria in the Optional Search Data area of the screen, and then click SEARCH. (To find all open items for the account, do not specify any search criteria before you click SEARCH.) For descriptions of the search criteria fields, see Adding Receipts to a Bank Deposit above. GlobalWare displays matching open items in the Where to Apply This Item grid on the Posting screen. Use this screen to post the payment to one or more open items. For details, see Post Deposit.
-
Voiding Receipts for a Bank Deposit
You can void posted receipts from the Bank Deposit screen, which this section describes, or by using the Void Cash Receipt function. To use the Void Cash Receipt function, see Void Cash Receipt.
To void a receipt from the Bank Deposit screen, double-click the row in the grid on the right side of the screen for the posted receipt you want to void.
Notes:
- Receipts appearing in the grid with a blue background have been posted. Those with a gray background have not been posted.
- You cannot void unposted receipts. However, you can delete them by selecting the row in the grid for the receipt you want to delete and pressing Ctrl+Delete.
The Void Deposit Item screen appears. To use this screen, see Voiding Deposit Items.
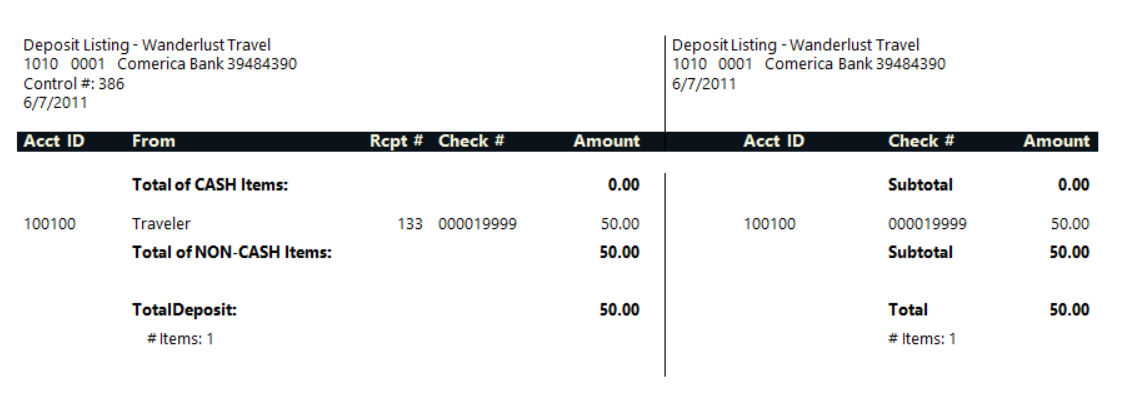
Printing a Deposit Slip
To print a deposit slip for a bank deposit that is displayed on the Bank Deposit screen, click PRINT.
The Send to dialog box appears. Select a destination for the deposit slip. For more information, see Printing Overview.
Working with an Existing Bank Deposit
You can work with an existing bank deposit to add or edit receipts, delete receipts, void posted receipts, post the deposit, or print a deposit slip.
To work with an existing deposit:
-
On the Bank Deposit Start screen, search for the bank deposit you want to work with. For details about this screen, see Creating a Bank Deposit above.
- In the Deposit Date field, specify the date of the bank deposit you want to work with. If you cannot provide a specific date, choose a date within the month in which the bank deposit was created. This field is required.
-
In the Deposit Look-Up area on the screen, do one of the following:
-
In the Check # field, specify the check number associated with the bank deposit you want to search for and work with. When you click SEARCH, the Bank Deposit screen appears and the bank deposit that matches the check number is displayed.
Note: The check number must match a bank deposit with a deposit date that falls within the month of the date specified in the Deposit Date field. Otherwise, the bank deposit will not be displayed.
-
In the Control # field, specify the control number associated with the bank deposit you want to search for and work with. When you click SEARCH, the Bank Deposit screen appears and the bank deposit that matches the control number is displayed.
Note: The control number must match a bank deposit with a deposit date that falls within the month of the date specified in the Deposit Date field. Otherwise, the bank deposit will not be displayed.
- To search for all bank deposits within the month of the date specified in the Deposit Date field, leave the Check # and Control # fields blank. When you click SEARCH, if GlobalWare finds one match, the Bank Deposit screen will open with the bank deposit displayed. If GlobalWare finds multiple deposits, it will list them in the Select Deposit grid that appears on the Bank Deposit Start screen.
-
-
Click SEARCH.
- If GlobalWare finds one bank deposit that matches the search criteria, the Bank Deposit screen appears with the bank deposit displayed.
-
If GlobalWare finds multiple bank deposits that match the search criteria, it lists them in the Select Deposit grid that appears on the Bank Deposit Start screen.
Each row in the grid represents a deposit and shows the deposit's control number, the deposit date, and an indicator of whether the deposit was posted. Select the bank deposit you want to work with and click RE-ENTER DEPOSIT (or double-click the bank deposit you want to work with). The Bank Deposit screen appears with the deposit displayed.
-
On the Bank Deposit screen, perform one or more of the following actions:
- Add receipts to the bank deposit. See Adding Receipts to a Bank Deposit above.
- Edit receipts that have not been posted. In the grid, double-click the row for the receipt you want to edit. The receipt's details appear in the Receipt Entry area of the screen so you can edit them. For details about working with receipts, see Adding Receipts to a Bank Deposit above. For more information, see Editing and Deleting Unposted Cash Receipts.
- Delete receipts. In the grid, select the row for the receipt you want to delete and press Ctrl+Delete.
- Void posted receipts. See Voiding Receipts for a Bank Deposit above.
- Post a bank deposit that has unposted receipts. See Posting Receipts for a Bank Deposit above.
- Print a deposit slip. See Printing a Deposit Slip above.
_313x420.png)