View a booking
Once you have created a booking (either by selecting Hold or Ticket), you have the option to display the graphical booking file.
Note: For a booking that was held without a form of payment, select the Reservation section, then select Issue ticket to add or edit payment information. Once added, select Save changes to keep the booking on hold or select Issue ticket.
Important: Ticket display (*HTE) is not supported in the terminal view for NDC transactions. Some carriers allow ticket display through the EDIFACT (GDS) path. However, this behavior is not consistent across all carriers. For both NDC and EDIFACT (GDS) bookings, use Smartpoint Cloud's graphical booking file to display tickets for a reliable and consistent experience.
Bookings can be retrieved using a graphical form or terminal entries. Bookings can be displayed either in a graphical view or a terminal window.
Once a booking is retrieved, the Booking View indicates the record locator, number of travelers, and number of flights. It provides quick access to edit and management tools.
From the graphical booking file, you can view and edit:
-
Traveler information, such as security documentation
-
Reservation information, such as flight information (including allowed baggage), tickets, seats, meals, special service requests, and associated remarks. For flights, you can also reissue and void tickets. For hotels, you can display hotel details and modify bookings.
Note: For a booking that was held without a form of payment, select the Reservation section, then select Issue ticket to add or edit payment information. Once added, select Save changes to keep the booking on hold or select Issue ticket.
-
Booking information, such as ticketing arrangements for held bookings, traveler contact, payment information, ID numbers, airline confirmation numbers, and messages for travelers (unassociated remarks).
-
Document information, such as invoice remarks (DI lines for NDC bookings), notepad remarks, OSI, and Review Booking file remarks.
Retrieve a booking
Retrieve using locator
You can retrieve a booking using the graphical interface. Select Booking file from the top menu. Enter the record locator and select Search.
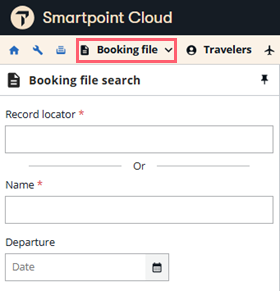
Advanced retrieve using name
To view a list of bookings using a passenger's last name, use the graphical Booking file search. The Booking file search can also filter results by origin, destination, airline, flight number, and departure date.
-
-
Enter the passenger's last name.
-
Optionally, enter a date to filter the results.
-
Select Search.
-
If only one booking file matches your search criteria, the booking file opens. If more than one booking file matches, a list of booking files displays. Select a booking file and click the Retrieve button at the bottom of the panel to open it.
If multiple results matched your search criteria, once a booking is opened, the list remains for you to retrieve another booking if needed. If changes have been made to the opened booking, you are prompted to save or ignore the changes.
Whichever graphical way you search for a booking,
-
If you are working in the graphical view, the graphical view of the booking displays.
-
If you are working in the terminal view, the booking displays in the current terminal window.
Refer to the known gaps for information on how modify without save affects retrieve.
Retrieve using terminal format
To retrieve a booking using the terminal format in a terminal window, enter * followed by the locator (e.g., *1ABC2D).
If you do not know the locator code, search for the booking using the traveler's last name.
-
In the terminal window, enter *-NAME to retrieve a list of matches. For example, if the passenger's last name is Traveler, enter *-TRAVELER .
-
Select a name to open the booking file.
Tip: If many names are returned, set one terminal window to Booking File Viewer, which allows you to click on a result in another window and have it display in the Booking File Viewer, allowing the list of results to remain in another window.
 Use Booking File Viewer
-
In one window, select the options (
 ) icon and choose Set as Booking File Viewer. It becomes window 0.
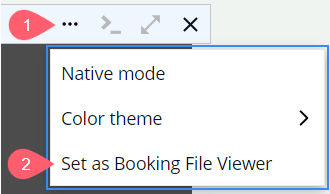
-
Search for a name in another terminal window (e.g., *-TRAVELER).
-
Select a green traveler name in the list of results to open the booking file in the Booking File Viewer window.

-
Click the Toggle view (
 ) icon in the window header to launch the graphical display.
To change the booking, refer to Enhanced Exchange. Select the Toggle view (![]() ) icon in the window header to open the graphical view.
) icon in the window header to open the graphical view.
Booking view
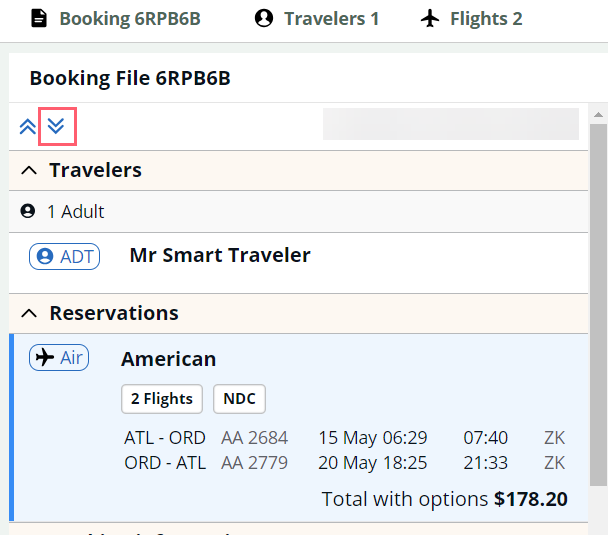
When a booking file is displayed or active in the graphical view, the Booking View section in the upper left indicates the record locator, number of travelers, and number of flights.

-
Select the down arrow (
 ) icon next to Booking and choose to view the graphical booking file, ignore the booking file, or start a new booking file. If the booking file contains GDS reservations, you also have the option to Cancel all traditional reservations, which will cancel all GDS segments, including air (ticketed and non-ticketed), hotel, car, passive, and low cost carrier content.
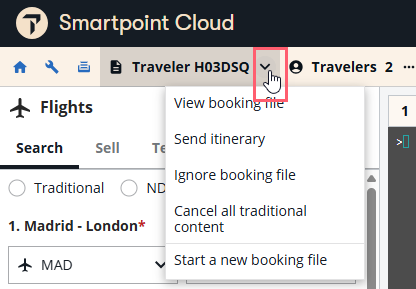
-
Select Start a new booking file to create a new booking file, provided the active booking file is not on a queue.
-
-
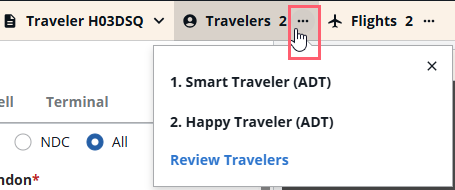
Hover over the ... next to Travelers to show the traveler name(s) and PTC.
-
Select the Review travelers option to open the graphical booking file and edit traveler information.
-
Click on Travelers menu to open the Profile search panel.
-
-
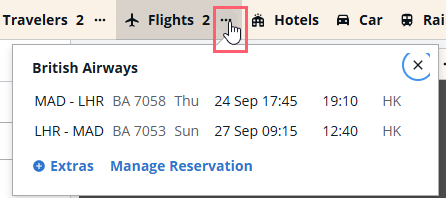
Hover over ... next to Flights to display route, carrier, flight number, date, time, and status for all flights in the booking.
-
Select the Extras beneath the flight list to view the Extras panel, which displays options for seats, bags, meals, traveler assistance, and/or other ancillaries, if supported by the carrier.
-
Select Manage Reservation to display the graphical booking file.
-
Click on Flights to open the Flight Search panel.
-
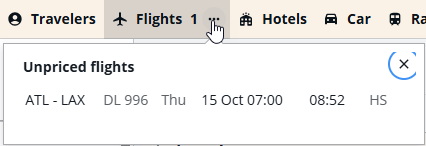
Bookings can contain traditional (GDS) flights that have been selected but not priced. If the booking contains unpriced flights, they are displayed in the drop down list in the Unpriced flights section.
flights, they are displayed in the drop down list in the Unpriced flights section.
-
Graphical booking file
From the graphical booking file, you can view and edit traveler, reservation, booking, and document information. Expand a section to view a summary. Select a summary to view the details in the right panel. Select the expand all (![]() ) icon to expand all sections.
) icon to expand all sections.
-
Select the Travelers section to view and edit traveler information, such as PTC
Passenger Type Code, used to categorize travelers. The most common PTCs are adult (ADT), child (CNN), and infant (INF)., date of birth, membership numbers, and security documentation. If you are viewing the booking file prior to Hold or Ticket, you can also delete travelers. For GDS bookings, you can add a name remark to a traveler.Edit traveler information
-
Expand the Travelers section.
-
Select the traveler summary section to display traveler details in the right panel.

-
Select the Edit travelers button.
-
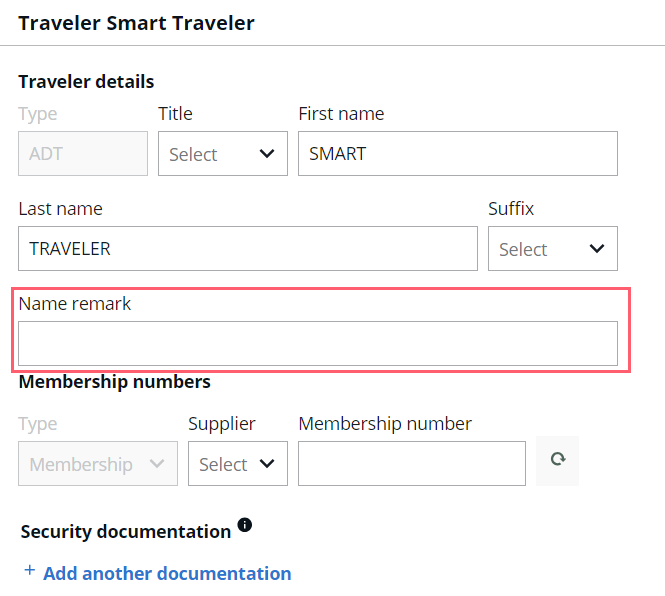
Traveler information displays with fields that can be edited. You can also add another form of documentation.
-
For GDS bookings only, you can add a name remark.
-
Select Apply changes when editing is complete.
Delete a traveler
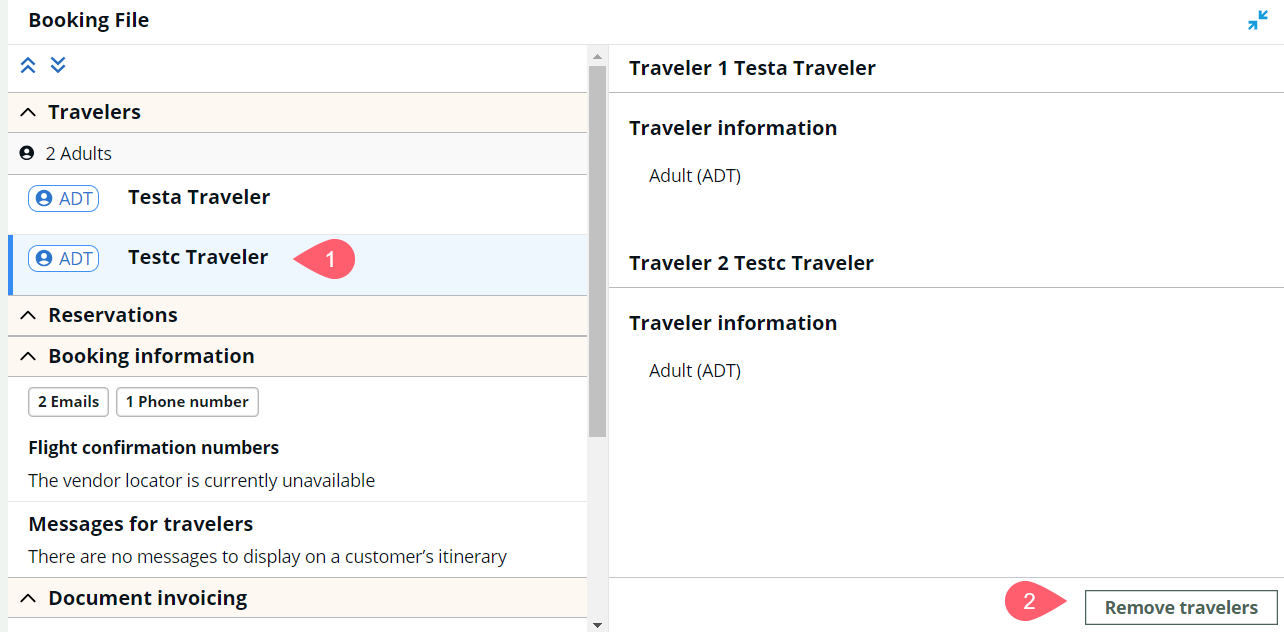
When traveler information is added to a booking file using cryptic commands or from a profile, you can delete a traveler prior to Hold or Ticket, as long as at least one adult remains in the booking file.
-
Retrieve the booking file.
-
Expand the Travelers section.
-
Select a traveler to display traveler details in the right panel.
-
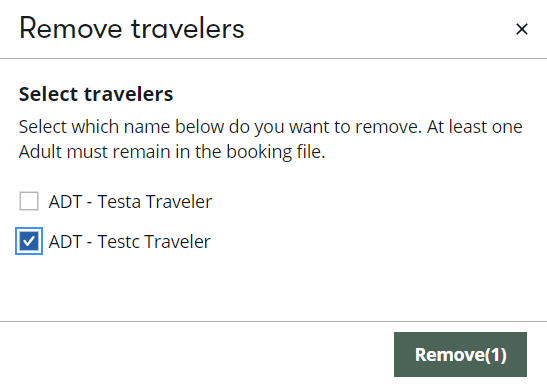
Select the Remove travelers button.
-
Select which traveler(s) to remove.
-
Select Remove.
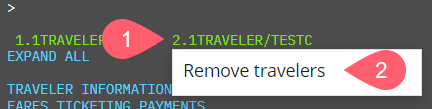
You can also remove travelers from the terminal window by displaying the booking file, right-clicking on a traveler name, then selecting Remove travelers. Select the traveler(s) to remove then select the Remove travelers button.
-
-
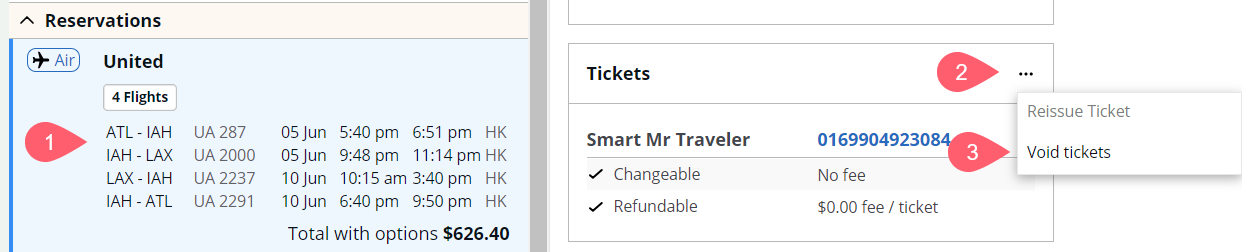
Select the Reservations section to display booking details. For air, you can view fare details (including commission, if applicable), flight information (including allowed baggage), and ticket information; add or modify seats, bags, and meals; add associated remarks; and reissue and void tickets.
Note: Special Service Requests (SSRs) can be added via terminal
For hotel bookings, hotel details display, including confirmation number, dates, form of payment used, payment guarantee, cancellation details, price details, and frequent guest number (if used). For Booking.com reservations, the Pin code displays.
View Fare Rules and Price Details
-
Expand the Reservations section.
-
Select the reservation summary section to display details in the right panel.

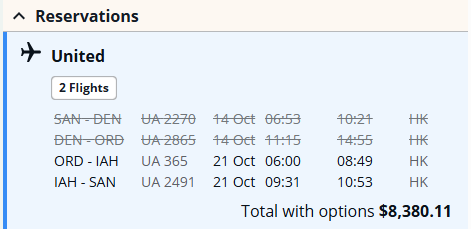
Flown flights display with strike through, gray text.
-
Select View rules from the Fare Details
Conditions and restrictions that apply to any booking based on its fare type. These determine the price of the fare. Can include blackout dates, advanced reservation requirements, minimum and maximum stay requirements, and cancellation and change penalties. panel. Fare rule details are displayed per segment. Select a segment to view the fare rule details.Notes:
-
Baggage allowance does not display in fare rules. However, it can be checked in the Itinerary Details panel of Review and Confirm screen.
-
Fare rules are only available if the booking was made in Smartpoint Cloud. Fare rules will not display for a booking made in Smartpoint Desktop and opened in Smartpoint Cloud.
-
-
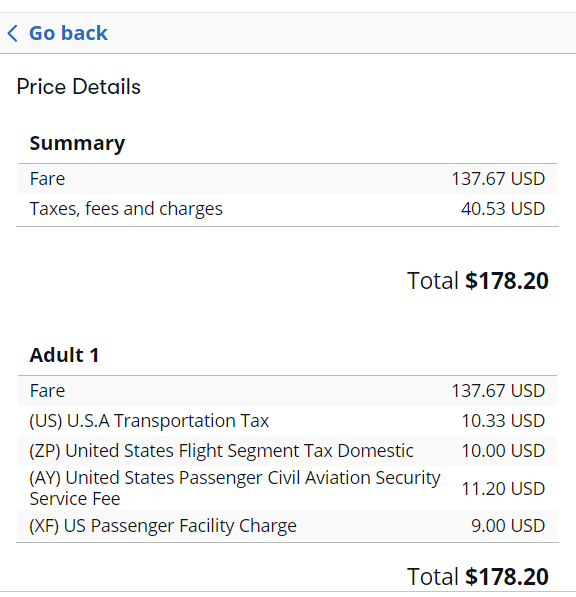
Select Price details below the total to view the fare breakdown per traveler.
-
Select the Go back link to return to the reservation details.
View Ticket details
-
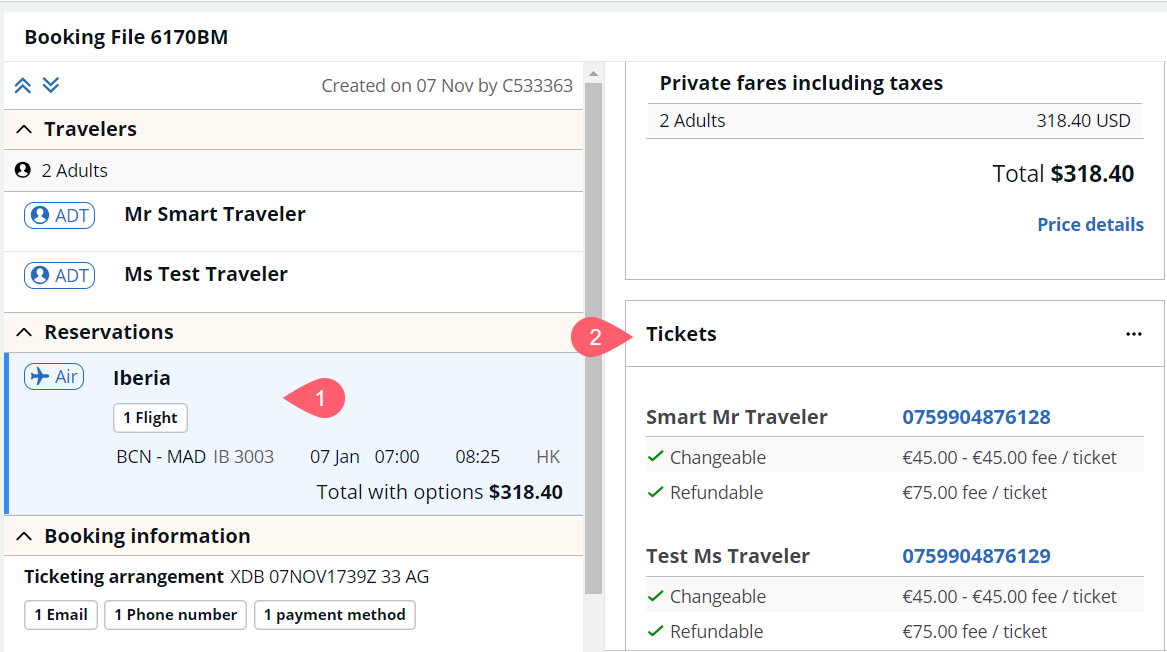
Select the reservation summary section to display details in the right panel. If the reservation contains tickets from a canceled reservation, select the Other tickets.
-
Scroll down to the Tickets card.
-
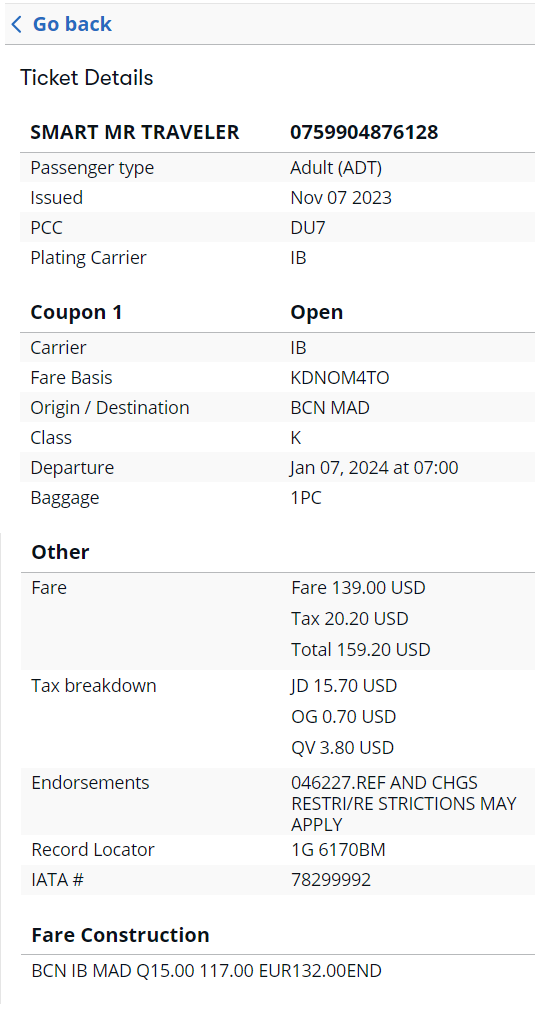
Select a ticket number.

-
The ticket details display. Commission information (if applicable) displays in the Other section.
-
Select the Go back link to return to the reservation details.
Add Seats
Seats are available for many NDC carriers as well as for GDS carriers that support seats.
-
Expand the Reservations section.
-
Select the reservation summary section to display details in the right panel.
-
Scroll down to the Upgrade the trip? section, below the flight details.
-
Select the Add extras button then Seats to add seats.
For more information about selecting seats and any associated EMDs
Electronic miscellaneous document (EMD); issued for a paid seat, ancillary, or any other paid service after successful payment., refer to Seats.Add Bags
Bags can be added for many NDC carriers. Bags can be added after booking (either hold or ticket) for traditional bookings (GDS).
-
Expand the Reservations section.
-
Select the reservation summary section to display details in the right panel.
-
Scroll down to the Upgrade the trip? section, below the flight details.
-
Select Add extras then Bags.
For more information about selecting bags, refer to Bags.
Add Special Service Request(s) (SSRs) for special meals and traveler assistance
Important: SSRs can only be added prior to booking, if supported by carrier.SSRs are added per passenger and cannot be modified or canceled at this time. Agents can add multiple Special Assistance SSRs and select Save in a single request.
-
Expand the Reservations section.
-
Select the reservation summary section to display details in the right panel.
-
Scroll down to the Upgrade the trip? section, below the flight details.
-
Select the type of request you want to add from the Extras panel.
For more information, refer to special meals or traveler assistance.
Associated Remarks
Associated remarks are flight-specific messages to the traveler that can be added to Traditional bookings.
-
Expand the Reservations section.
-
Select the reservation summary section to display details in the right panel.
-
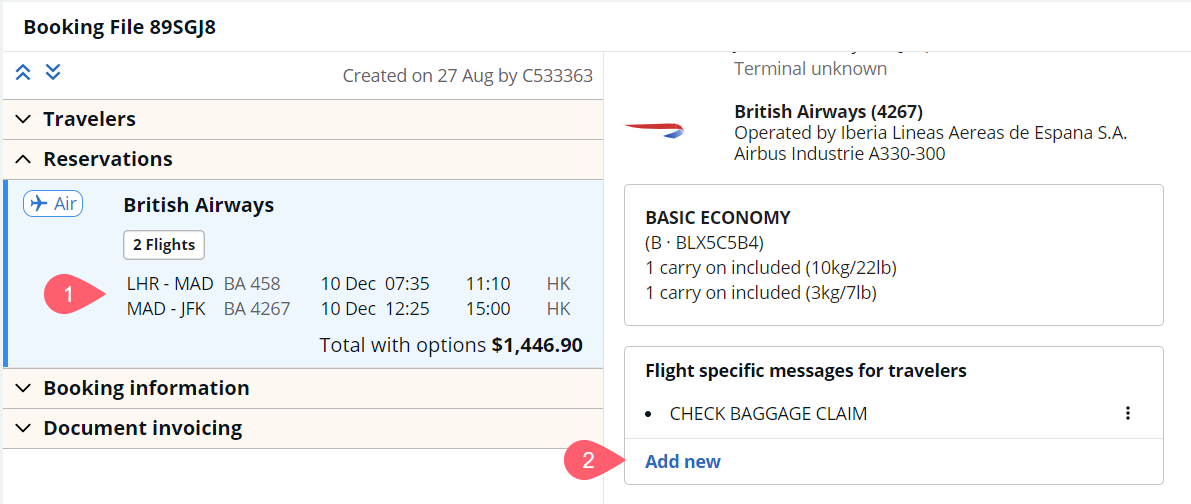
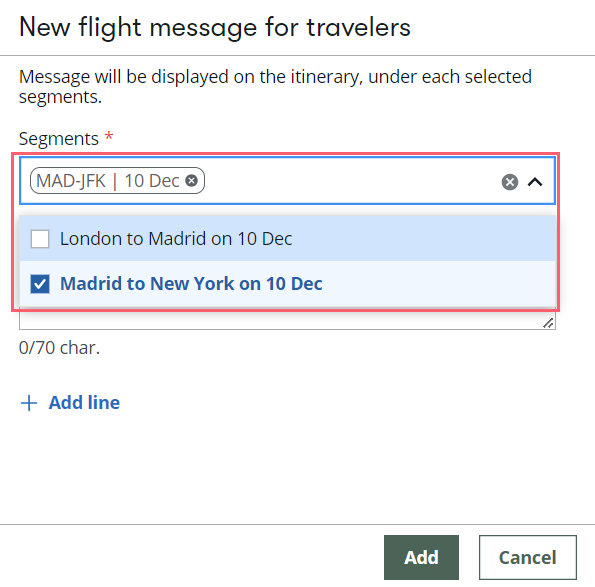
Scroll to the flight to which you want to add a message. Below the flight information, select Add new in the Flight specific messages for travelers section.
-
In the Segments list, select to which segments you want to apply the message.
-
Enter the message. Messages have a maximum of 70 characters and special characters are now allowed.
-
Select + Add line to add another message.
-
When all messages have been added, select the Add button.
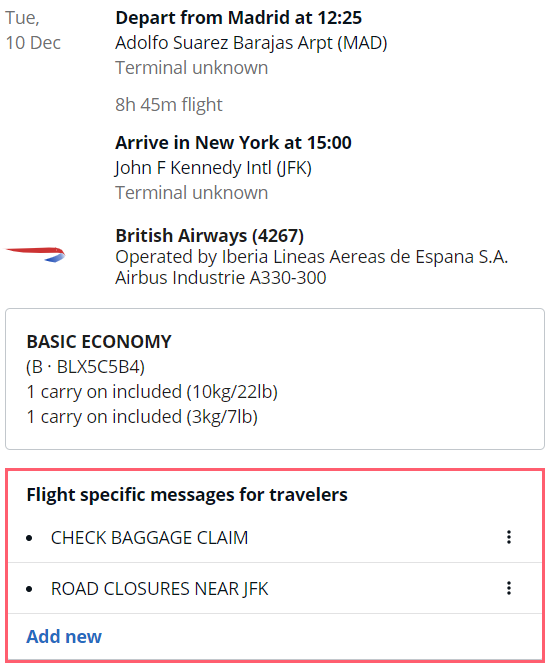
Messages display in the Flight specific messages for travelers section.
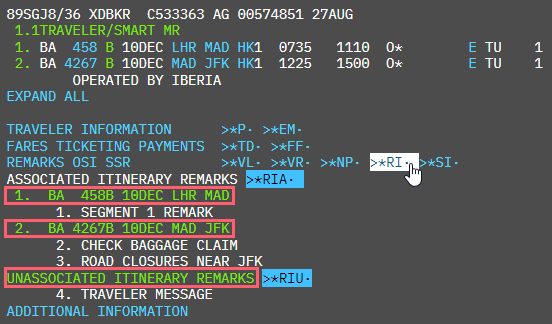
Message also display in the terminal view. Select green link text to open that remark section in the graphical booking file.
To delete or edit an associated remark in the graphical booking file, select the options (
 ) icon for the remark you want to edit or remove, then select either Edit message or Remove message.
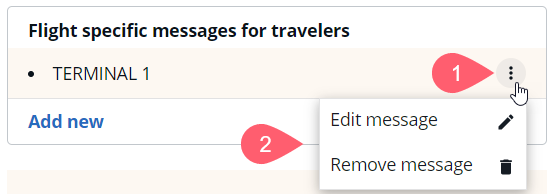
-
-
If the booking file contains unpriced flights, they are listed in the Unpriced flights section. Unpriced flights are traditional (GDS) air segments that have not yet been priced (fare quoted). At this time, unpriced flights can only be viewed and canceled through the graphical booking file.
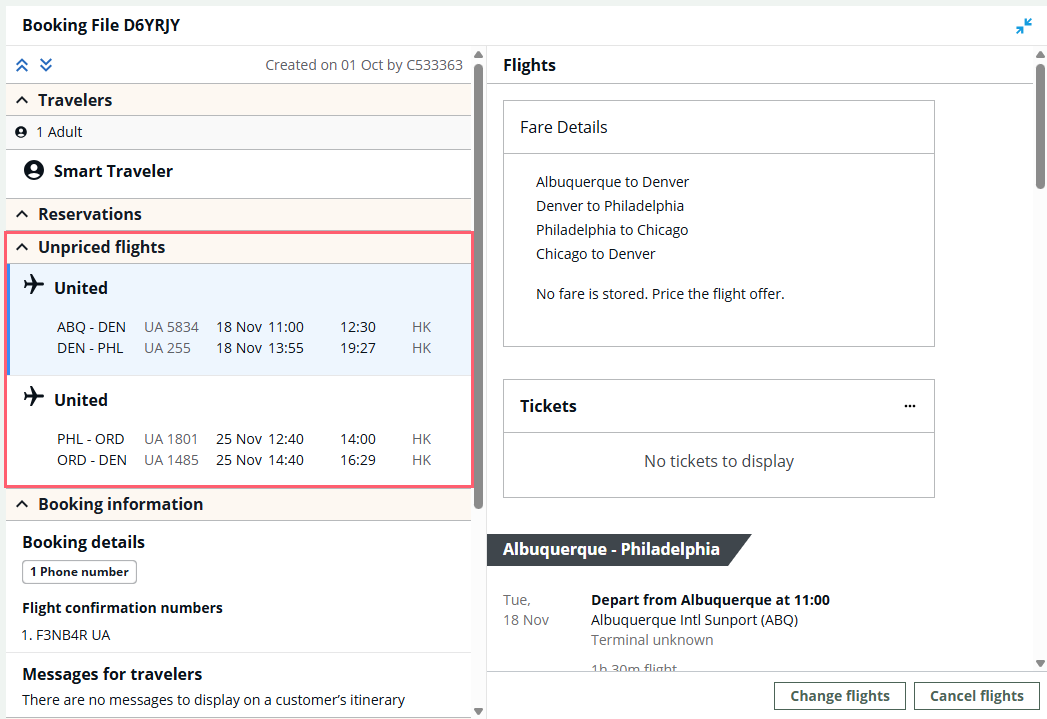
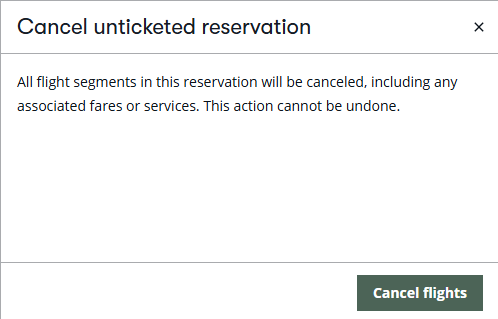
To cancel an unpriced flight, select the flight card to display the details in the right panel, then select the Cancel flights button. Select Cancel flights in the dialog window to confirm the cancellation.
-
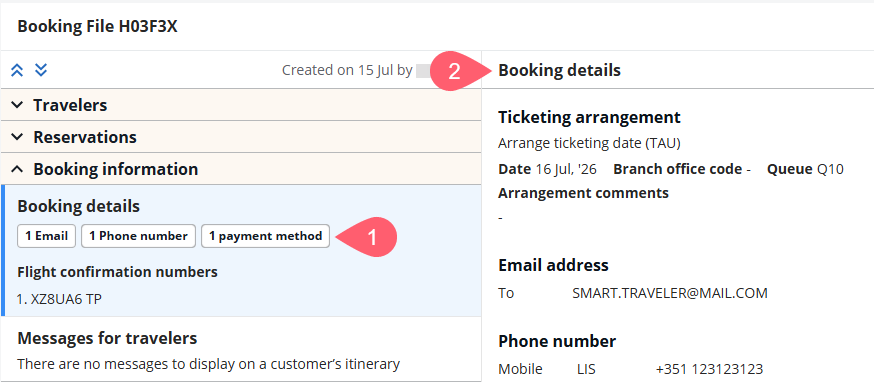
Select the Booking information section to access ticketing arrangement information for held bookings, traveler contact, payment information, ID numbers, airline confirmation numbers, and messages for travelers (unassociated remarks).
Corporate agreement number
Important: Can only be added prior to ticketing.-
Expand the Booking information section.
-
Select the booking information summary section to display booking details in the right panel.
-
Select the Edit button. Fields that can be edited display.
-
In the Corporate Agreement Number section, select the plus (+) sign to add the corporate agreement number.
-
Both CLID/ and JBID/ are supported formats.
-
The corporate agreement number cannot be changed or deleted if it is already present in the booking file. In this case, the field is grayed out.
-
-
Select Apply changes. A confirmation message displays that the reservation details were updated.
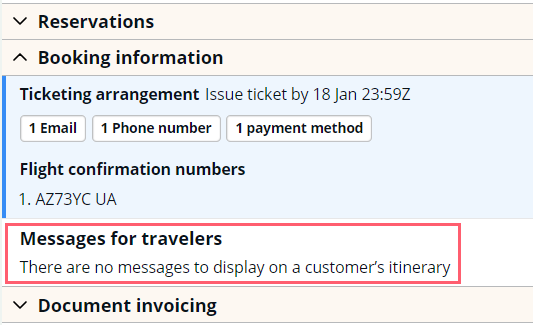
Message for travelers (unassociated remarks)
-
Select Message for travelers.
-
If no messages exist, select the Add a message button. If the booking file contains messages, select the + icon in the upper right.
-
Select Add line to add another message.
-
Select Add button to add messages to the booking file.
-
To edit or insert a message, hover over a message to display the options (
) icon, then select Edit message, Add message before, or Add message after. 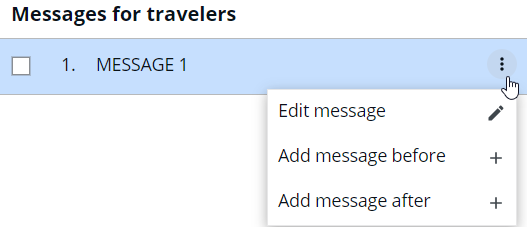
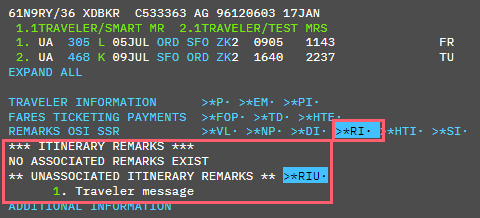
These notes display in terminal in *RI (itinerary remarks) section.
To delete a message, check the box for each message you want to delete, then select the Remove message(s) button.
-
-
Select the Document invoicing section to view and edit invoice remarks (DI lines for NDC bookings), notepad remarks, OSI, and review booking file information.
Invoice remarks
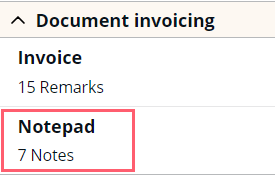
To access Invoice remarks, expand the Document invoicing section of the graphical booking file, then select Invoice.
The right panel displays all invoice remarks.
-
If no remarks exist, select the Add remark button.
-
Select the type of remark and enter the remark text.
-
AC - Account details (only 1 allowed)
-
AR - Replace original sign on code with new sign on, which will be used on the invoice/itinerary.
-
FS - Add a Fare Saver to the itinerary/invoice; do not enter decimals or currency codes.
-
FT - Up to 45 characters of free text, which is sent to the back office system (MIR).
-
TK - Add manual ticket numbers to the itinerary/invoice.
-
X* - Back office accounting field
-
CR - Copy up to 12 canned remark lines from the canned remark record and place them in the itinerary/invoice.
-
DYO - Use a DYO (design your own) format number for itinerary/invoice production
-
FP - New free text
-
-
Select Add line to add another note.
-
Select Add button to add notes to the booking file.
To delete remarks, check the box for each remark you want to delete, then select the Remove remark(s) button.
To edit a remark that was added manually, hover over the remark row and select the options (
) icon at the far right then select Edit. You can also choose to add a new remark before or after the current row. 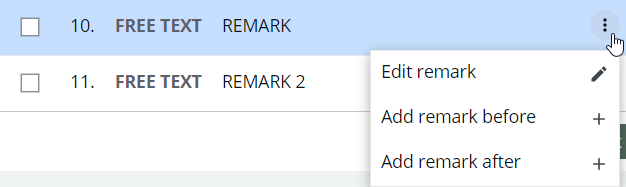
Note: Invoice remarks that are automatically created when booking an NDC offer cannot be edited or deleted.
Notepad remarks
To access Notepad remarks, expand the Document invoicing section of the graphical booking file, then select Notepad.
The right panel displays all notepad remarks.

-
If no notes exist, select the Add note button.
-
Select the type of note and enter the note text. You can type a custom qualifier (e.g., CQ*) that is used by your agency.
-
Notes - Create a notepad item. Will not show in history of the booking file when deleted.
-
D* - Create a notepad item with D qualifier. Qualifiers to be defined by the agency.
-
H* - Creates a notepad that will be saved in the history of the booking file when removed.
-
HG* - Create a Historical notepad item with G qualifier. Qualifiers to be defined by the agency.
-
C* - Creates a Confidential notepad item, which is only visible in own PCC.
-
CM* - Create a Confidential notepad with qualifier M. Qualifiers to be defined by the agency.
-
-
Select Add line to add another note.
-
Select Add button to add notes to the booking file.
-
Use the Search (
 ) icon in the upper right of the Notepad panel to search for text within the notepad remarks.
 -
Use the Filter (
 ) icon to filter notes by note type. Select the types of notes to filter. Select the Filter icon again to remove or add filters.
 -
To edit a note, select the options (
) icon at the end of a note then select Edit note. -
To add a note before or after an existing note, select the options (
) icon at the end of a note then select an add option. -
To delete a note, select the checkbox before the note and select the Remove notes button at the bottom right. You can delete multiple notes at once.
These notes display in terminal in *NP (notepad remarks) section.
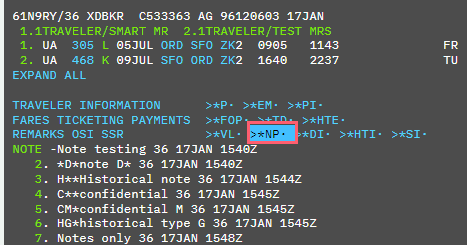
Select the green NOTE link to open these remarks in the graphical booking file.
When booking traditional (GDS) flights, multiple notepad remarks are created that begin with TSFQ. These lines are used as keys to retrieve Fare Rules. These lines can be ignored.
Other service information
You can add, edit, and delete Other Service Information (OSI) using the graphical booking file.
-
Expand the Document invoicing section of the graphical booking file, then select Other service information.
-
Select Add message.
-
Select which airlines (or all) should receive the message.
-
Enter the message and select Add message to add another message or select Add to add the message and close the window.
To edit a message in the graphical booking file, select the options (
) icon for the message you want to edit, then select Edit message.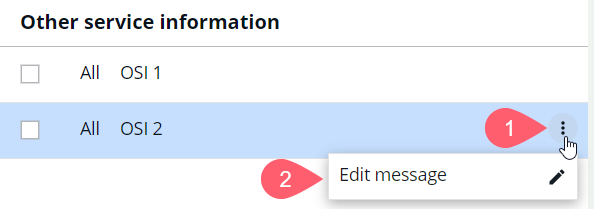
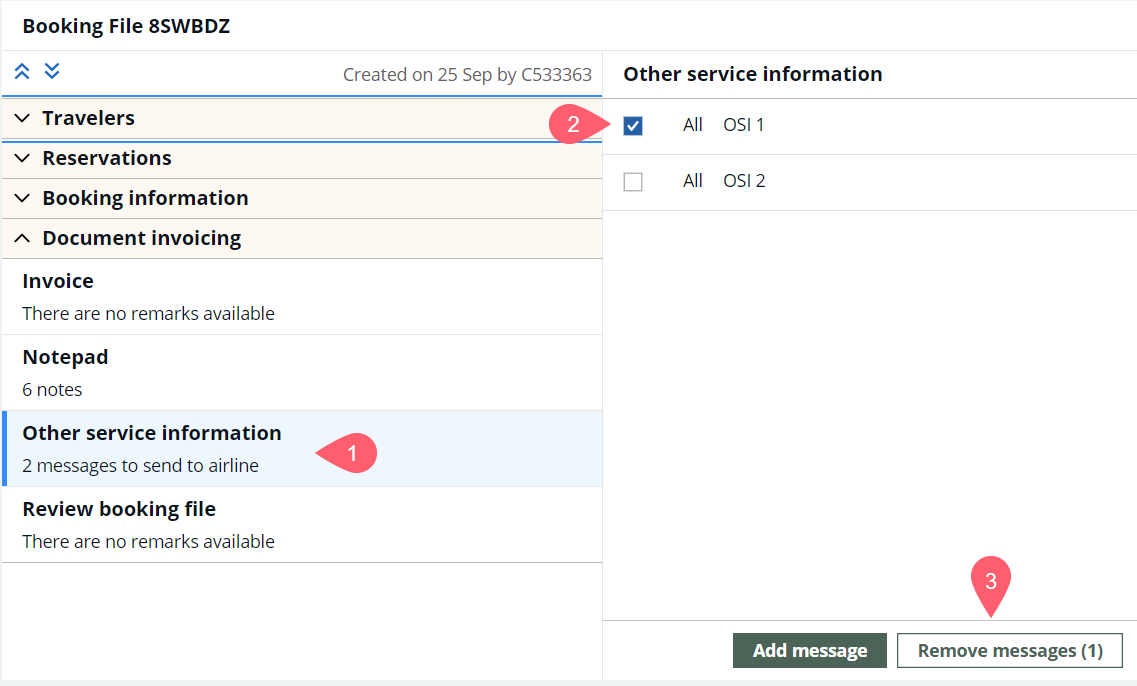
To delete a message, select which message(s) to delete, then select the Remove messages button.
If OSI information is added through a terminal format (SI.), this information displays in the graphical booking file.
For more information on formats, refer to Other Service Information and Review Booking File in the Travelport+ Formats guide.
Review booking file
You can add, edit, and delete review booking file remarks using the graphical booking file.
-
Expand the Document invoicing section of the graphical booking file, then select Review booking file.
-
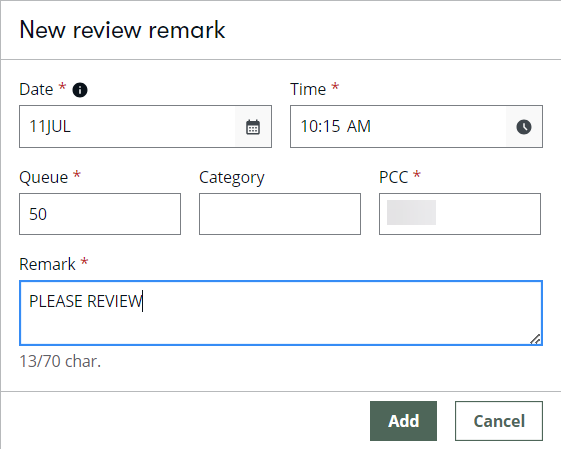
Complete the required fields (date, time, queue, PCC, and remark). Default values of tomorrow's date, current time, queue 12, and current PCC are pre-populated and can be changed as needed. You can also assign a category if it already exists in the queue. For more information, refer to Travelport+ Queue categories.
-
Select Add.
To edit a remark in the graphical booking file, select the options (
) icon for the remark you want to edit, then select Edit remark. You can edit the message, date, and time, then select Save.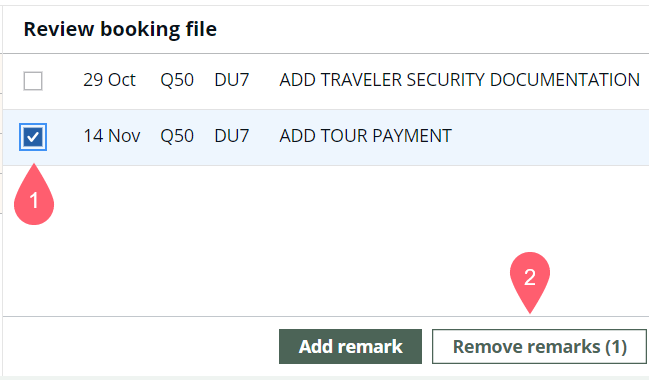
To delete a remark, select which remark(s) to delete, then select the Remove remarks button.
If review booking file information (format RB.) is added in a terminal window using formats, this information displays in the graphical booking file.
For more information on formats, refer to Other Service Information and Review Booking File in the Travelport+ Formats guide.
-
In the graphical booking file view and subject to carrier support, you may have the following options. Expand each section for instructions and more information.
American Airlines works with third-party vendor to fulfill carbon offset. Therefore, no EMDs are issued.
-
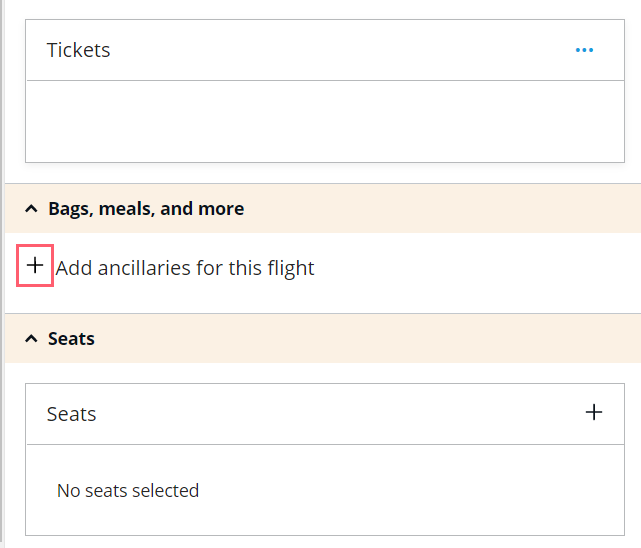
From the View Booking File display, in the right panel, scroll down to the Bags, meals, and more section.
-
Select the + to shop for ancillaries.
-
The option to reduce carbon emissions and the associated price display. Select the checkbox to offset the environmental impact and accept the price. Per American Airlines processing, this ancillary is applied to all travelers on all segments.
-
Select the Save button.
The Booking File shows that the ancillary is booked.

Once payment has been taken, the third party (Cool Effect) emails the passenger directly with the purchase receipt. For this reason, email address is mandatory for the purchase of American Airlines Carbon Offset.