Seats
Seats are available for many NDC airlines and for GDS carriers that support seats. Some NDC carriers allow seats to be chosen before booking and some carriers only allow seats to be chosen after booking. Refer to the FAQs for a list of airline-specific knowledge base pages for more details.
Agents can access seat maps and select and book seats for their single or multi-passenger bookings. For the best user experience, it is recommended for the agents to use the graphical flow to display and book seats or bags.
You can add seats:
-
Immediately after selecting flights (prior to booking), or
-
To an existing booking.
Booking bags and seats in the same transaction is available for Air France, British Airways, Iberia, KLM, Lufthansa Group, Qantas Airways, Singapore Airlines, and United Airlines before booking, after booking, and after ticketing, per each carrier's business rule.
For NDC seats, the DI lines are updated to show selected seats and any EMDs associated with paid seats (NDC only). EMDs are also indicated in the graphical booking file.
You can cancel or modify seats if needed and if supported by the carrier.
Preview seat map
-
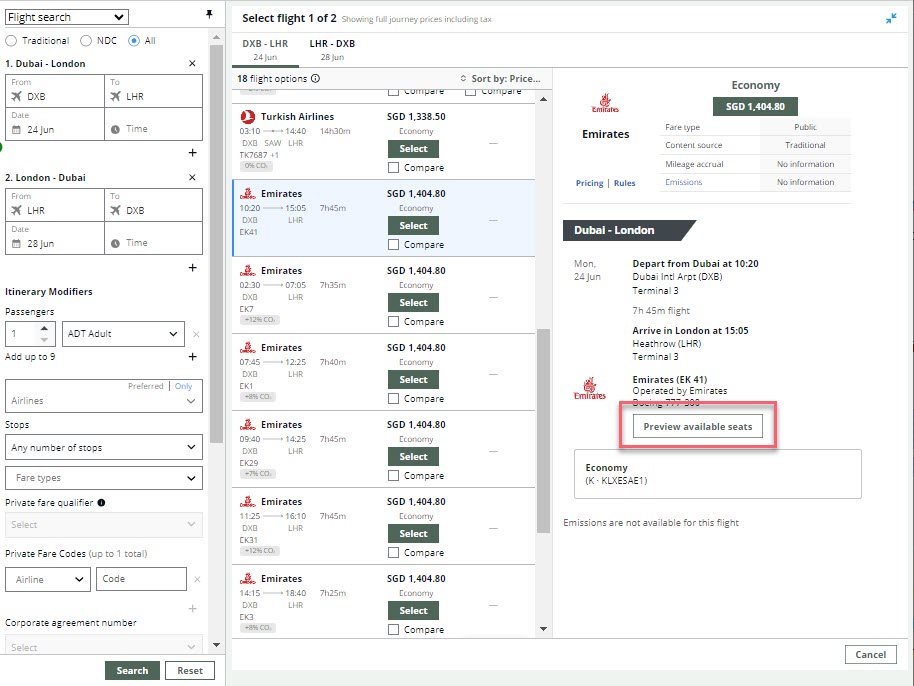
In flight search results, select Preview available seats to view the seat map for a flight.
-
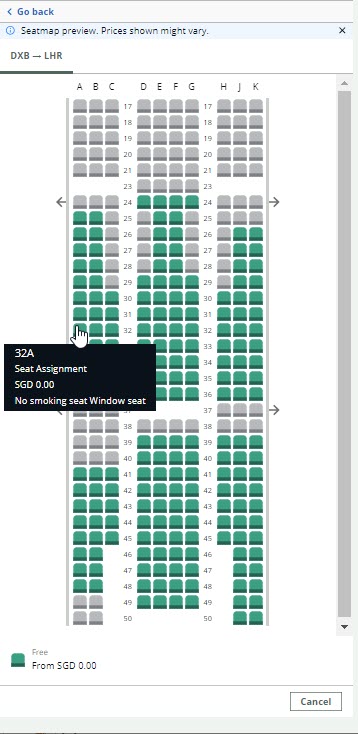
If available, the seat map displays. Hover over a seat for an informational window about that seat.
-
Select Go back at the top of the window to return to the list of flight search results.
Select seats prior to booking
Important:
-
Free seats (both NDC and GDS) and paid seats (NDC only) are available prior to booking.
-
For NDC and GDS bookings, both free and paid seats can be added to held or ticketed bookings.
-
For NDC and GDS bookings, paid seats can be canceled (if allowed by the airline) using the GUI seat map. However, refunds are not provided for paid seats.
-
When paid seats are selected, the same form of payment is used for the ticket and the seats. (NDC only)
-
Seat maps are not available for GDS multi-offer bookings.
-
Currently AA only accepts credit/debit card as form of payment for seats. If Cash is used, the ticket will be fulfilled but the seats will remain on hold and canceled upon carrier decision.
-
UA does not allow canceling of free or paid seats after booking. The seat needs to be replaced with another seat. Seat changes are allowed on ticketed bookings only.
-
For BA, when adding a seat to an existing held booking, the agent must first put the seat on hold then issue payment for the air segments and seat.
-
At this time, FQTV would need to be included after booking is committed with the airline.
-
The booking class in the passive segment is interactive, indicating that the agent can book seats for the flight. However, NDC seats must be added to the NDC order via the NDC graphical interface (if seats are supported by the NDC carrier).
-
Seats can be requested using loyalty details and corporate ID (CLID) and will display chargeable price as 0.00, The corporate ID must be added to the booking file with an OSI before NDC search by entering SI.AA*CORPORATE ID NUMBER. For some carriers, a loyalty card status will obtain a free seat. A CLID number is not recognized through Travelport’s NDC products; however, it may allow certain upgrades when the passenger arrives at the airport if included in the booking file.
-
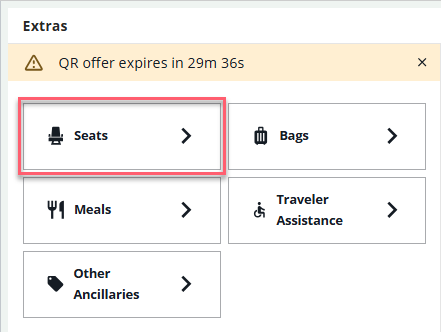
Once the last leg of the trip is selected, if the carrier supports seats prior to booking, the Extras panel displays.
-
Select Seats to add seats.
-
If selecting seats prior to booking and if the booking file does not contain passenger information or has a passenger mismatch, a form displays to enter the information that is required prior to selecting seats. Complete the fields and select Confirm details. This form cannot be used to add information for infants (passenger type INF/INS).
-
The seat map displays for the first segment. Hover over a seat to show seat details. Free and paid seats are indicated by different colors.
Note: Prior to booking, free seats are available for both NDC and GDS offers. Prior to booking, paid seats are available only for NDC offers. After booking, paid seats are available for both NDC and GDS offers.
-
Select seats for the first segment.
-
If you have multiple segments, select the next flight segment and select seats.

As seats are selected, the seat number and any associated cost are added to the summary.

-
Once you have selected seats, you can add Bags or Other ancillaries if they are offered by the carrier.
-
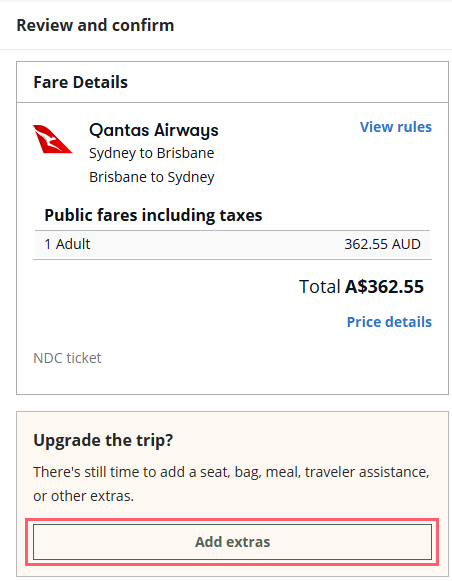
To book the flights and seats, select Checkout to add traveler and payment information. The Review and confirm screen displays. Fare Details section is updated with any costs associated with the selected seats.
-
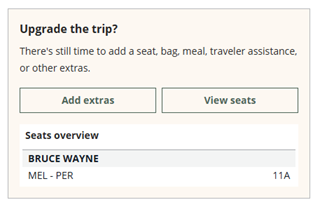
To view selected seats, select View seats in the Upgrade the trip? section. Optionally, select Add extras to select additional supported ancillaries for the itinerary.
-
Select Hold or Ticket. If you select Ticket, a confirmation dialog displays for you to verify that you want to close the booking. Once a booking is ticketed, you cannot add or modify other ancillaries. Select Pay and close the booking to ticket. Refer to Booking for more information.
Select seats after booking or ticketing
-
 ) icon in the window header to open the graphical view.
 -
Display the graphical booking file. For traditional bookings, you can also book seats from the terminal window. Refer to Book seats from terminal view.
-
Select Seats from the Add Extras section.
-
If you are adding seats before holding or ticketing, on the Review and confirm panel, scroll down to the Upgrade the trip? section under the Fare Details and select Add extras.
-
If you are adding seats after ticketing, select the Reservation section, then scroll down on the right panel to the Upgrade this trip? section and select Add extras.
-
-
Choose seats for each segment, as described above.
-
Select Book and pay to confirm your selections. If the carrier allows, select Save changes to put the seats on hold.
Seats and any EMDs are added to the DI lines.
EMDs
EMDs![]() Electronic miscellaneous document (EMD); issued for a paid seat, ancillary, or any other paid service after successful payment. are issued for paid seats. In the graphical booking file, if you have issued tickets, instantly generated EMDs are indicated by a message in the Seats card for paid seats.
Electronic miscellaneous document (EMD); issued for a paid seat, ancillary, or any other paid service after successful payment. are issued for paid seats. In the graphical booking file, if you have issued tickets, instantly generated EMDs are indicated by a message in the Seats card for paid seats.
Some providers may issue a single EMD for all ancillaries together and the ancillaries do not have individual pricing attached.

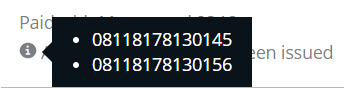
Hover over the i to display EMD numbers.
When an EMD is not generated instantly at ticketing
-
An information banner displays with the message Flight(s) successfully booked and ticketed. Your flight(s) booking will be confirmed by the airline after the EMDs have been created.
-
The message Applicable EMDs are pending displays at the bottom of the seat card.
Hover over the i to review the message that EMD processing may take up to 10 minutes and to retrieve the booking file for updates.
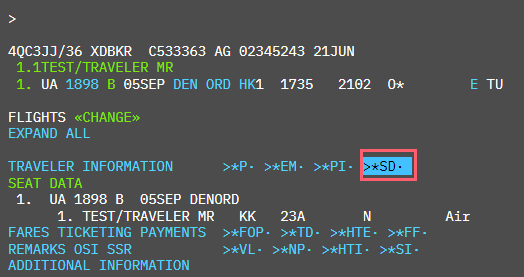
DI lines for NDC seats
Following a successful seat confirmation, agents can find their seat selections by viewing the DI Lines (NDC), viewing the Seats details on the confirmation page, or re-launching the seat map to view their selections.
Free seats example
For DI Line guidelines, please see the DI Lines - Add free seats section.
FREE TEXT #TAS01#DAS/P01/S01/SEAT/15A/0.00FREE TEXT #TAS01#DAS/P02/S01/SEAT/15B/0.00
Paid seats example
Seat selection and cost displays for each passenger.
FREE TEXT-#TAS01#DAS/P01/S01/SEAT/30B/10.00FREE TEXT-#TAS01#DAS/P02/S01/SEAT/30A/10.00
EMD information for non-free seats displays.
FREE TEXT-#TAS01#EMD/P01/08111177711106/SEAT 30B/AUD/10.00FREE TEXT-#TAS01#EMD/P02/08111177711110/SEAT 30A/AUD/10.00
Cancel or modify seat selection
Important: Paid seats can be canceled (if allowed by the airline) using the GUI seat map. However, refunds are not provided for paid seats after ticketing.
If the carrier supports seats, for NDC and GDS bookings, modify is available from free to paid, paid to paid, and paid to free seats through the GUI seat map for held and ticketed bookings.
Paid seats can be canceled (if allowed by the airline) using the GUI seat map. However, refunds are not provided for paid seats when canceled after ticketing.
To cancel or modify seats:
-
) icon in the window header to open the graphical view.
-
Select the Reservation section, then scroll down on the right panel to the Add extras section under the itinerary information and select Seats.
-
The seat map displays with your prior seat selection. Select the segment and traveler for which you want to modify a seat.
-
Modify the seats:
-
To cancel a seat, select the X in the Seats summary card or remove the booked seat by selecting it again from the seat map.
Important: Refunds are not provided for paid seats after ticketing.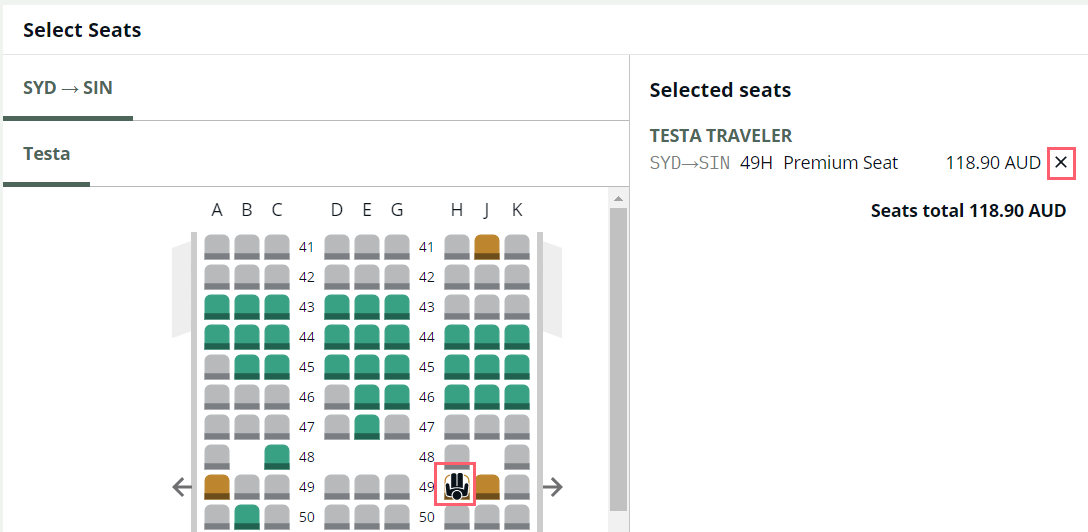
-
To change a seat, select a different seat for the selected passenger.
-
-
Select Save.
-
The Extras panel displays with the updated seat selection. Select the Review and confirm button.
-
The Fare Details section is updated with any costs associated with the selected seats. Select Book and pay.
Book seats from terminal view
Important: Only available for traditional bookings that are held or ticketed. NDC bookings and traditional bookings prior to end transact must use the graphical seat map flow.
For the best user experience, it is recommended for the agents to use the graphical flow to display and book seats or bags.
To select free seats after booking or ticketing for traditional bookings:
-
Retrieve the booking.
-
From in the interactive booking file (terminal window), do one of the following:
-
Click the flight class
-
Enter a cryptic command:
-
SA*S1 will open by default the Seat Map on the first segment
-
SA*S2 will open by default the Seat Map on the second segment
-
-
-
After selecting seats, click Save.
-
If the booking is on hold, you can issue ticket if you enter the form of payment. This will pay for the flights and confirm the free seats on the airline's side.
-
If the booking is ticketed, once the seat selections are saved successfully, the seats are confirmed by the airline.
-
The graphical booking file displays. In terminal view, you can display seat information by selecting *SD in the booking file.