EMD Manager: EMD-A
Creating EMD-A
For supported EMD-A types, the EMD Manager contains a user interface that automates the available EMDs and reason codes by location and airline. EMD Manager replaces the information found in the Airline EMD Fact Sheet.
To create an EMD-A using EMD Manager:
-
Create a PNR/Booking File with at least one flight-related Ancillary Service. Also known as Optional Services or Additional Services, flight-related Ancillary Services include seats, meals, pillows, and baggage, that have been sold from the Industry Standard Message (ISM) database.
Important! The status of the Ancillary Service must be confirmed (HD or KD status) to issue an EMD-A.
 Examples
Travelport+ (1G)

Apollo (1V)
-
Ticket the flights in the PNR/Booking File. Each EMD-A must be associated to a ticket number.
Note: As of Smartpoint 10.0, EMD Manager supports plating carrier validation for code share flights for EMD-A. (Travelport+ (1G only).More Information
As of Smartpoint 10.0, EMD Manager supports airlines that require that require plating carrier validation on the main carrier when issuing tickets and subsequent EMD-As. Currently, these carriers are Norwegian Group (D8) and LATAM Airlines (LA), but always confirm carrier requirements.
For example, if a booking Norwegian Air Shuttle (DY) is populated as the plating carrier:
-
Create a PNR/Booking File with Norwegian Group (D8) as the booking carrier.
-
Store the fare.
-
Ticket using Norwegian Air Shuttle (DY) as the plating carrier.
-
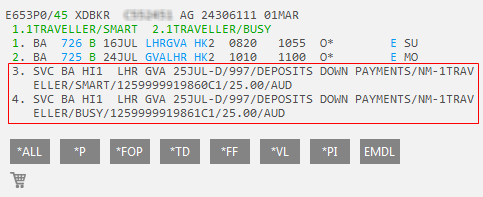
Add an ancillary segment.
-
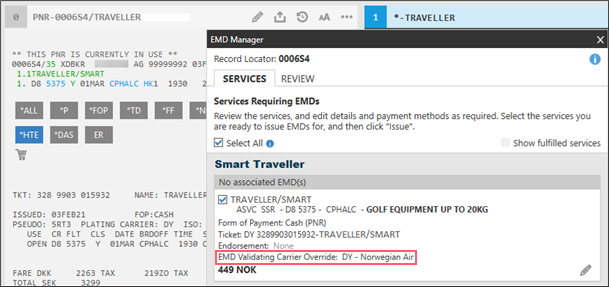
Open the EMD Manager to display DY as the plating carrier in the Service (SVC) segment with the comment: EMD Validating Carrier Override DY - Norwegian Air.
-
-
When all of the Service Segments are created for the PNR/Booking File, open the EMD Manager. You can either:
-
Press ALT+K.
-
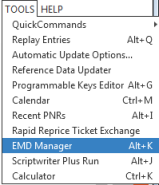
Classic Windows. From the TOOLS menu, select EMD Manager.
-
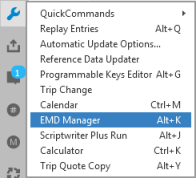
Flex Windows. Click the Tools
 icon and select EMD Manager.
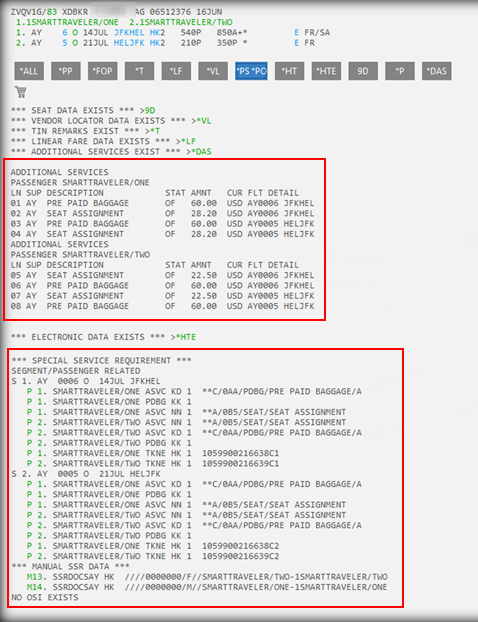
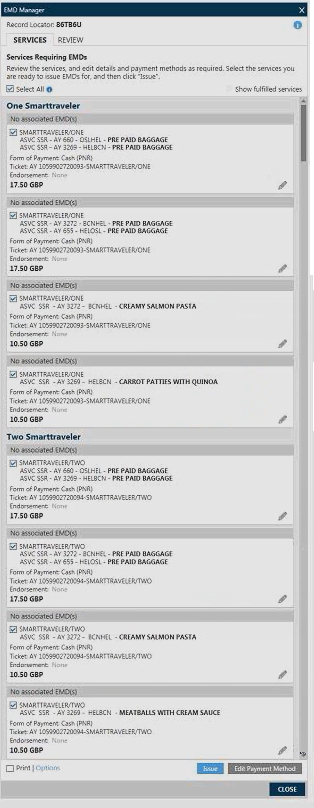
The Services tab of the EMD Manager displays any ASVC (Additional Service) SSRs that were created when Ancillary Services were added.
In the following example, services are sorted by passenger and baggage ASVC SRRs for connecting flights are sorted together.
 More Information
- To be paid by EMD, the carrier must support EMD-A for the applicable country.
- Only ASVC SSRs with a confirmed (HD or KD status) are displayed in the EMD Manager. ASVC SSRs that do not have a confirmed status are ignored by the EMD Manager.
-
Ancillary services booked for an infant passenger may result in an extra ASVC SSR that is displayed incorrectly in the EMD Manager. This error occurs because ASVC SSR descriptions that do not match the *DAS description do not display a price in the EMD Manager. A terminal format is required to issue the EMD.
Tip! If you also created Service (SVC) segments, the list displays these SVC segments to issue EMD-S. You can issue both EMD-S and EMD-A from the combined SVC/ASCV list. -
-
Optional. You can add or change ticket numbers, endorsements, commissions, the validating carrier for ASVC SSRs. Click the Edit
 icon in an ASVC SSR that you want to modify. The Additional Details window displays for the selected ASVC SSR.
 -
By default, EMDs use the form of payment for the PNR/Booking File, indicated by (PNR). However, you can override the form of payment for an ASVC SSR without changing the original form of payment for the PNR/Booking File.
Changing the form of payment
- Select one or more ASVC segments.
- Click Edit Payment Method at the bottom of the screen to display the Payment Information screen.
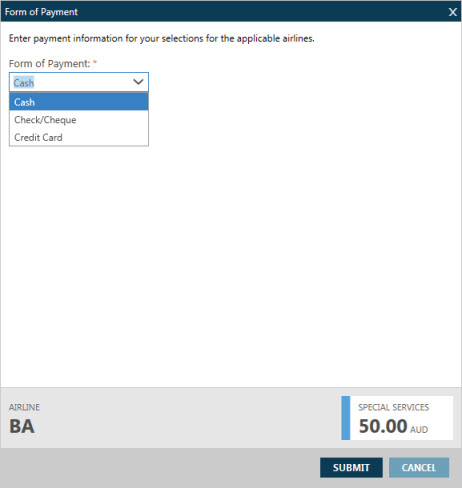
- Click the Form of Payment drop-down arrow to select the form of payment for the selected SVC segments. The available forms of payment vary by airline.
- In the Payment Information screen, complete any fields associated to the selected Form of Payment: Cash, Check, or Credit Card.
Credit Card Information
- In Name as it appears on card, enter the card holder's name as it is listed on the credit card.
- In Card Type, select from the credit card types available for the selected airline.
- In Card Number, enter the credit card number.
- In Expiration Date, Enter the expiration date for the credit card in MMYY format.
- In Security Code, enter the three- or four-digit CVV (Credit Verification Value) code, if applicable. Security codes may be required by some credit card types, airlines, countries, , or types of purchase.
Tip! If a CVV code is required for this purchase, the SUBMIT button is disabled until the Security Code field is complete.
- In Approval Code, enter an approval code from the credit card company, if it is required by the airline for ticketing. A maximum of seven alphanumeric characters can be entered for the approval code.
Note: You cannot enter both a security code and an approval code. If you enter one type of code, the other code field is disabled.
- Click SUBMIT to save the form of payment change and redisplay the Services tab.
Tip! Some airlines require an EMD-A to be issued even if there is no charge for the amount of the service. These EMD-As with an amount of 0.00 are processed the same as an EMD-As for a non-zero amount. -
After you complete all changes to any Service Segments, click Select All or select the check boxes for individual segments.
-
Optional. Select the Print check box in the lower left corner to print the selected EMDs when they are issued. If you do not already have selected print options for this itinerary, the Print Options window is displayed automatically.
More Information
Setting Print Options
To set print options:
- Click Options to display the Email and Print Options window.
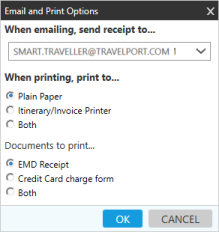
- In When printing, print to..., select your option for plain and/or itinerary/invoice printers.
- In Documents to print..., select your option for EMD receipts and/or credit card charge forms.
- Click OK to complete the printer options. Your selected print options are maintained while the EMD Manager is open. However, these options are cleared when you close the EMD Manager.
An EMD is not printed until it is issued (EMDI). The print information is stored as an email remark.
Terminal Equivalents
The following terminal modifiers are added to EMDI in the PNR/Booking File:
Printer Options:
- PP- = print to plain paper
- PI- = print to the itinerary/invoice printer
Print Document Code Selection:
- C = to print the credit card charge form
- R = to print the EMD Customer Receipt
Standalone Electronic Miscellaneous Document (EMD-S) Galileo/Apollo User Guide at AN8618 for more information about printing EMDs.
- Click Options to display the Email and Print Options window.
-
Optional. Select the Email check box in the lower left corner to automatically email the selected EMD receipt.
Tip! The Email check box is shaded and disabled if no email address is associated to the PNR/Booking File. More Information
- Click Options to display the Email and Print Options window.
- If more than one email is listed in the PNR/Booking File, you can click the When Emailing... arrow to select the email recipient.
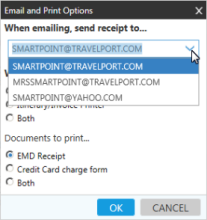
- Click OK to complete the email options. Your selected options are maintained while the EMD Manager is open. However, these options are cleared when you close the EMD Manager.
An EMD is not printed until it is issued (EMDI). The email information is stored as an email remark.
Terminal Equivalents
The following terminal modifiers are added to EMDI in the PNR/Booking File:
- PE- = email the EMD Customer Receipt
- PEnn- = email the EMD Customer Receipt with the email item number.
- Click Options to display the Email and Print Options window.
-
After you complete updates for any ASVC SSRs, select the segments for which you want to create EMDs. Or, select the Select All check box to select all ASVCs in the list.
-
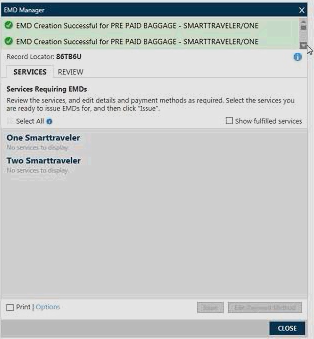
Click Issue to create EMDs for each of the selected ASVC SSRs.
Tip! It may take some time to issue a large number of EMDs. A longer waiting period does not necessarily mean that there is a problem with the EMD Manager.Confirmation messages for each EMD display at the top of the EMD Manager window. In the following example, one EMD was created.
-
By default, ASVC SSRs do not display if EMDs were issued. ASVC SSRs continue to display if EMDs were not issued for that SSR.
However, you can select Show fulfilled services to display the ASVC SSRs for which EMDs were issued. The services list is redisplayed with the status OPEN FOR USE indicated for each successfully issued EMD.

Next Steps
After an EMD is issued, you can:
- Return to the EMD Manager to:
- Issue more EMDs.
- Make changes to unissued EMDs.
- View the for history for issued EMDs.
- Void or refund issued EMDs.
- Click EMDL in the PNR/Booking File to view the EMD segments.