Matched Actions
This page provides instructions for the creation of Actions for matched PNR's. This is Step 3 of the rule creation flow.
The Actions page lets you determine what actions are taken when PNR matches the criteria defined in the Triggers of the rule. You can create one or more actions for each rule. Always remember to add a queue action to your rule. Queue action is the only mandatory action.
The functionality of this page depends on the configuration of the Triggers. If you’ve created no Trigger groups, one Trigger group, or if you created multiple Trigger groups and selected the operator And in the Match Triggers dropdown, are able to create only one set of actions.
-
If you created multiple Trigger groups and selected the operator Or in the Match Triggers dropdown, you are able to create a set of actions per each Trigger group. In this case, you see a reference to each trigger group created in the previous step, including where the if matched, stop here was selected.
-
For example, if you are creating a schedule change rule you can handle minor and major schedule change scenarios with just one rule by creating two Trigger groups: one for your minor schedule changes and one for your major schedule changes. You can set different actions to your minor and major schedule change Triggers.
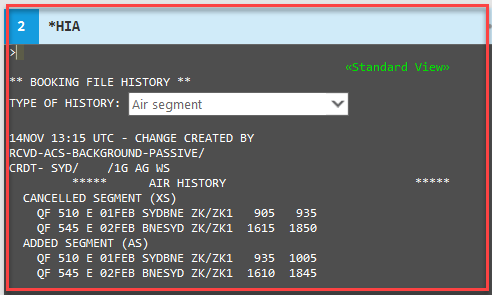
A PA Audit remark  with time and date stamp is added to the notepad remarks of the PNR when an action is successfully executed. E.g., ACCEPT CHANGE BOOKING UPDATED 18MAY 0750, MOVE FROMQ 16 TO Q45 SUCCESS 18 MAY 0752
Notes:
-
To assist with reducing errors where rules are being built with a move to queue and a remove from queue action, you do not have the functionality that allows both queue actions within a single trigger group.
-
In Travelport+/Productivity Automator a move to queue automatically removes the PNR from the source queue.
Adding one set of actions
Click the + Add Action button to display the action options. Select one or more of the following actions to perform when the trigger criteria is met.
Notes: At least one action must be a Queue action.
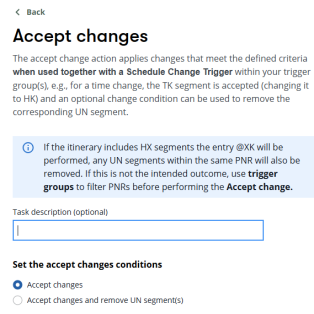
Accept Changes
This action processes schedule changes.
-
Enter a description of the activity in the Task Description (optional) text box.
-
Select one of the following options for an acceptance criteria:
-
Accept changes accepts every change for the PNR.
-
Accept changes and remove UN segment(s) accept changes and removes any canceled (UN) segments, as UN segments cannot be changed to confirmed (HK) segments and must be removed from the PNR.
-
-
Optionally, select a Copy action setting. Copy action is available both when creating a new action or editing an existing action.
-
Click Confirm to confirm your actions, or click Cancel to remove any actions and close the Add action modal.
Cryptic commands
Cryptic Commands, enabling users to apply cryptic entries as part of an automated action flow. You can update your booking using cryptic command formats. The cryptic command can be used as a follow-on from the previous entry.
Notes:
-
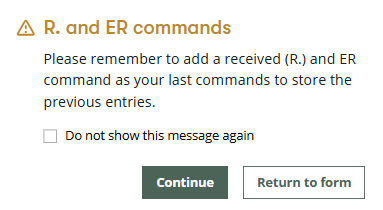
Remember to add a received (R.) and ER command as your last commands to store the previous entries.
-
Commands can be reordered using drag‑and‑drop or the arrow controls
 and removed using the trash can icon
  .
. -
Examples of Cryptic command rules are available in the Templates to utilize and reference.
Validations and restricted entries
Certain types of cryptic entries are not allowed. If an invalid entry is added, the user will be notified when navigating away from the command box and an error message will be displayed.
The following entries are not permitted:
-
Queuing actions (QEB / QR) - Use the dedicated Queue actions within the Matched Action side panel instead.
-
End/Ignore Transaction (E, ET, I, IR) - Only ER is allowed, as it redisplays the booking file to support any follow‑on configured actions.
-
Credit card form of payments - Not supported due to PCI compliance requirements.
-
Repeat entries (e.g., REALL, REALLSALL).
-
System or security related commands, including sign-on/off, change work area, emulation, and security profile commands.
To add a cryptic command:
-
Optionally, enter the Task description that explains the cryptic command function.
-
Enter the Cryptic command, e.g., F.CA12345678997754 in the associated field.
-
Join multiple entries using the + sign, e.g., NP.TEST+R.PA+ER.
-
Remember to add a Received (R.) and ER command as your last commands to store the previous entries:
-
Users can insert a Received R. and ER entry at any point in the configuration to save data before continuing.
-
However, each cryptic command configuration must end with a Received R. and ER to complete the action.
-
A reminder message will appear when the user confirms the action. This reminder can be dismissed for future use if desired.
-
-
-
Click New command to add additional commands.
-
Click the Trashcan icon
to delete an entry. -
Click the drag-and-drop icon
to move an entry.
Fares and Ticketing Actions
Auto-Ticketing
Auto-Ticketing lets you use this template to complete your ticketing details.
-
Productivity Automator reviews each filed fare separately within a PNR, and transmits MIR and Itinerary files for each filed fare as it is ticketed successfully. For filed fares that do not issue, there is no MIR and / or Itinerary produced.
-
Use the issue modifiers you want added at the time of ticketing.
-
Enter a description of the auto-ticketing activity in the Task Description (optional) field.
-
Enter the associated PCC for auto-ticketing in the ISSUE PCC field.
-
Select which document production is required using the radio buttons. Options available are:
-
No ticket - will not issue a ticket but look to transmit MIR/Itinerary files only as required.
-
Printerless - will reflect AAT settings and bypass ticket printer address requirement.
-
Printer – will issue E-ticket to printer address specified.
-
-
Enter the issue address in at least one of the following optional fields:
Note: The ticketing command uses the stand alone TKP entry (programmatically) when you configure the action to issue the ticket, MIR and itinerary. This ensures the MIR is transmitted with the ticket information and invoice number.-
Enter the address for the associated printer in the Issue Ticketing Printer Address field.
-
Enter the MIR (Machine Interface Record) address data hand-off from the Galileo System to a Back Office System in the Issue MIR Address field.
-
Optionally, select Dual MIR.
-
Enter the MIR address and PCC where you wish for the dual MIR to be transmitted.
Note: You cannot have the same PCC for both MIR transmissions. If the same PCC is required, configure it in the MIR Routing Table.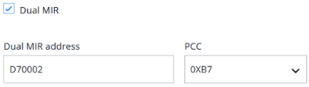
-
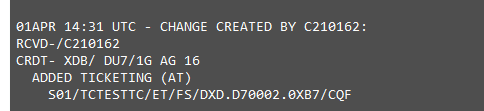
Optionally, in the PNR history, view the details of the command used:
-
-
Enter the Itinerary address in the Issue Itinerary Address field.
-
-
Optionally, in the Ticket Modifiers area:
-
Select the payment type from the Form of Payment drop-down menu.
-
Select either Amount or Percentage from the Commission drop-down menu and enter the value for commission.
-
Enter the associated tour code in the Tourcode text box to store the tour code in the filed fare before ticket issuance.
-
Select an option from the Bulk or Inclusive Tour drop-down list. This option stores an Inclusive (IT) or Bulk Tour modifier into the filed fare before ticket issuance.
-
-
Optionally, select a Copy action setting. Copy action is available both when creating a new action or editing an existing action.
-
Click Confirm to confirm your actions or click Cancel to remove any actions and close the Add action modal.
Involuntary Exchange
The Involuntary Exchange action provides flexibility to support different involuntary schedule change outcomes. An involuntary exchange applies where no additional fare collection or change fees are required.
Note: The capability to select Involuntary Exchange has been temporarily enabled for a limited subset of customers as part of an initial testing phase. Customers interested in participating are encouraged to contact their account manager to request access.
This action can optionally attempt to revalidate the existing ticket.
-
To accept the schedule change, the Accept Change action must performed prior and can be added to the same group of actions.
-
Involuntary Exchanges which require endorsement changes are not supported and must be handled manually.
-
Ancillaries and EMD's associated with previous flights must be manually updated. Use an EMD trigger to filter them out.
-
An appropriate trigger group must be configured to ensure that airlines which do not support revalidation are excluded from revalidation attempts.
To complete a ticket exchange:
-
Select Involuntary Exchange from the Fares and Ticketing group of actions.
-
Optionally, enter a Task description.
-
Optionally, select Reject if the segment status code is not HK in the Segment Status area.
Note: If a segment is not confirmed, the failure handler action(s) are executed for involuntary exchange and optional revalidation.
-
Optionally, select Process a ticket revalidation to attempt revalidating a ticket first. If unsuccessful, then a ticket exchange is performed.
-
A valid reissue PCC must be provided.
-
The exchange must be performed in the same PCC in which the original ticket was issued.
-
Select a valid Reissue PCC in the Set the involuntary exchange conditions area.
-
When an airline does not permit a ticket revalidation, this procedure processes an even exchange.
-
The exchange must occur in the same PCC which the original ticket was issued.
-
-
Click Confirm. If revalidation is not possible, the action will refile the original fare and perform a ticket reissue instead.
Involuntary Exchange Notes
As of release 2.1, involuntary exchanges that require endorsement updates or the addition of a waiver code are not supported and must be handled manually. These capabilities are planned for inclusion in a future release.
If the Ticket Revalidation action is already applied within a matched action group, the option to add an Involuntary Exchange action will be disabled, as both actions cannot exist within the same group.
Expired or invalid fares will only be removed following a successful exchange. If any errors occur during the exchange process, the original fares are preserved and the failure handler is executed.
Supported functionality
The Involuntary Exchange action currently supports the following scenarios:
-
Best buy fare pricing used to quote original fare (FQBB) when "NO REBOOK REQUIRED" with validation performed on fare basis and fare amount to ensure they match the original
-
Different passenger type codes (CHD, INF, etc.)
-
Multiple passengers
-
Multiple tickets
-
Original ticket modifier additions
-
Fares quoted by segment number
-
Previously exchanged tickets
-
Ticket status validation (USED, CKIN, etc.)
-
Bulk/Inclusive tour fares (BT / IT)
-
Partially flown tickets ** Additional testing is required due to limited test environment data
Unsupported functionality
The following scenarios are not yet supported:
-
Endorsement updates (future enhancement)
-
Waiver code additions (future enhancement)
-
Best buy fare pricing used to quote original fare (FQBB) resulting in “REBOOK REQUIRED”
-
Fares stored from a manual fare build (FB)
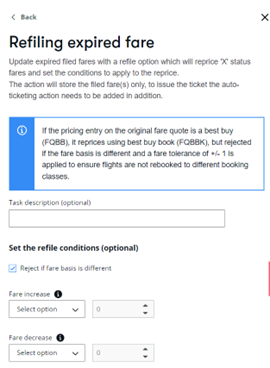
By adding Refiling expired fare action to your rule, if a filed fare has an expired filed fare (FCPI status code of X ) then the refile action will reprice according to the pricing entry stored in the filed fare.
Notes:
-
If a fare quote best buy (FQBB) and subsequently a rebook (FQBBK) had been used on the original pricing, when the reprice takes place, Productivity Automator uses FQBB and FQBBK to store the filed fare by default, regardless of the refile conditions set in the action, rejects fare basis, and the amount increase / decrease of 1 is applied. This is so that if the fare had changed on the FQBBK then this fails repricing, ‘X’ status filed fare remains in the booking, and the failure handler is executed.
-
If a filed fare has an invalid filed fare (FCPI status code of I), caused by a change to the flight segments contained in the filed fare, then the refile action will be repriced according to the pricing entry stored in the filed fare.
-
For ticketed filed fares that have an involuntary change it will become an invalid filed fare with no ticket number.
-
It is possible to refile this fare if fare conditions are still met.
-
To add Refiling expired fare action to your rule:
-
Enter a description of the action in the Task Description (optional) field.
-
Set optional refile conditions. The refile conditions by default have the reject if fare basis is different check box selected. This is optional and can be unchecked. However, if on refile the fare basis had changed, the fare is repriced regardless.
-
Optionally, select an option and value for Fare increase and/or Fare decrease. A tolerance level can be set, which compares the expired filed fare with the reprice, and if the tolerance by amount or percent and fare increases and/or decrease is not met, then the refile does not take place.
-
Optionally, select a Copy action setting. Copy action is available both when creating a new action or editing an existing action.
-
Optionally select or deselect the Copy the original ticket modifiers when the fare is refiled check box in the Set the ticket modifier conditions area. This includes the option for reapplying ticket modifiers (TMUs) such as endorsements, tour codes, commission overrides, etc. It allows users to seamlessly reapply original ticket modifiers during fare refiling, and is checked by default.
Notes:
-
Should there be an error returned from the provider system during the TMU update request to the new fare, the new fare will not be stored, and the failure handler will be applied.
-
For any existing rules with the refile action, the Set the ticket modifier conditions checkbox remains unchecked and will need to be selected manually to include this functionality in future rule executions.
-
-
Click Confirm to confirm your actions or click Cancel to remove any actions and close the Add action modal.
The Refiling Historical Fare action lets you refile a current (.H) or historical (.T) fare and set tax conditions. It will reprice using historical fares with current taxes or historical fares with taxes, and set conditions to apply the reprice. The action stores the filed fare(s) only. To issue the ticket, the auto-ticketing action must be added.
Certain fares, like ITX, allow for a historical fare quote to apply to the fare and taxes on a historical date, e.g., FQ.T11MAR23.
If the historical fare is unavailable, you have the option to refile the fare. By using the optional refile conditions, a tolerance (either by amount or percentage) can be set to ensure that the refiled fare is within the desired range.
-
Optionally, enter a description for the action in the Task description field.
-
Set the reprice conditions:
-
Current taxes (.H). E.g., FQ.TDDMMMYY
-
Historical taxes (.T). E.g., FQ.HDDMMMYY
-
-
Optionally, Set the refile conditions. If the pricing entry on the original fare quote is a best buy (FQBB), it reprices using best buy book (FQBBK), but rejected if the fare basis is different and a fare tolerance of +/- 1 is applied to ensure flights are not rebooked to different booking classes. If the historical fare is unavailable, you have the option to refile the fare. By using the optional refile conditions, a tolerance (either by amount or percentage) can be set to ensure that the refiled fare is within the desired range.
-
Optionally, select the Reject if fare basis is different check box.
-
Select a Fare Increase and/or Fare decrease option. Choose Amount or Percentage, and enter a tolerance level amount to apply to the refiled fares. If the fare amount has increased or decreased by the value specified, the refile does not take place and the failure handler is executed.
-
-
Optionally, Set the tax conditions.
-
Add one or more Tax codes using a comma to separate the values.
-
Select whether to apply the tax to the Current value or the Historical value.
-
In the Tax increase and/or Tax decrease sections, select Amount or Percentage, and enter a tolerance level amount to apply to the refiled tax. If the tax amount has increased or decreased by the amount or percentage specified, the refile does not take place and the failure handler is executed.
-
Optionally, click the New Tax
 button to add another tax condition.
-
-
Optionally, select a Copy action setting. Copy action is available both when creating a new action or editing an existing action.
-
Click Confirm to confirm your actions or click Cancel to remove any actions and close the Add action modal.
Add a ticket revalidation action to your rule to handle time and date schedule change scenarios for all tickets that have already been issued.
-
Enter a description of the action in the Task Description (optional) text box.
-
Optionally, in the Set the ticket revalidation conditions area, select the Reject if the segment status code is not HK to determine whether Productivity Automator automatically includes logic to identify if an airline has already performed a revalidation action.
-
Optionally, select a Copy action setting. Copy action is available both when creating a new action or editing an existing action.
-
Click Confirm to confirm your actions, or click Cancel to remove any actions and close the Add action modal.
Note: Prior to release 2.1, you could select Airline exclusions. However, , when an airline was excluded within the action itself, Productivity Automator would immediately progress to the next action in the group. This behaviour often limited flexibility and could result in sub optimal outcomes, particularly in scenarios where revalidation was not permitted and alternative processing, such as an exchange, was required. By removing this field, customers have greater control and visibility over airline specific logic within their trigger groups, allowing for more precise routing, better error handling, and improved end to end automation outcomes.
File Finish
The File Finish action adds remarks to the PNR (e.g., Notepad remarks).
Note: Prior to Productivity Automator release 1.17, logic prevented Productivity Automator from executing if doing so would create a duplicate notepad or historical notepad remark; such rules would instead execute the failure handler. This logic would also stop a notepad or historical remark from being entered twice by the File Finish action. With release 1.17, this logic has now been removed, allowing the File Finish action to add a notepad or historical notepad remark should the same remark already exist.
-
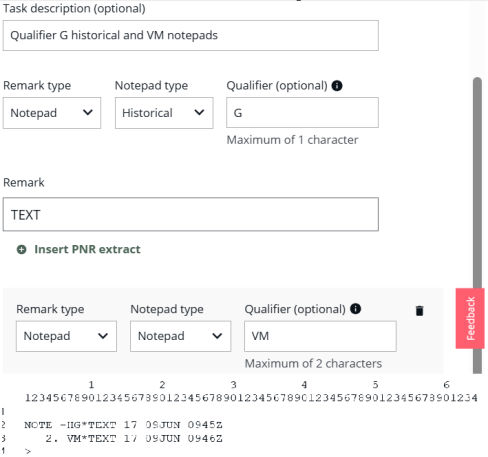
Enter a description of the finishing activity in the Task Description (optional) field.
-
Select the type of remark from the Remark Type drop-down menu. Some options provide a secondary selection option to clarify the Remark type.
-
Unassociated (70 Characters)
-
Notepad - Notepad type
-
Notepad
-
Historical
-
-
SSR (186 characters)
-
OSI (182 characters)
-
Document instruction (DI.) - Prefix
-
FT - Freeform text
-
CR - Canned remark
-
AC - Accounting
-
X - Freeform accounting (supports Travelport GlobalWare users, a travel agency management system providing full accounting and reporting)
-
-
-
Optionally, enter a Qualifier (maximum of one character) to add a notepad / historical notepad to include an optional qualifier. A qualifier is defined by the agency as a single or as a double qualifier.
-
Enter the remark text to be added to the PNR in the Remark field.
-
Optionally, click
 to insert a PNR extract.
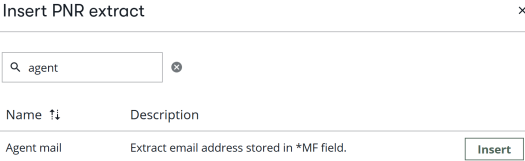
-
Search for the extract by typing the search term in the Search field, or find the extract name in the list.
-
Click the Insert button to select extracts from the booking to add to the Remark field.
-
Repeat step a and b to add additional PNR extracts to the Remark field.
-
-
Select the + New remark button
 to add any further remarks to the booking. This opens a new Remark type dropdown allowing you to repeat the process to add additional remarks.
 -
Optionally, select a Copy action setting if available. Copy action is available both when creating a new action or editing an existing action.
-
Click Confirm to confirm your actions or click Cancel to remove any actions and close the Add action modal.
NDC Actions
NDC Auto-Ticketing Action
The NDC auto-ticketing lets you use this template to complete your NDC ticketing details. The screen includes a link to a matrix of NDC airlines currently supported by this ticketing action.
-
Productivity Automator reviews each filed fare separately within a PNR, and transmits MIR and Itinerary files for each filed fare as it is ticketed successfully.
-
For filed fares that do not issue, there is no MIR and / or Itinerary produced.
Note:The following logic is applied for form of payment when issuing an NDC ticket:
-
PNR has any or no Form of payment, and cash override is selected:
-
Payment is issued as cash.
-
-
PNR has cash Form of payment – and no override:
-
Payment is issued as cash.
-
-
PNR has credit card Form of payment – and cash override is selected:
-
Payment is issued as cash.
-
-
PNR has credit card Form of payment – and no override:
-
Payment is issued as credit card.
-
-
PNR has NONREF, MISC or INVOICE Form of payment – and cash override is selected:
-
Payment is issued as cash.
-
-
PNR has NONREF, MISC or INVOICE Form of payment – and no override:
-
Payment is issued as cash. (When a booking has been held with a NONREF, MISC or INVOICE form of payment, these are not supported by NDC, and tickets will be issued as CASH.)
-
To use this action:
-
Select NDC auto-ticketing: Issue an NDC ticket.
-
Click the Supported NDC airlines link to shows a matrix of NDC airlines supported by Productivity Automator and review which airlines can be used with NDC auto-ticketing.
-
Optionally, enter text of the auto-ticketing activity in the Task description field.
-
Select a radio button for which Document production (ticket issuance) is required:
-
NDC ticket: This option will look to issue the ticket of a book and held NDC PNR.
-
No ticket (MIR and/or itinerary production only): This option sends PNR for MIR and/or Itinerary production only.
-
-
Optionally, enter the MIR and/or Itinerary address.
-
Enter the MIR (Machine Interface Record) data hand-off from the Galileo System to a Back Office System in the MIR Address field.
-
Enter the Itinerary address in the Itinerary Address field.
Note: Ticket printer address requirement is bypassed for NDC PNRs.
-
-
Optionally, select a Ticket modifier (for use with NDC ticket only) option.
-
Select the Override PNR form of payment to Cash ticket modifier option, for use with NDC ticket only, which overrides the form of payment within the held PNR to Cash.
-
When selected, if there is any other Form Of Payment (FOP) within the PNR, or no FOP within the PNR, Productivity Automator requests the NDC ticket to be issued as Cash FOP.
-
-
Click Confirm to confirm your actions or click Cancel to remove any actions and close the Add action modal.
Notes on Credit Card FOP:
-
Prior to release 2.2, the NDC auto-ticketing action supported FOP cash only.
-
With release 2.2, agents can automatically ticket an NDC PNR that was created using a credit card during the book-and-hold process.
-
Workflows can be further automated by allowing ticket issuance without manual intervention when a qualifying credit card is already stored on the booking.
-
The credit card must be stored during the initial book-and-hold flow.
-
CVV data is not captured or stored during book and hold. As a result:
-
This action is only available for airlines that do not require CVV at the time of ticketing.
-
If an airline requires CVV input during ticket issuance, auto-ticketing with credit card is not supported for that carrier.
-
-
NDC accept changes
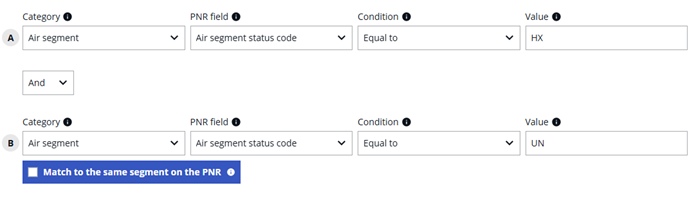
The NDC accept changes processes your NDC schedule changes. and applies changes that meet the defined criteria when used together with a Schedule Change Trigger within your trigger group(s). For example, for a time change, the TK segment is accepted (changing it to HK) and an optional change condition can be used to remove the corresponding UN segment. It then sends a confirmation to the airline to accept the changes that have been proposed by the airline and update the PNR for schedule changes.
Notes:
-
All NDC schedule changes require this action for agencies who have opted into the standardized status (TK/UN).
-
If the itinerary includes HX segments, the entry @XK is performed.
-
Any UN segments within the same PNR are removed.
-
If this is not the intended outcome, use Trigger Groups to filter PNRs before selecting Accept Changes.
-
-
As referenced in PA-4565, all schedule changes that use the new NDC normalized workflow require acceptance, reshopping, or refunding (all where applicable).
-
Reshop and Refunds must be handled manually; however, agencies can automate their acceptance using the new NDC Accept change action in Productivity Automator.
-
As with traditional air, all schedule changes must be accepted, including all small or minor changes.
-
Within the NDC actions menu, the NDC accept changes action is displayed.
-
Optionally enter a Task description.
-
When configured as part of the rule, this action sends an appropriate notification to the airline to accept the change. In the PNR:
-
TK segments are updated to HK.
-
Any UN/HX segments are removed.
-
-
-
Select Accept changes or Accept changes and remove UN segments.
-
Optionally, use the NDC Normalized PNR Schedule and Accept Change template.

Note: If this behavior is not desired for scenarios where a PNR contains both HX and UN segments, configure a Trigger Group to identify such PNRs and handle them using a separate, tailored action.
NDC cancel
The NDC Cancel action helps agencies identify and proactively cancel NDC PNRs where required, reducing the risk of an ADM being issued due to an uncancelled NDC offer. When executed, the NDC Cancel action sends a cancellation request directly to the airline to cancel the order and updates the PNR by removing the associated segments.
Notes:
-
This action is compatible with PNR's with a segment status of ZK or segments which have been standardized to show HK/TK/UN.
-
You are sending a cancellation message to the airline and are therefore confirming that you want all segments cancelled.
-
This action cancels segments on both ticketed and unticketed PNRs and does so regardless of the segment status code. For this reason, thorough testing and precise trigger criteria are essential to avoid unintended cancellations.
To create an NDC cancel action in your workflow to cancel an NDC order:
-
Select NDC cancel from the NDC actions group.
-
Optionally, enter a Task description.
-
Optionally, select a trigger group(s) to apply the Copy action to. Copying an action allows you to set up an action once and apply it to all or several trigger groups.
-
None: No trigger groups will have the NDC cancel action applied.
-
All: All trigger groups will have the NDC cancel action applied to them.
-
Set group(s): Displays a dialog to select one or more trigger groups to which you apply the copy action.
Note: It is the customer’s responsibility to ensure that appropriate trigger groups are carefully configured so that only eligible NDC PNRs reach this action. Productivity Automator cannot be held responsible for any PNRs that are cancelled in error as a result of incorrect or incomplete trigger configuration.
-
NDC PNR Sync
The NDC PNR sync action checks Queue 11 for any NDC bookings with schedule changes and performs a sync to retrieve the most up-to-date booking information.
When an airline updates an NDC booking with a schedule change or partial cancellation, this is received by Travelport and placed on Queue 11. The booking must then be synced to ensure it contains the most up-to-date information. When the sync is complete, the user must set up a Queue move action to move the booking to the desired queue and designate actions for the schedule change booking on a second rule.
Note: An NDC airline who cancels a booking in its entirety automatically syncs the Travelport PNR and the PNR is placed on Queue 23.
The sync happens automatically. Changes are automatically accepted.
-
For NDC schedule changes and partial cancellations, use Queue 11.
-
For NDC full cancellations, use Queue 23. No PNR sync is required.
-
Enter a description of the finishing activity in the Task Description (optional) field. The NDC PNR Sync Matched Action is otherwise not configurable.
-
Optionally, select a Copy action setting. Copy action is available both when creating a new action or editing an existing action.
-
Click Confirm to confirm your actions, or click Cancel to remove any actions and close the Add action modal..
Note: As part of the rule creation for NDC PNR sync, a user should configure a failure handler for any instance where the sync between the GDS and the airline fails.
-
In case of a sync failure, Productivity Automator captures the error response that is required by the helpdesk for troubleshooting why the sync failed. This can be captured within the failure handler in a “Send email” action using the FailureRemark PNR extract and will also be shown within the PNR audit page.
-
A known issue to be aware of is that, at present, we are unable to use the “File finish” action within the failure handler to document the PNR with the error response. This is due to the size of the error reaching the maximum notepad characters.
-
See Schedule Change NDC Triggers for what to do once bookings have been synced and moved to the desired queue from Queue 11 for actioning.
Identify if a PNR sync is required for NDC schedule changes
When an NDC involuntary schedule change is received by Travelport, it is received as an Order Change Notification (OCN). The PNR is placed on Queue 11 (Q/11), and the PNR’s header line includes the message “NDC CONTENT HAS CHANGED - SERVICE VIA NDC WEB PLUGIN” as illustrated in the following screen shot.
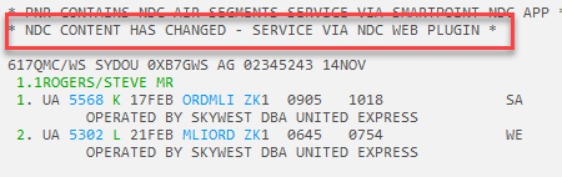
When a rule running the NDC PNR sync action on Q11 sees this and the NDC identifier banner in the PNR - NDC CONTENT HAS CHANGED - SERVICE VIA NDC WEB PLUGIN & PNR CONTAINS NDC AIR SEGMENTS-SERVICE VIA SMARTPOINT NDC APP, Productivity Automator performs the sync action and all other actions within the rule. The final queue action is to move the PNR to a success queue (unless the sync fails and it goes to the failure handler path).
-
If there are no NDC identifier banners in the PNR, Productivity Automator does not perform a sync. Instead, it adds the notepad remark NO NDC SEGMENTS EXIST - NO SYNC REQD. Other actions on the rule, if valid, execute.
-
If there is the NDC PNR identifier, PNR CONTAINS NDC AIR SEGMENTS-SERVICE VIA SMARTPOINT NDC APP in the PNR, Productivity Automator does not perform a sync. Instead, it adds the notepad remark NDC PNR SYNC NOT REQD. Other actions on the rule, if valid, execute.
Queue Actions
The Queue actions determines the next steps for the associated PNR in your queue. Selecting an action in this category is mandatory to continue to the next step. Choose to either move the PNR to a queue or remove the PNR from a queue.
This action moves the PNR to another queue within the same PCC or via a specified PCC in the action. It is automatically removed from the original queue.
Enter a description of the action in the Task Description (optional) text box.
Select a radio button for Location Details:
Don’t change PNR PCC location: The PCC as defined in the rule setup is used for the queue move action.
Specify New PCC: The entered PCC is used for the queue move action.
Enter a queue number to move the PNR when the action is triggered in the Queue Number field.
Optionally, enter a two-digit alpha or numeric queue category descriptor in the Category field. E.g., 12 or CK. This entry cannot be a combination of alphanumeric, e.g., K7.
Optionally, select a date range to prioritize PNRs by date in the Date Range drop-down menu. A queue category is required before selecting a date range. Options are D1 - D4.
Optionally, select a Copy action setting. Copy action is available both when creating a new action or editing an existing action.
Click Confirm to confirm your actions, or click Cancel to remove any actions and close the Add action modal.
Note: Move to queue action automatically removes the PNR from the original queue. Therefore, there’s no need to create Remove from queue action if Move to Queue Action is created.
This action removes the PNR from the current queue when the trigger activates.
Enter a description of the action in the Task Description (optional) text box.
Select whether you want to remove the PNR from any other queues (1-99).
Multiple values are accepted.
Use comma to separate the queue numbers.
Optionally, select Multiple queue remove to remove from multiple queues.
Optionally, select a Copy action setting. Copy action is available both when creating a new action or editing an existing action.
Click Confirm to confirm your actions, or click Cancel to remove any actions and close the Add action modal.
Note: When a Queue action (Move to queue or Remove from queue) is added to your action builder, it is always placed as the last action. The order can be amended for all other actions except for Queue.
Retention Line
The Retention Line action keeps your booking file live after your active segments have departed.
-
Enter a description of the action in the Task Description (optional) text box.
-
Select either the Text remark segment or Surface segment radio button, and enter text in the corresponding field regarding the retention line.
-
Select either the Start after today or Start after last segment date radio button to specify when the retention line is triggered to keep your booking file live.
-
Enter the number of days to keep your booking file live in the Number of days text box.
-
Optionally, select a Copy action setting. Copy action is available both when creating a new action or editing an existing action.
-
Click Confirm to confirm your actions, or click Cancel to remove any actions and close the Add action modal.
Send Email
The Send Email action lets you create an email that is sent to the agent and/or traveler when the rule is triggered. Use the button to add PNR extracts, such as agentEmail, passengerEmail, departureDate, PNR, etc. A PNR extract pulls information from the PNR to add into your email.
Notes:
-
agentEmail PNR extract pulls data from the MF field in the PNR. PassengerEmail PNR extract pulls data from the MT field in the PNR.
-
Productivity Automator also checks the Phone field in the PNR if emails are not found in the MT/MF fields.
To use the Send Email action:
-
Enter a description of the action in the Task Description (optional) text box.
-
Enter one or more email addresses in the To field.
-
Email addresses can be pulled from PNR by clicking on
button. A combination of manually entered addresses and PNR extract is accepted.-
Search for the extract by typing the search term in the Search field, or find the extract name in the list.
-
Click the Insert button to select extracts from the booking to add to the Remark field.
-
Repeat step a and b to add additional PNR extracts to the To field.
-
-
Click CC to carbon-copy an email to one or more recipients.
-
Click BCC to blind-carbon-copy an email to one or more recipient
-
-
The From field is prepopulated to use noreply@travelport.com.
-
Optionally, add a Sender display name.
-
Enter a subject line for the email in the Subject field or click
 to select from a list of available PNR extracts. Click Insert next to the PNR extract to include. Repeat as necessary.
Note: When a PNR extract includes a time format within the Send Email action, the system uses the PCC’s time format setting to determine how the time is displayed. For example, if the PCC is configured for a 12-hour format, the itinerary table in the email will reflect that format. -
Optionally, add text in the Email field.
-
Click the
 button to pull required information from PNR by adding a PNR extract. Click Insert next to the extract you wish to add. Repeat as necessary.
Note: When a PNR extract includes a time format within the Send Email action, the system uses the PCC’s time format setting to determine how the time is displayed. For example, if the PCC is configured for a 12-hour format, the itinerary table in the email will reflect that format. -
Format the text using the B to bold highlighted text, or i to italicize highlighted text.
-
Highlight text and click the hyperlink button
 to add a URL in the associated text field. Click Save to add the URL to the email.
 -
Click H1, H2, or Blockquote to format text with those styles.
-
-
Optionally, select a Copy action setting. Copy action is available both when creating a new action or editing an existing action.
-
Click Confirm to confirm your actions, or click Cancel to remove any actions and close the Add action modal.
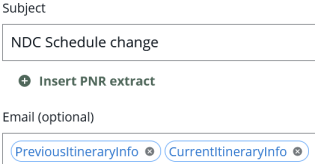
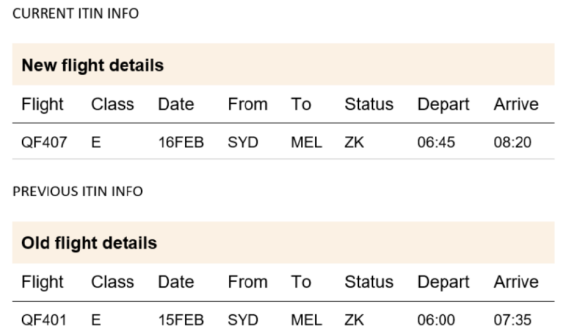
NDC users may use the combination of the extracts PreviousItineraryInfo and CurrentItineraryInfo to generate a table showing a booking's old schedule compared to its new, current schedule, similar to traditional bookings.
Send ViewTrip Itinerary
The Send ViewTrip Itinerary action sends an itinerary to your customer.
-
Enter a description of the action in the Task Description (optional) text box.
-
Optionally, select a Copy action setting. Copy action is available both when creating a new action or editing an existing action.
-
Click Confirm to confirm your actions, or click Cancel to remove any actions and close the Add action modal.
Copy Action
Each matched action has the potential to display the Copy action option, which optionally allows you to set up an action once and apply it to all or several triggers groups created. The Copy action option displays when creating a new action, or editing an existing action.
This feature allows you to take the information filled in on the current action form and copy it to either all other action groups in the rule or just specific action groups.
To display the Copy action, a rule must have multiple triggers, and have Or selected on the Triggers page so that there are corresponding action groups.
-
None - no actions will be copied to other trigger groups.
-
All - the action you just created will be copied to all trigger groups.
-
Set group(s) - select the trigger groups where the action will be copied.
Note: If you attempt to copy an action to a trigger group that already has the same action, a warning displays, "Action already exists." Select either to Return to Form to modify the action, or, Replace action(s) and change the duplicate action in the target.

Adding a set of actions per Trigger group
For each trigger group, you can add actions and use the drop-down arrow to display a reminder of the criteria selected for that trigger group. It also displays where any if matched stop here options are selected on each trigger group.
-
Copying an action allows you to set up an action once and apply it to all or several triggers groups.
-
Trigger groups can be actioned independently should only a single trigger group match. Or, there could be numerous trigger groups matching and all associated actions are being performed. Therefore, you are required at minimum to add a queue action on each action group.
-
Where rules are being built with a move to queue and a remove from queue action, you cannot add functionality that allows both queue actions within a single trigger group.
-
In Travelport+/Productivity Automator a move to queue automatically removes the PNR from the source queue.
-
Click the Add Action button to add actions to your Trigger groups.
-
At least one action in each group must be a queue action.
Matched Actions Action Card
When an action is added to a Matched action, it displays as an Action card.
-
Use the drag and drop button
in the action card to re-arrange the order in which the actions are executed. -
Conversely, you can also use the Up and Down arrows
 to move the action up or down in the action priority list. The actions take place in the order listed in the action panel.
 -
Hover over the
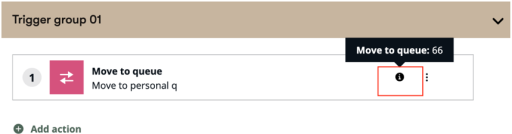
 icon to view the details of the action. E.g., queue number for queue action, Printer and MIR address for ticketing.
 -
Click the 3 vertical dots icon
 to edit or delete the action.
Validating Matched Actions
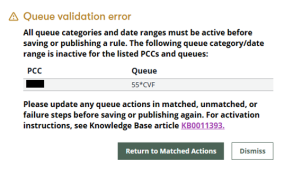
At the end of the rule creation or editing process, when you attempt to Save or Publish a rule, Productivity Automator validates all queue‑categories and associated date ranges used within the Matched Actions steps. A rule can only be saved or published when all referenced categories and date ranges are active in the specified PCC.
-
If any category is inactive or missing, the system displays a validation message Productivity Automator now validates all queue‑categories and associated date ranges used within the Action, Matched Actions, and Failure Action steps. A rule can only be saved or published when all referenced categories and date ranges are active in the specified PCC.
-
If any category is inactive or missing, the system displays a validation message when the user attempts to save or publish the rule. The notification includes a table listing the PCC, queue, category, and date ranges to help users quickly identify the issue. Users may then return to the Matched Actions and Failure Action steps to update the rule or temporarily dismiss the message while activating the category in Travelport+.
-
For convenience, the notification also includes a link to the relevant Knowledge Base article, guiding users through the process of activating queue categories and date ranges.
Click Next to display the Unmatched Actions screen.