Triggers
This page provides instructions for the creation of Triggers. This is Step 2 of the rule creation flow. This, along with Unmatched actions, are the only optional steps in the rule creation flow. If you skip this step every single PNR on the queue specified in the previous step will be processed by the rule.
The Triggers page lets you determine the criteria to trigger your rule. You can create a simple trigger with just one criteria in it, or a complex trigger group with multiple criteria. You can also create multiple Trigger groups of various complexity.
If there are multiple criteria in your trigger group you can specify if you want all criteria to match the PNR, or any of the criteria to match the PNR using the AND/OR operator.
Trigger groups execute in the order of priority. Ensure you create the most important Triggers first.
A single trigger group can be duplicated by clicking the copy button  . When two or more trigger groups exist, it is possible to rename, delete and move the trigger group in order of importance by using the icons in the trigger group header.
Note: A tooltip displays: "Remember to add your triggers and groups in order of priority. Only one operator is allowed per group and between trigger groups. Subgroups should be used to combine and and or operators."

For an in-depth training guide to building triggers, see Best Practices: Building a Viable Trigger.
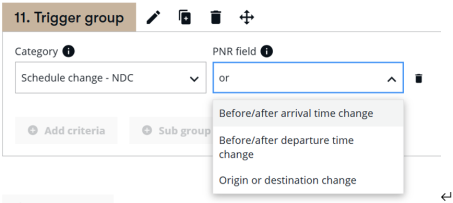
Note: Within the triggers step, you can search within the single and multi-select dropdowns by entering the search term. E.g, in the image below, "or" displays three options.
To create one or more triggers:
-
Select an option from the Category drop-down menu. The value selected here dictates the available options in the additional fields that display for you to finalize your criteria creation.
Criteria Description Create criteria related to air segment such as airline code, segment status code, departure date, flight number, etc. All air segments Create criteria that target all air segments with the same airline or segment status code. All car segments Create criteria that target all car segments with the same vendor or status type. All hotel segments Create criteria that target all hotel segments with the same hotel or status type. All segments Create criteria that target PNRs with the same segment type. Create criteria that target information in the booking file such as Customer ID, SSR Code, Notepad Remarks, etc. Create criteria related to car segment such as City Code, Vendor Code, Base Rate Amount, etc. Create criteria that target fares in the booking, e.g., Base Amount, Paper Ticket, etc. Create criteria that target different forms of payment within the PNR, e.g., Invoice Number, Type of Payment cash, etc. Has been ticketed Create criteria that target previously issued tickets details Select options such as Electronic Ticket, Ticket Number, etc. Create criteria related to hotel segment such as Property Name, Rate Amount, etc. Select the number of category to apply the criteria with a count of something. E.g., the number of passengers or number of segments. Create criteria that target passive segment, e.g., Segment status code. Create criteria that target passenger information such as Name Remark, Passenger Type Code (PTC), etc. Quality control Create criteria that quality checks your PNR. Create criteria to target schedule change scenarios, e.g., Departure Time Change, Flight Cancellation, etc. Create criteria to target schedule change scenarios, e.g., Departure Time Change, Flight Cancellation, etc., for NDC bookings.
Create criteria that target seat information, such as Row Number, Seat Code, etc. Create criteria that target segment information such as Segment Type or Segment Number. Waitlist Create a waitlist segment criteria -
Select a subset of the Category in the PNR Field drop-down list.
Depending on the Category selected, the PNR Field drop-down list displays available options for that particular Category. E.g., if you selected Form of payment category you’d have to choose from the following options: form of payment, free text remark, invoice number, type of payment, type of payment card, type of payment card (card issuer) or type of payment cash.
You can search in the field by entering a search term, like "or" to display results like "Before/after arrival time change" or "Origin or destination change." -
Select a parameter in the Condition drop-down menu that triggers the Value field based on the selections in the Category and PNR field. For example, if you selected Air Segment in Category, and Air Segment Status Code in the PNR field, you can choose Equal To, and enter HK in the Value field.
-
Enter an alpha, numeric, or alphanumeric text in the Value field. Some of the Value fields accept multi-selection, and you can choose Select all to select all the values.
-
If Time period is selected in the Operator drop-down, the Value field counts forward from the current date. For example, a value of 7 would include the week including and following the current date, and a value of 0 would target only the current date, e.g., "today."
-
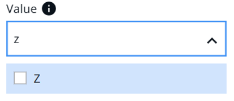
You can also enter a search term to display all matches. E,g, enter "Z" to display all terms that contain the letter "z."
-
-
Optionally click either the Add Criteria button to add an additional criteria to your Trigger group, or, click the Sub group button to add additional mixed operators in trigger logic.
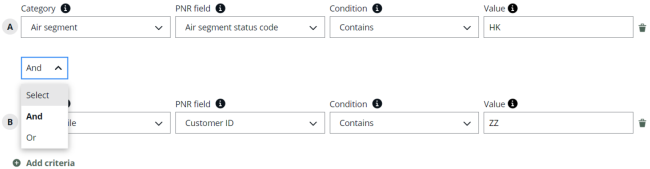
When adding multiple criteria lines, select And or Or operator between the lines.
-
Select And if all criteria lines must match before the associate action is performed.
-
Select Or if only at least one line must match.
Note: When using the "OR" condition, the "Match to the same segment" checkbox should not be displayed, as selecting between two options contradicts the requirement for both to match the same segment.
-
Only one operator can be selected for each trigger group.
-
Lines are labeled alphabetically as they are added.
Notes:
-
In the Schedule Change category, the Rerouting change trigger allows users to create a rule targeting routing changes; specifically, a scenario in which the origin and destination remain the same but any intermediary segments are changed, removed, or added. This trigger targets pending rerouting changes, not confirmed changes.
-
When adding segment categories to criteria lines, the "Match to the same segment on the PNR" checkbox displays. This allows for logic that targets the same segment on the PNR. For example, a rule could target a single segment and look to match on both the airline and the status code.
Note: If mixing the Air segment/ Schedule change with non-segment criteria, there will be an associated warning popup informing that the setup won’t work and invites you to change the order of the triggers.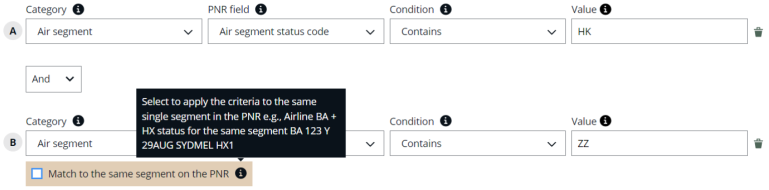
Trigger sub groups can be added to facilitate the mixing of operators.
After entering at least one criteria line in a trigger group, the option to add a sub group becomes active.
Sub groups act as a secondary level within a trigger group. Sub groups behave the same as normal trigger groups; the user will add criteria lines and select a single operator to use within the sub group.
However, the operator selected within the sub group may differ from the operator in the main trigger group.
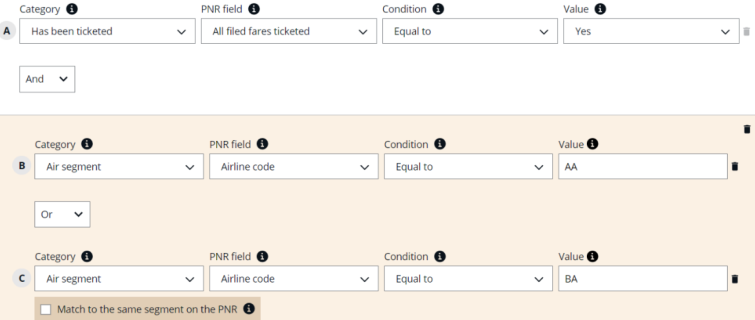
In the following example, the main group with line A links to the sub group with And, while lines B and C within the sub group are linked by Or. As per the new trigger group summary, this results in the expression A and (B or C), and Productivity Automator will now execute the associated Action 1 in one of two scenarios – when A and B are true or when A and C are true.
Overall, sub groups allow you to create trigger groups with more complex logic but must contain at least two criteria.
-
-
If at least two criteria from the same category are added to one Trigger group, the Match drop-down displays towards the top of the group box. Select And or Or.
-
And indicates that if all the criteria with the And criteria are met, the rule triggers.
-
Or indicates that one or more of the trigger criteria must be met in order for the rule to trigger.
Note: When using the "OR" condition, the "Match to the same segment" checkbox should not be displayed, as selecting between two options contradicts the requirement for both to match the same segment.
-
-
Optionally, when adding segment categories to criteria lines, the "Match to the same segment on the PNR" checkbox displays. This allows for logic that targets the same segment on the PNR. For example, a rule could target a single segment and look to match on both the airline and the status code. Where subgroups are used, for multiple criteria within a subgroup, you can either match the criteria of the subgroup to each other, or you can match the subgroup as a whole to the criteria line above it.
-
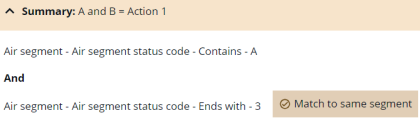
Expand the Summary section to ensure your values and selections are correct. As the trigger logic is built, the Summary section is filled in to demonstrate the logic in a single expression and show to which action the logic is associated with.
-
Optionally, click the Trigger Group button
 to create a new Trigger group. Trigger groups can contain one or more criteria. Repeat steps 1-7 if necessary.
Notes: The same operators (And, Or) are available between trigger groups with the same logic.
-
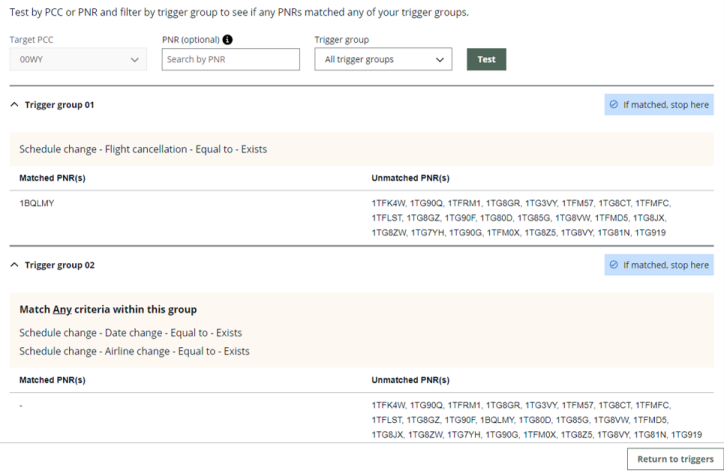
If Or is selected in the drop-down above, if matched, stop here check box displays in all but the last Trigger groups in the right bottom corner of the trigger group box. If the check box is selected for a certain trigger group and if a PNR matches the criteria in this Trigger group, Productivity Automator will not process the remaining Triggers.
-
You can check if matched, stop here on multiple Trigger groups. For example:
-
A rule has 3 Trigger groups.
-
Triggers 1 and 2 have if matched, stop here check box ticked.
-
During execution, one PNR matched Trigger group 1.
-
Since it matched, stop here was selected and the PNR matched to the criteria, the rule will not continue to check if Triggers 2 and 3 also matched.
-
-
The second PNR matched the Trigger group 2.
-
The rule checked if the PNR is a match for Trigger 1 and since it wasn’t a match, it checked Trigger 2.
-
PNR matched Trigger 2.
-
If matched, stop here was selected on that Trigger so the rule will not continue to check if Trigger 3 is a match.
-
-
-
If you wish for multiple trigger groups to match, then leave the If matched, stop here unchecked. This means that if groups 1 and 3 both match then the actions associated with both trigger groups are processed.
-
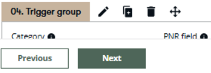
The first trigger group is named 01.Trigger group, and each subsequent trigger group will follow numerically. However, the trigger groups can be edited and renamed. Click the edit
 button next to the trigger group name to display the Rename trigger group dialog box to rename it to something more meaningful and descriptive. Up to 45 characters (including spaces) can be added.
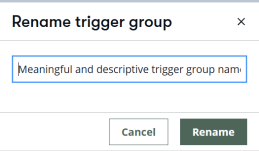
-
After NDC bookings have been synced and moved to the desired queue from Queue 11 for actioning, the user should set up a second rule to designate those actions.
The category "Schedule change - NDC ZK" is available, and works similarly to the existing "Schedule change" category. It can be used to target NDC bookings that encounter different types of schedule updates, including airline changes, arrival/departure time changes, class changes, and date changes.
Notes:
-
In version 1.29 and greater:
-
When Productivity Automator reviews the schedule change history after an NDC PNR sync following an Order Change Notification (OCN), it only reviews the most recent schedule change in the PNR, by viewing the date of the DI line and the corresponding air segment history and match that to the trigger group criteria, ignoring any previous schedule changes. This excludes the new total arrival/total departure change triggers which will look at multiple changes per segment.
-
This second rule should target that desired queue with every type of schedule change that the user wishes to account for. For example, the user could set up a different action for bookings with an Arrival/Departure time change of greater than 30 minutes, a second action for bookings with a Date change, and third action for bookings with an Arrival/Departure time change of fewer than 30 minutes.
-
-
In version 1.34 and greater:
-
New functionality supports the enhanced NDC Flight Disruption capability.
-
Travelport+ agents can receive airline schedule change updates directly within their NDC booking files.
-
Agents can then accept changes through Productivity Automator.
-
For more details or instructions on how to opt in, search for PA-4565: NDC New Flight Disruption-Schedule Change in the Advisory List in MyTravelport.
-
Productivity Automator continues to support customers who remain opted out, while delivering enhanced capabilities for those who choose to opt in.
-
In line with the communication in PA 4565, with the introduction of the new values of Air, Air NDC, Air LCC, and Air Traditional within the trigger categories Segment & All segments, customers with existing rules for Traditional Air Schedule Changes that use these triggers, may want to review their existing rules to confirm that they will not be affected by the new triggers.
-
Test Triggers
If you create 1 or more Trigger groups, you can test them before the rule goes live.
-
Click the Test Triggers button at the bottom of the Triggers page.
-
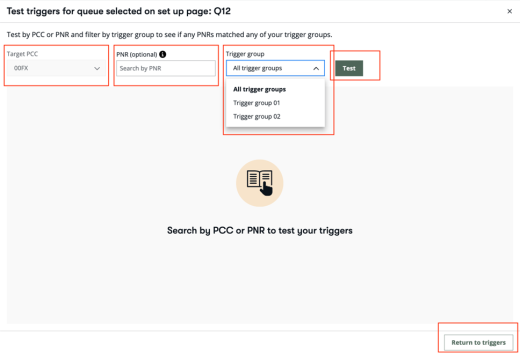
Review the Test Triggers pop-up window that displays.
-
Select options for Productivity Automator, which checks the PNRs on the queue specified on the Setup page.
-
If you configured the rule to target 1 PCC, that PCC automatically displays in the Target PCC drop-down, and the selection is grayed-out.
-
If you target multiple PCCs, you can select 1 PCC at a time from the Target PCC drop-down.
-
You can test all PNRs on the queue if you leave PNR (optional) field empty. Enter PNR in the PNR (optional) field to test a specific PNR.
-
You can test your PNRs against all the trigger groups or just one of them, depending on the selection you made in the Trigger group drop down.
-
Click the Previous or Next button to navigate to the next page of triggers, if more triggers have been created than can fit on one page. Optionally, click an arrow that navigates back to the top of the page.
-
Click the Test triggers button to display results. Matched and unmatched PNRs are listed per every Trigger group.
-
Click Return to triggersto dismiss the Test Triggers pop-up.
-
If there are no PNRs matching the criteria, a message, ‘No results found, try again' displays.
-
Click Next to display the Matched Actions screen.