Adding Expense Payables
Adding an expense payable for a vendor establishes a payable entry on your balance sheet and an expense entry on your income statement. Then you can use the Batch Checks, Batch ACHs, or Batch EFTs function to automatically print checks when the payable is due. (see Batch Checks, Batch ACHs, or Batch EFTs.) If you do not want to set up an expense payable for a vendor, you can use Write Individual Checks to write a check directly to the general ledger.
When you create an expense payable, GlobalWare creates general ledger entries based on information you provide on the Add Expense Payables screen. For more information, see Expense Payables Overview. After you create an expense payable, you can edit it. You can also clone it with new post and due dates. This enables you to, for example, enter all payables for the year for a vendor with minimal data entry. For details, see Editing or Cloning Expense Payables.
To add an expense payable:
- Set up an account ID for the vendor by using the Account ID function if you have not already done so. For details, see Adding Accounts.
-
On the Expense Payables screen, click ADD.
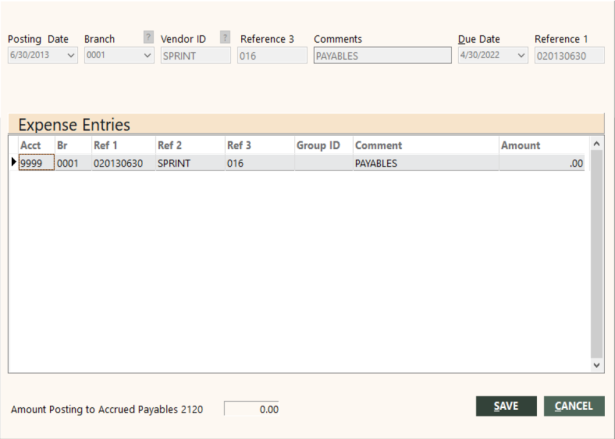
The Add Expense Payables screen appears.
 Field descriptions
The following table describes the fields on the Add Expense Payables screen.
Field Description Posting Date
General ledger posting date for the expense payable. GlobalWare uses this date to create the first reference for identifying the expense payable in the general ledger. However, you can change this reference to something else if you want. For more information, see the description of Reference 1 in this table.
Branch
Number of the branch for the expense payable.
To find and select a branch, click the lookup (
 ) button. The Find Branch screen appears. For details, see Using the Lookup Buttons and Screens.
Vendor ID
Identifier of the vendor account to which the expense payable applies. GlobalWare uses this as the second reference for identifying the expense payable in the general ledger.
To find and select a vendor account ID, click the lookup (
) button. The Find an Account ID screen appears. For details, see Using the Lookup Buttons and Screens.Reference 3
Third reference used to identify the expense payable in the general ledger. While this can be set to anything you choose, it is recommended that you use it for whatever is best for your business processes, such as account number or department number. This field is limited to 10 characters.
Comments
Comment associated with the expense payable.
Due Date
Date on which the expense payable is due.
Reference 1
First reference used to identify the expense payable in the general ledger. By default, GlobalWare sets this field to the expense payable posting date preceded with a zero (0) using the format 0YYYYMMDD. However, if you want to add more than one expense payable with the same posting date, you can change this field from GlobalWare's default setting to something that could be used as the first reference to identify the expense payable. Each expense payable must have a unique combination of references 1, 2, and 3. This field is limited to 10 characters.
-
Complete the fields as appropriate.
You must specify a unique combination of posting date (reference 1), vendor ID, and reference 3. Each expense payable in GlobalWare must have a unique combination to identify it.
-
Click OK.
The Expense Entries grid appears on the screen.
You will use this grid to enter offsets for the expense payable.
Field descriptions (for Expense Entries grid only)
The following table describes the fields in the Expense Entries grid on the Add Expense Payables screen.
Field Description Acct
Number of the general ledger account for the expense payable offset.
Br
Number of the branch for the expense payable offset.
Ref 1
First reference used to identify the expense payable in the general ledger. This is the general ledger posting date for the expense payable in the format 0YYYYMMDD. Because each expense payable must have a unique combination of references 1, 2, and 3, this reference might have an alphabetic character instead of a zero (0) preceding the date (for example, A20120630 or B20120630).
Ref 2
Second reference used to identify the expense payable in the general ledger. This is the identifier of the vendor account to which the expense payable applies.
Ref 3
Third reference used to identify the expense payable in the general ledger.
Group ID
Identifier of the group to which the expense payable is associated.
Comment
Comment associated with the expense payable offset.
Amount
Amount due for the expense payable offset. GlobalWare allows comma ( , ) or period ( . ) as the decimal character (for example, 12, 12.00, and 12,00 are valid).
Amount Posting to Accrued Payables 2120
Total amount to post to the Accrued Payables account (usually 2120). GlobalWare calculates the total and displays it as you add expense payables to the grid.
-
Edit the fields as appropriate, as follows:
- In the Acct field, specify the appropriate account number for the expense. For a list of standard expense accounts in the general ledger, see Chart of Accounts – Expense.
- In the Br field, specify the appropriate branch for the expense.
- Ref 1, Ref 2, and Ref 3 are not editable.
- The Group ID and Comment fields are optional.
- In the Amount field, specify an amount due for the expense. You cannot leave this field set to zero (0.00) or blank.
Note: GlobalWare calculates the amount posted to Accrued Payables and displays it in the lower-left area of the screen.
- To enter another offset, select the last row in the Expense Entries grid, and then press the Down Arrow key. GlobalWare adds another row.
-
When finished, click SAVE.
Note: If an expense payable already exists with the same combination of Ref 1, Ref 2, and Ref 3, a message appears, informing you that an entry for this vendor exists on this posting date with the same references. Click OK. GlobalWare cancels the addition of the expense payable and resets the Add Expense Payable screen so you can add the expense payable with a different posting date.