Write Individual Checks
The Write Individual Checks function on the Print Checks screen enables you to enter a standard check, and then print it immediately or store it in the check queue for printing at a later time. You can also record general ledger entries for standard checks without actually printing them.
In addition, you can use this function to record electronic funds transfer (EFT) and automated clearing house (ACH) checks. By default:
- EFT check numbers start with the letter E (for example, E00001234)
- ACH check numbers start with the letter A (for example, A00005678)
GlobalWare stores the letter (A or E) in the general ledger subsource field. For more information about this field, see General Ledger Transactions.
Writing Individual Checks
To write an individual check:
-
On the A/P submenu, click Print Checks. Alternatively, click the Print Checks (
 ) icon on the GlobalWare icon toolbar.
The Print Checks screen appears.
-
In the field directly under the Check Entry heading, select Write Individual Checks if the field is not already set to this selection.
The Print Checks screen changes to accommodate the Write Individual Checks function.
 Field and button descriptions
The following table describes the fields on the Write Individual Checks version of the Print Checks screen.
Field Description Post Date
Date on which the check will post to the general ledger. This date is not used if you store this check to print later.
Batch Description
Description included in the Journal Entry Register report if you print the check immediately or record it manually. For more information, see General Ledger Report / Journal Entry Register. However, the description is included in Check Queue Maintenance if you store the check in the check queue. For more information, see Check Queue Maintenance. This field automatically defaults to "Check", but you can change it.
Cash Account
Cash account to which to post the check. Only those branches to which the employee has access are available.
Check #
Number assigned to this check. GlobalWare automatically assigns the next check in the sequence. Change the starting check number if necessary. You might want to specify a different starting check number if the same checking account and stock are used for different branches. This number is not used if you store this check to print later.
Check Date
Date on which the check is written. GlobalWare automatically uses the post date (date of entry) as the default check date. The check date is printed on the check. To use a different date, change the date in this field. Both post date and check date should be within the same month. The check date is not used if you store this check to print later.
Account ID
Identifier of the account to which to write the check. To find and select an account ID, click the lookup (
 ) button. The Find an Account ID screen appears. For details, see Using the Lookup Buttons and Screens.
You can also write a one-time check to an entity that does not have a valid account ID. Type an asterisk (*) in this field followed by the entity's name (for example, *ACME SVCS). The asterisk identifies the entity as not having a valid account ID.) GlobalWare processes general ledger checks for these non-valid account IDs.
After you specify an account ID, press Enter. GlobalWare populates the Payee field automatically, activates the options under Post Check, and populates the Last Control # field with the next available journal entry control number in GlobalWare.
GlobalWare automatically selects the GL Check option under Post Check and opens the GL Entries grid when you enter any of the following types of account IDs in the Account ID field:
- Vendor account ID
- Account ID that is set up with a standard general ledger entry
- Non-valid account ID (entity name preceded with an asterisk)
For account IDs that have standard general ledger entries, GlobalWare loads the grid with the entry. Otherwise, GlobalWare automatically provides a default entry you can modify. In either case, follow the procedure under Posting a Check to a General Ledger Account below to modify grid entries.
Payee
Name of the payee to print on the check. When you press Enter after specifying an account ID in the Account ID field, this field defaults to the account ID name (or the characters that follow the asterisk [*]). You can change this field to print a different payee name on the check.
Get Comments
Indicates whether to retrieve the default check comments from the System Control function. For more information, see Comments Tab.
Standard
Indicates whether you are writing a standard check.
EFT
Indicates whether you are writing an EFT check.
ACH
Indicates whether you are writing an ACH check.
Invoice (Search)
Indicates whether to post the check to an open invoice. This option displays invoice search criteria fields and the Search Results grid. After you specify search criteria and click SEARCH, the grid lists open invoice items that match the specified search criteria. This option is available only if the account ID entered in the Account ID field is valid and for a non-vendor account that is not set up with a standard general ledger entry. (Press Enter after specifying an account ID in the Account ID field to make this option available.) For more information, see Posting a Check to an Open Invoice Item below.
To view detail for an invoice item listed in the grid, select the item and press F4. The Invoice Display screen appears. For more information, see Invoice Display Screen.
On-Account Check
Indicates whether to post the check on account. This option displays the Amount and Offset Description fields. Use this option and these fields when the invoice item you want to pay does not appear in the Search Results grid for the Invoice (Search) option. This can happen, for example, when the invoice has not interfaced yet or the item is for a refund due to the provider for commission on a plastic refund. This option is available only if the account ID entered in the Account ID field is valid and for a non-vendor account that is not set up with a standard general ledger entry. (Press Enter after specifying an account ID in the Account ID field to make this option available.)
GL Check
Indicates whether to post the check to a general ledger account. This option displays the GL Entries grid with a default entry you can modify. If you specified an account ID in the Account ID field that has a standard general ledger entry, the grid automatically lists the entry. (Press Enter after specifying an account ID in the Account ID field to make this option available.) For more information, see Posting a Check to a General Ledger Account below.
Last Control #
GlobalWare automatically populates this field with the next available journal entry control number when you enter the identifier of an account in the Account ID field.
Account Name
Name of the account specified for the general ledger entry. GlobalWare automatically populates this field when you specify a general ledger account and branch in the Acct and Branch fields in the GL Entries grid. This field is not displayed if the On-Account Check option is selected.
Amount Selected
Total amount of all items selected in the Search Results grid (only if the Invoice (Search) option is selected) or total amount of all entries selected in the GL Entries grid (only if the GL Check option is selected). This field is not displayed if the On-Account Check option is selected.
The following table describes the buttons on the Write Individual Checks version of the Print Checks screen.
Button Description PRINT CHECK
Sends the check to the printer. If you selected the Get Comments option, the Printed On Check dialog box will appear. When it appears, specify the comments and address to put on the check, and then click OK. For details, see Printing Comments and Addresses on Checks below.
STORE TO QUEUE
Stores the check in the check queue for printing at a later time. If you selected the Get Comments option, the Printed On Check dialog box will appear. When it appears, specify the comments and address to put on the check, and then click OK. For details, see Printing Comments and Addresses on Checks below.
RECORD MANUAL CHECK
Manually records the check in the general ledger without printing it.
CANCEL
Cancels the check you are writing.
- Complete the Check Entry and Check Type areas of the screen as appropriate.
-
If you entered a payee name preceded with an asterisk (*) in the Account ID field, the GL Entries grid automatically appears, listing a default general ledger entry that you need to modify. For details, see Posting a Check to a General Ledger Account below. Otherwise, select the appropriate posting option in the Post Check area of the screen, and then go to the applicable section.
- For Invoice (Search), see Posting a Check to an Open Invoice Item below.
- For On-Account Check, see Posting a Check On Account below.
- For GL Check, see Posting a Check to a General Ledger Account below.
-
When finished with the check, click one of the following buttons to perform the desired action:
- PRINT CHECK
- STORE TO QUEUE
- RECORD MANUAL CHECK
_725x293.png)
Posting a Check to an Open Invoice Item
Use the Invoice (Search) option when the payment applies to one or more open invoice items. This option displays search criteria fields and the Search Results grid.
_725x493.png)
-
Use the fields under Optional Sort Data and Date Range to specify the appropriate search criteria.
-
In the Branch field, select a branch number. The Search Results grid will display invoice items that match the branch number. Select All to display items for all branches.
To find and select a branch or location group, click the lookup (
) button. The Find Branch screen appears. For details, see Using the Lookup Buttons and Screens. - In the Invoice field, specify an invoice number. You can also specify more than one invoice number in this field by using the comma as a separator (for example, 11231,21340,21343). The Search Results grid will display invoice items that match the invoice number.
- In the From field, specify the beginning date of a range of invoice dates. The Search Results grid will display invoice items that match the specified range of dates. Use this date in conjunction with the To date to define a range. If you specify only the From date, the range includes all dates from this invoice date to the current date.
- In the To field, specify the ending date of a range of invoice dates. The Search Results grid will display invoice items that match the specified range of dates. Use this date in conjunction with the From date to define a range. If you specify only the To date, the range includes all dates before and including this invoice date.
-
-
Click SEARCH.
The Search Results grid lists the invoice items that match your search criteria.
-
Press F4 with a search result row selected to view check details. Select the Previous or Next button view check details for the previous or next check in the search results.
-
Select one or more invoice items that you want to pay. Use the Spacebar key or double-click an item to select it (or deselect it).
- You can include up to 44 invoice items on one provider check. To include multiple invoice items, select the Multiple Items per Check option on the Edit Provider screen. See Edit Provider Screen.
- Selecting an invoice item changes the Pay field.
- For cash-basis accounting, possible Pay values are Y (yes), N (no), and G (gross). If the value is Y, the check will pay the net amount (the total amount less the commission). If the value is G, the check will pay the entire amount, and you will receive a check from the provider for commission.
- For accrual accounting, possible Pay values are Y (yes, pay net) and N (no).
- Change the To Pay amount for an invoice item if the amount is different than the net or gross amount. The Pay field changes to Y when you change the amount.
- Continue with step 5 in the main procedure under Writing Individual Checks above.
Posting a Check On Account
Use the On-Account Check option when the invoice item you want to pay does not yet exist in GlobalWare (for example, the invoice has not interfaced yet, but you need to write the check today, or the item is for a refund due to the provider for commission on a plastic refund). This option displays the Amount and Offset Description fields.
_725x293.png)
- In the Amount field, specify the payment amount for the check.
- In the Offset Description field, specify a description for the offset payment. By default, GlobalWare uses the payee name.
- Continue with step 5 in the main procedure under Writing Individual Checks above.
Posting a Check to a General Ledger Account
Typically, you would use the GL Check option for impromptu payments (for example, a gift for a customer). If you do not create expense payables, use this option to pay vendors for operating expenses.
Tip: If you write expense checks often, consider using the Expense Payables function to set up expense payables. Creating an expense payable for a vendor establishes a payable on your balance sheet and an expense on your income statement. After creating an expense payable, you can use the Batch Checks, Batch ACHs, or Batch EFTs function to automatically create a check when the payable is due. For more information, see Expense Payables Overview and Using the Expense Payables Screen.
Additionally, you can use the GL Check option for settling with ARC, direct-settlement airlines, or individual providers.
The GL Check option displays the GL Entries grid with a default general ledger entry provided.
_725x513.png)
Notes:
- If a standard general ledger entry exists for this account ID, GlobalWare automatically loads it into the GL Entries grid.
- If you entered a payee name preceded with an asterisk (*) in the Account ID field, the GL Entries grid automatically appears with a default general ledger entry provided. You need to change this default entry appropriately.
To change entries in the grid:
-
In the Acct field, specify the appropriate general ledger account number from which to write the check, and then press Enter or the Tab key. If the Select GL Account dialog box appears, select the appropriate chart and branch combination from the grid, and then click SELECT. The name of the general ledger account appears in the Account Name field below the grid.
- In the Comment field, type a comment for the entry.
-
In the Ref 1, Ref 2, and Ref 3 fields, specify the appropriate reference information as needed.
For ARC or a direct settlement account, enter the period ending date in the Ref 1 field. The Ref 2 field contains the provider's account ID. For a settlement check, enter ARC or DIRECT.
- In the Group ID field, specify a group ID if applicable.
- In the Amount field, specify the amount for the check.
-
To add more general ledger entries to the grid, press Enter, or press the Tab key while in the Amount field, or press the Down Arrow key from any field. Complete the fields. You can press F10 to copy the value from the record above.
To delete a record, press Ctrl+Delete.
- Continue with step 5 in the main procedure under Writing Individual Checks above.
Printing Comments and Addresses on Checks
Whether you choose to print the check immediately or store it in the check queue for printing at a later time, you can specify comments and an address (that is different than the account ID address) to print on the check. However, you must select Ask for Comments on the User tab of the Preferences screen to do so. Otherwise, GlobalWare will print the account ID address and no comments on the check. For more information, see Preferences.
After you select the Get Comments option on the Write Individual Checks version of the Print Checks screen, and then select Invoice (Search) or On-Account Check, the Printed On Check dialog box appears when you choose to print the check immediately or store it in the check queue for printing later.
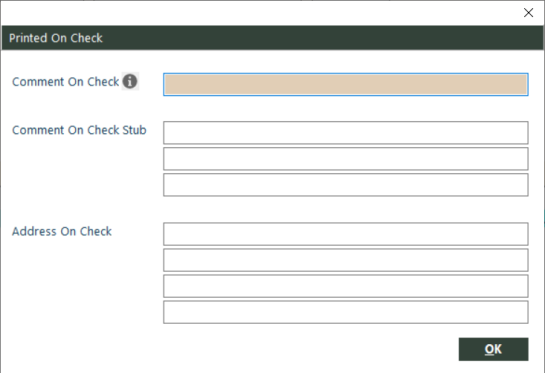
Complete the dialog box as appropriate and click OK.