Editing or Cloning Expense Payables
You can edit an expense payable only if the posting date is in an open period. However, you can reverse it on the current date. Expense payables that are partially paid or are in the check queue waiting to be printed cannot be edited. For details, see Editing Expense Payables below. You can also clone existing expense payables for future periods. Cloned expense payables must have posting dates in open periods. For details, see Cloning Expense Payables below.
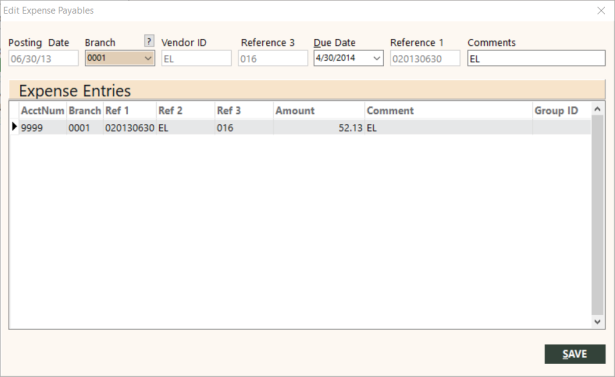
Editing Expense Payables
To edit an expense payable:
-
In the Vendor box on the Expense Payables screen, select the vendor for which you want to edit an expense payable.
The Details grid lists expense payables associated with the vendor.
-
Select the expense payable to edit.
Note: Expense payables highlighted in green are partially paid or have checks waiting in the check queue to be printed. You cannot edit them.
-
Click EDIT.
The Edit Expense Payables screen appears.
The fields in the top area of the screen apply to the expense payable. The grid lists the offsets for the expense payable.
 Field descriptions
The following table describes the fields on the Edit Expense Payables screen.
Field Description Posting Date
General ledger posting date for the expense payable. GlobalWare uses this date to create the first reference for identifying the expense payable in the general ledger. (See the description of Reference 1 below.)
Branch
Number of the branch for the expense payable.
To find and select a branch, click the lookup (
 ) button. The Find Branch screen appears. For details, see Using the Lookup Buttons and Screens.
Vendor ID
Identifier of the vendor account to which the expense payable applies. GlobalWare uses this as the second reference for identifying the expense payable in the general ledger.
Reference 3
Third reference used to identify the expense payable in the general ledger.
Due Date
Date on which the expense payable is due.
Reference 1
First reference used to identify the expense payable in the general ledger. GlobalWare's default setting for this field is the expense payable posting date preceded with a zero (0) using the format 0YYYYMMDD. Because each expense payable must have a unique combination of references 1, 2, and 3, this reference might have an alphabetic character instead of a zero (0) preceding the date (for example, A20120630 or B20120630) if it was cloned and you chose not to change the posting date on which it was cloned. This reference could also be set to something else if you changed it from GlobalWare's default setting at the time you added the expense payable.
Comments
Comment associated with the expense payable.
AcctNum
Number of the general ledger account for the expense payable offset.
Branch (in grid)
Number of the branch for the expense payable offset.
Ref 1
First reference used to identify the expense payable in the general ledger. GlobalWare's default setting for this field is the expense payable posting date preceded with a zero (0) using the format 0YYYYMMDD. Because each expense payable must have a unique combination of references 1, 2, and 3, this reference might have an alphabetic character instead of a zero (0) preceding the date (for example, A20120630 or B20120630) if it was cloned and you chose not to change the posting date on which it was cloned. This reference could also be set to something else if you changed it from GlobalWare's default setting at the time you added the expense payable.
Ref 2
Second reference used to identify the expense payable in the general ledger. This is the identifier of the vendor account to which the expense payable applies.
Ref 3
Third reference used to identify the expense payable in the general ledger.
Amount
Amount due for the expense payable offset. GlobalWare allows comma ( , ) or period ( . ) as the decimal character (for example, 12, 12.00, and 12,00 are valid).
Comment
Comment associated with the expense payable offset.
Group ID
Identifier of the group to which the expense payable is associated.
-
Complete the fields as appropriate, as follows:
- Use the fields in the top area of the screen to change the expense payable. You can edit the Branch, Due Date, and Comments fields.
- Use the fields in the grid to change an offset for the expense payable. You can edit any field except Ref 1, Ref 2, and Ref 3.
-
When finished, click SAVE.
GlobalWare updates the affected general ledger entries and also updates the offsets in the Accrued Payables account (specified in the Accrued Payables field on the System tab of the System Control screen; usually 2120).
Note: If the posting date is in a closed period, a message appears, informing you that you cannot edit an expense payable in a closed period. It also asks whether you want to reverse it on the current date. To reverse the general ledger entries and close the original and reversing payable transactions, click OK. Otherwise, click Cancel.
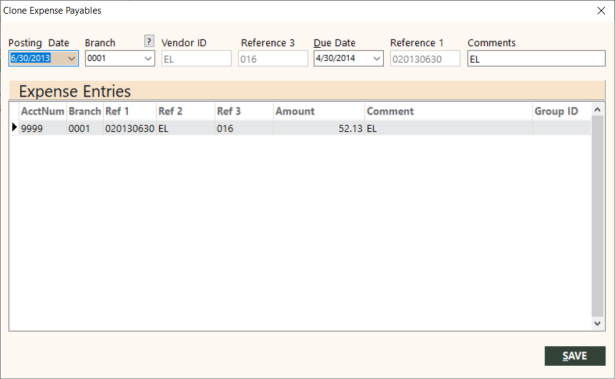
Cloning Expense Payables
To clone an expense payable:
-
In the Vendor box on the Expense Payables screen, select the vendor for which you want to clone an expense payable.
The Details grid lists expense payables associated with the vendor.
-
Select the expense payable to clone.
Note: Expense payables highlighted in green are partially paid or have checks waiting in the check queue to be printed. You cannot clone them.
-
Click CLONE.
The Clone Expense Payables screen appears.
The fields in the top area of the screen apply to the expense payable. The grid lists the offsets for the expense payable. For descriptions of fields on this screen, see Editing Expense Payables above.
-
Complete the fields as appropriate, as follows:
-
Use the fields in the top area of the screen to change the expense payable. You can edit the Posting Date, Branch, Due Date, and Comments fields. If you change the posting date, specify a date in an open period.
- You cannot edit fields in the grid. To edit an expense payable offset, use the Edit Expense Payables screen. See Editing Expense Payables above.
-
-
When finished, click SAVE.
Notes:
- If the posting date is in a closed period, a message appears, informing you that you cannot clone an expense payable if the posting date is in a closed period. It asks whether you want to change the posting date. To change it, click OK. Otherwise, click Cancel.
- If an expense payable already exists with the same combination of Ref 1, Ref 2, and Ref 3, a message appears, informing you that an entry for this vendor exists on this posting date with the same references. It asks whether you want to add another one. To add another one, click OK. (GlobalWare adds the expense payable, but changes the zero [0] that precedes the posting date in reference 1 to A. For example, A20120630. GlobalWare can increment the letter for more expense payables. For example, B20120630, C20120630, and so forth.) Otherwise, click Cancel.