Printer Connections
The Printer Connections option within the Travelport Administrative Portal is used by administrators to set up printer connections at the agent and branch level.
Notes:
-
Printer connections used by terminal emulation are set up in the terminal.
-
Travelport RESTful/JSON API Microservices (Trip Services) hybrid users should not assign a ticketing GTID. Users can set an itinerary and/or MIR GTID. If unsure about your setup, contact your Travelport Representative.
Guidelines
-
Printer connections must be set up to issue tickets through the Universal Record.
-
Only one printer of each type may be configured for each profile entity for Galileo and Apollo. For Worldspan, each device type/document type combination must be unique for each profile entity.
-
As a best practice, set up printer linkage at the work area branch level so that all agents can use the same printers. Only establish linkage at the agent level for the few people for whom an exception is needed. If you need to define a separate printer connection for a particular user, see Individual Printer Settings.
-
If connections exist at multiple levels, the printer connection at the lowest level is used. Therefore, if an agent has a printer connection, the agent's printer will be used even though a branch printer connection exists.
-
Be aware that printer linkages apply to the agent’s default work area branch and that the linkage for the agent's default branch does not apply to any other branches into which the agent emulates.
-
If an agent emulates into a work area branch that has a printer linkage, then the agent can print to the emulated work area branch’s printer because the entire work area branch has access to it.
-
If an agent emulates into a work area branch that does not have a printer linkage, then the agent cannot print to his/her default work area branch printer, unless that printer exists in the emulated work area branch's pseudo city code.
-
If an agent has an individual printer linkage and emulates into a work area branch, then the agent's individual printer linkage takes precedence. However, the agent can only print to his/her individual printer if the printer linkage exists in the emulated work area branch's pseudo city code.
Access Printer Connections
Printer connects can be accessed through the Travelport Admin Portal in two ways:
-
Through the profile settings
-
From the Profile menu, select Open Profile.
-
Open the profile for which you want to modify printer connections.
-
Click the Details tab.
-
Expand the Printer Connections area on the left, then click the manage printer connections link.
-
Through the printer connections (described below)
Manage Printer Connections
To manage printer connections at a hierarchy level using the Travelport Administrative Portal:
-
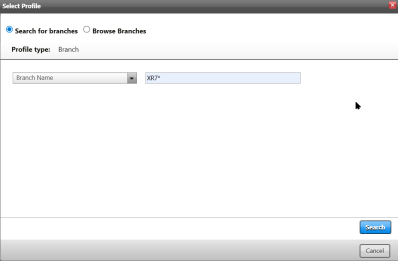
Change context to the correct PCC.
-
Select the Search for branches radio button, ensure Branch Name displays in the left drop-down field, enter the PCC with an asterisk (*), and click Search.
-
Select the correct option from the display.
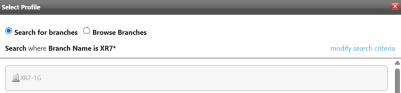
The bottom of the screen now displays the correct PCC.

-
Open printer connections by clicking the Agency Configuration menu then selecting Printer Connections.
-
One printer of each type (Ticket, Itinerary, MIR) can be assigned to a profile.
-
If both the work area branch and an individual agent are assigned printers, Universal Desktop searches for printers from the agent profile upwards and uses the first connection found. If an agent needs to print while emulating into a branch, the system uses the agent's assigned printer if one exists. If the agent is not assigned a printer, the system determines if the branch that the agent is emulating has a printer assigned to it. If so, that printer is used. If not, the system crawls up the profile hierarchy of the emulated branch until a printer is found.
-
Select a profile to which the printer will be assigned by clicking the Select Profile link on the Printer Connections tab. You can search by name (e.g., WAB-E9G) or browse the profile hierarchy to find the profile. For more information on searching for profiles, see Open Profile.
-
The ability to search by work area branch name or any search criteria depends on the template search option being set.
-
When browsing, click the name to move down the hierarchy. To select, click the shaded profile area, then click Set to select.
-
Click add new connection link.
-
Select a provider.
-
Select the Device type.
-
If the selected provider is Worldspan, select the Document Type.
-
In the Device ID field, enter the GTID of the device, which is 6 alphanumeric characters.
Note: If Worldspan is chosen as the provider and the Device Type = Ticketing, the same Device ID can be specified for all coupons.
-
Click Save.
Notes:
-
There is no validation on the Device ID value entered. It is an administrator’s responsibility to enter the correct value. If an improper device ID is entered and the profile entity attempts to use the device, it will be rejected.
-
A new customer will receive their configuration details from their Travelport Sales representative.
-
Edit and Delete symbols appear next to each device to allow for future amendments.
Individual Printer Settings
Only define printer settings for an individual if that individual uses a printer that is not the one defined for his or her work area branch. Printer configurations for an individual agent can only point to one GDS. The agent’s printer must be present in each branch emulated in order for linkage to work.
-
Open the agent's profile for which you want to define a printer connection (select the Profiles menu, then Open Profile).
-
Search or browse for the agent's profile. If you are browsing the hierarchy for an agent, ensure that Show travelers or agents in the hierarchy option is selected.
-
Open the agent's profile.
-
Click the Details tab.
-
Click the arrow next to Printer Connections in the left column. Assign a printer connection to agents who use a different device than the one specified for the WAB. If the agent uses the device specified for the WAB, then a printer connection should not be defined.
-
Click the manage printer connections link.
-
To assign a device, click the add new connection link. A dialog box opens to create a printer connection.
-
Select the Device type from the drop-down menu, then type in the Device ID and click Save.
Note: Similar to Terminal connections, printer connections may be set for an entire WAB using the Agency Configuration menu option in Travelport Admin Portal. Should individual agents print to different printers in the office, then the assignment must be done when creating or modifying the user profile, as defined in the steps above.