Create Agent Profile
Agent profiles should be created for each user. The profile controls all of the user’s settings. Everything that an agent can do and see within Universal Desktop is assigned through this profile. Data files are no longer stored locally.
Travelport creates a customer’s Administrator user profile. Administrators are then responsible for creating their own users' profiles.
An agent profile contains the following information:
-
General information, such as the agent's email address and phone number
-
Association to a hierarchy
-
Agent preferences
-
Role assignments, which control what the agent can do and see in Universal Desktop and Universal API
-
Terminal connections, which allow agents access to the Host Terminal window
Note: Each use that requires access to terminal emulation must be assigned a terminal address (TA) in the Travelport Admin Portal. -
Printer connections, which must be assigned to agents who use a different device than the one specified for the WAB
-
Branch assignments, which control the branches to which an agent has access
Note: Each agent must have a default work area branch assignment. If no default is assigned, the agent must change context every time he or she logs into Universal Desktop.
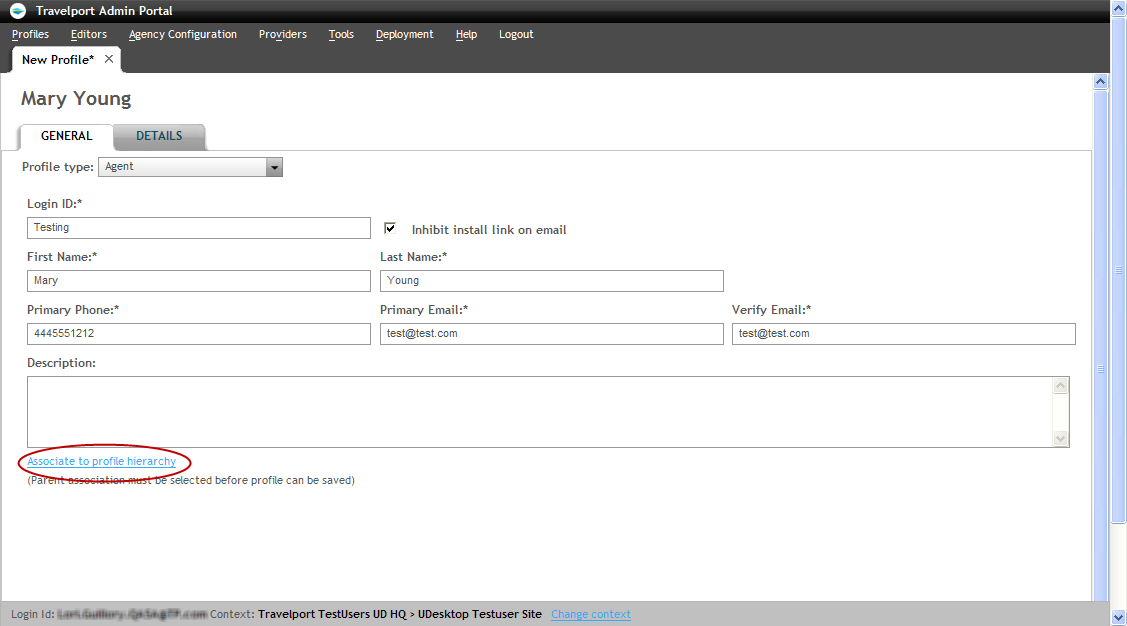
Enter General Information
To create an agent profile,
-
Select the Profiles menu, then select New Profile.
-
Select Agent as the profile type.
-
Complete the General tab details.
-
Login ID must be unique throughout the entire system. The recommendation is the user’s email address. Optionally, the pseudo city code can be added to ensure a unique identity. Once created, the login ID may not be changed. A new profile would need to be created.
-
Enter the agent's name as they would like it to appear in the Trip Record. The agent's name populates to the Branch phone field when the agent makes a reservation.
-
The email address must be valid, as agent profile details and password are sent to this address.
-
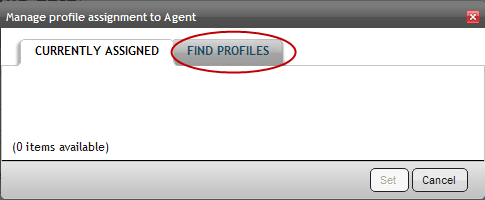
Click the Associate to profile hierarchy link to choose the hierarchy to which to associate this agent.
-
Click Find Profiles to display the agency hierarchy.
-
Find the required Branch Group by searching for the profile or browsing the hierarchy.
Note: An agent profile should not be associated directly to the work area branch in which the agent will work; rather, the agent should be assigned to the Parent of the work area branch. -
To search for a profile, select the profile type (e.g., Branch Group), select the search criteria (e.g., Name), then enter the search value. An asterisk can be used as a wildcard at the end of the search value.
-
Click the assign link next to the branch group to which you are assigning the agent. Then, click Set.
Note: If you try to assign an agent profile to the work area branch, the following error is returned: Parent of Agent can be an agency or branch group. If this error occurs, navigate up at least one level of the hierarchy using the breadcrumb trail and assign the agent at a higher level. -
Click the Save button. At this point Universal Desktop interfaces with Zircon to create the new agent profile and updates the user list on ProvisionIT. A warning banner displays indicating that this process can take up to 2-3 minutes. If the link with Zircon fails or the login ID already exists, Universal Desktop returns an error and does not allow the user to continue with the agent profile creation. For more information, see Ask Travelport 28088 – What are the steps to create agent profile.
-
Once Zircon successfully creates the agent profile, two email notifications are sent directly to the email address specified. One email contains the agent login information and the installation URL, unless the Inhibit option was checked. The other email contains the user's password.
-
Click the Details tab. This tab shows the folders of available settings on the left and this profile’s inherited data from parent profiles on the right.
-
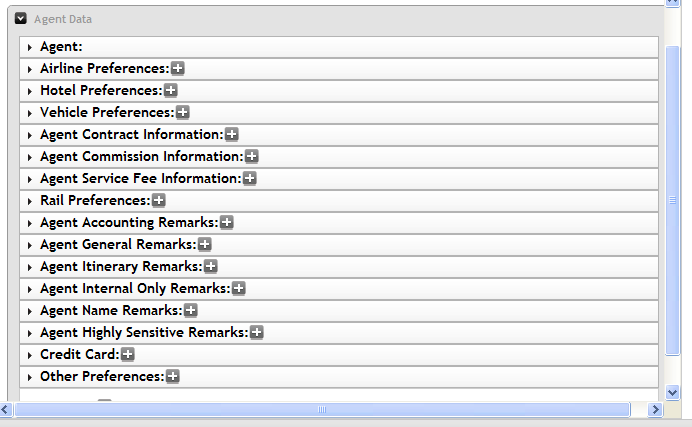
Expand the Agent Data section to modify the agent's preferences.
-
Agent - Branch Emulation role allows agents to emulate into their own Work Area Branch (WAB) only.
Important: There is currently no default emulation permission within the Agent role; therefore, ensure the Agent – Branch Emulation role is assigned to agents. -
Agent - Bridge Branch Emulation role allows agents to emulate to their own office WAB in addition to other WABs in their agency. All WABs the agent is permitted to work in must be also assigned.
-
Agent - Agency Emulation role allows agents to emulate from the Zircon-provisioned control branch to any WAB in the entire Agency hierarchy.
-
Click the Set button when all roles have been assigned.
-
Click the arrow next to Terminal Connections in the left column. A TA, or terminal address (formerly GTID), must be assigned to agents if they are to have access to the Host Terminal window. Assign the terminal connections from those available. The first one is the default for the hierarchy.

Associate to a Hierarchy
Note: It is important to consider what the agent profile will be used for and by whom before managing its profile assignments. Agent profiles are assigned to a level of hierarchy above the contract site that holds the HAP and master GTID; they can be assigned to an Agency or a Branch Group.
Complete Details
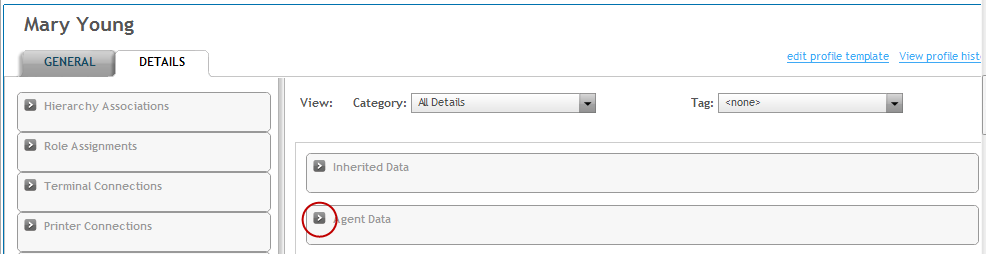
When the Agent Data section is expanded, you can set preferences for a full range of options.
Agent Role Notes
When creating an Agent’s profile, one of the following three levels of emulation must be assigned as a minimum requirement:
The minimum emulation role is Branch Emulation. If this is not assigned, agents cannot access their assigned/default WAB (covered in the next step) .
Additional roles may need to be added depending on the customer needs. For example, the role designed for UD Branch Admin has the permission for Bridge Branch emulation built in; however, if they need to emulate into all of the offices within their Agency hierarchy, they need to have the Agency emulation role assigned. UD Agency Admin roles are inclusive of emulation permissions.
Agency Administrator Role Notes
The UD Agency Admin role
includes permission for agency emulation and account and traveler profile
view and edit. Travelport and Support roles and permissions are defined separately by Travelport.
Manage Terminal Connections
Note: Terminal connections can also be accessed from the Travelport Admin Portal main menu, where connections may be set for multiple users.
-
Click the arrow next to Printer Connections in the left column. Assign a printer connection to agents who use a different device than the one specified for the WAB. If the agent uses the device specified for the WAB (in the Agency Configuration), then a printer connection should not be defined.
-
To assign the agent a printer different than the one used by the WAB, click the manage printer connections link.
-
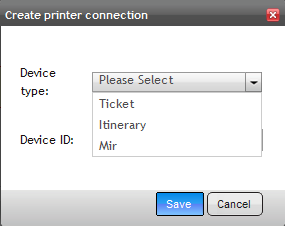
To assign a device, click the add new connection link. A dialog box opens to create a printer connection.
-
Select the Device type from the drop-down menu, then type in the Device ID and click Save.
Note: Similar to Terminal connections, printer connections may be set for an entire WAB using the Agency Configuration menu option in both Travelport Admin Portal and Universal Desktop. Should individual agents print to different printers in the office, then the assignment must be done when creating the user profile, as defined in the steps above. -
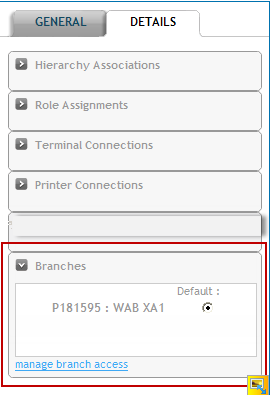
Click the arrow next to Branches in the left column to assign a default work area branch.
-
Click the manage branch access link.
-
Select the Find Profiles tab, then search for or browse to each required WAB.
-
Click assign for each work area branch (WAB) to which the agent needs access.
-
Agent (working in one branch only) - A default WAB should be assigned; if no default WAB is assigned, users must change context every time they log in to Universal Desktop.
-
Agent (working in multiple branches) - In addition to a default WAB, agents working in multiple branches also need to be assigned to any other WABs in which they are permitted to work. These agents should have a role assignment of Agent - Bridge Branch Emulation. This role is integral to the UD Branch Admin role.
-
Agent (working in all branches) - If the user is permitted emulation into any office within their agency’s hierarchy, then only their default Work Area Branch need be assigned in this step. These users should have a role assignment of Agent – Agency Emulation.
-
Agency Administrators - Do not need emulation rights, as they have emulation rights across the organization at all levels as part of the UD Agent Admin role. They should not have a default work area branch.
-
-
When all branches have been assigned, click the Set button.
-
If a user is assigned to multiple branches, select the radio button next to the WAB that is the user's default.
- When all agent preferences and settings have been specified, click the Save button.
Manage Printer Connections
Add a Default Work Area Branch
Note: If more than one work area branch is assigned to a user, then the Agency Administrator must choose one work area branch to be the agent's default. If only one work area branch is assigned to a user, then that branch is the default.