Terminal Connections
This topic describes how to search for terminal connections and how to set up terminal emulation. To add a terminal connection to a particular agent, see Set an Individual's Terminal Connection. To manage the assignment of connection IDs for your branch to the agents working in that branch, see Manage Assignment of Connections.
The option for the number of terminal addresses available is selected during provisioning. The allocation of terminal addresses is generally set up during the creation of the agent profiles.
-
From Travelport Admin Portal, go to the Agency Configuration menu, then select Terminal Connections.
-
To view a list of all agents currently created and whether they have been assigned terminal addresses, click the Select a profile link on the Terminal Connections page.
Terminal addresses may only be searched by Agency or Branch Group. To view terminal addresses assigned to a specific work area branch, you must search for the Branch Group. You can search by name or browse the hierarchy:
-
Ensure that the Search for profiles option is selected. Select the search criteria from the drop-down menu, then enter a search value.
Note: The asterisk character (*) can be used as a wildcard at the end of a search value. For example, searching for Branch Groups by Name of Travel* returns all branch groups with names beginning in Travel. Results might include Travelport Training and Travellers Pro, but would not include ABC Travel. -
Alternatively, browse the profile hierarchy to find the required Branch Group that holds the work area branch. When browsing, click the name to move down the hierarchy, then click shaded profile area to select it, and then click Open.
Note: The ability to search by Branch Group using the name option depends on the search option being set in the template.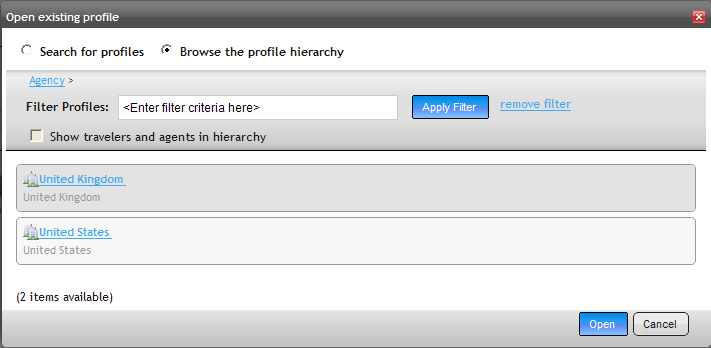
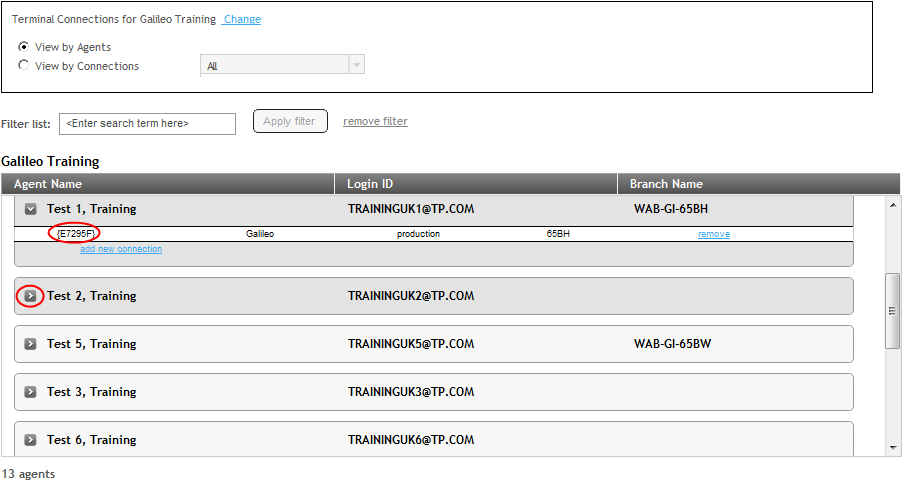
View by Agents
When a profile is selected, the Terminal Connections page displays agent connections by default. The "View by Agents" option displays all current user logins.
-
To view the terminal address assigned to a user, click the arrow beside the user login.
-
To change a terminal address assignment, click the remove link or add new connection link.
More than one terminal address can be assigned to an individual agent. Both GTIDs display as tab options at the top of the Terminal emulation screen.
View by Connections
To change the view to see all terminal addresses assigned to the work area branch, click the View by Connections option button. All the terminal addresses are displayed, irrespective of whether they are assigned to an agent or not.
-
To view only assigned or only unassigned terminal addresses, change the request in the drop-down menu at the top of the list.
-
To unassign a terminal address, click the unassign link in the SID / PCC column.
-
To assign a terminal address from this window, click the blue assign link. A dialog is displayed with all the created agents shown; highlight the agent from the list and click Set.
Notes:
-
Terminal addresses (GTIDs) are created during the provisioning process.
-
If a terminal address has been assigned to an Agency Admin profile, this terminal address currently does not appear in the Travelport Admin Portal, but the terminal address will work when the terminal emulation window is accessed in Universal Desktop.
Set an Individual's Terminal Connection
Edit an agent's profile to define a terminal connection for only that agent.
-
Open the agent's profile for which you want to define a terminal connection (select the Profiles menu, then Open Profile).
-
Search or browse for the agent's profile. If you are browsing the hierarchy for an agent, ensure that Show travelers or agents in the hierarchy option is selected.
-
Open the agent's profile.
-
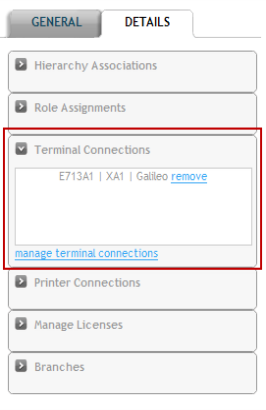
Click the Details tab.
-
Click the arrow next to Terminal Connections in the left column. A terminal addresses, or terminal address (formerly GTID), must be assigned to agents if they are to have access to the Host Terminal window.
-
Click the manage terminal connections link to search for available terminal addresses to assign to the user.
-
Select an available terminal address from the list and click Save.
Terminal Emulation Set-up
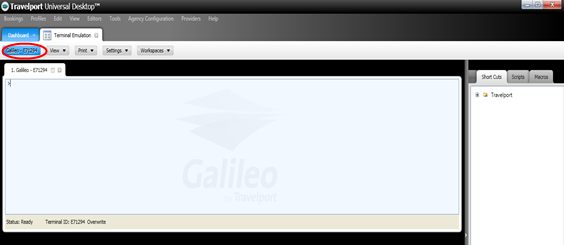
Once a terminal address has been assigned to an agent, the agent must login to Universal Desktop to access the Terminal window either via the View > Terminal menu or by typing Ctrl+T.
To open the Galileo Terminal window, click on the Galileo button which displays the terminal address assigned to the user. If a customer has Apollo and Galileo terminal addresses provisioned, two buttons display. If more than one terminal address is provisioned for a GDS, an arrow displays to the right of the button. Click the Galileo button at the top of the screen to open the window for terminal address.
Multiple terminal windows can be opened by repeatedly clicking the button. These windows are the all the same session and do not work separately. Up to 10 windows can be opened by using the View/Tab view option. Up to 4 windows can be opened in grid view.
Manage Assignment of Connections
Users with the permission to manage terminal connections at the branch level can manage the assignment of connection IDs for their branch to the agents working in that branch. In other words, they can have a default branch of the same branch.
During the provisioning process, an agency that has existing GTIDS/DAs/Terminal Connection IDs from Focal Point, Galileo Desktop, or other Travelport products can request that these IDs to be cloned. Cloning a terminal connection ID allows the cloned ID to retain attributes such as printer connections. All Portal Terminal Connection screens will display the original terminal connection ID and the cloned connection ID.
Terminal Connections Menu Option
When you select Terminal Connections from the Agency Configuration menu, you see one of two possible screens.
- If you have either the role of View Terminal Connections or Manage Terminal Connections at Agency level, then All Terminal Connections for the Agency screen is displayed. This screen has a list of all SID/PCC for the agency and the host type.
- If you have View Terminal Connections or Manage Terminal Connections at Branch level, the system bypasses the screen referenced in the prior bullet, and displays Assigned and Unassigned Terminal Connections for a specific SID/PCC [Portal], which is a list of all terminal connections for the branch they are emulated to.
Assigned and Unassigned Terminal Connections for a Specific SID/PCC/Portal screen includes:
- Assigned terminal connections are displayed first, and include Agent Name, Login ID, Original Connection, Connection ID, and the link to unassign/assign.
- Unassigned terminal connections include the Original Connection ID, Connection ID, and the link to unassign/assign.
- Original Connection ID, when cloned, data is populated from the original GTID ID.
- Original GTID is a one to one ratio with Connection ID.
- When the connection ID is not cloned, the original GTID row is empty.
- The Original Connection ID is informational only and cannot be assigned.
Assign or Unassign a Terminal Connection
From the Assigned and Unassigned Terminal Connections screen, the column on the far right displays either Assign or Unassign. Click to change the status of that terminal connection for that agent.