Smart Buttons
Controls/XML Elements
Text Field <TextBox>
The TextBox element enables agents to input text information to be used by the program. The text field can be used to ask a question to the agent and collect the answer as a variable.
For example:
Note: There is also a TextBox element that occurs as a child element of QuestionsBlock and can be used with the Question Block Designer. Both TextBox elements have similar, but not exactly the same, attributes.
Configuring
You can configure TextBox in the Smart Buttons Editor using either the Text Field Editor or XML.
Configuring with the Text Field Editor
To configure with the Text Field Editor:
-
Open the Smart Buttons Editor to create a script.
-
Click Text Field <TextBox>.
-
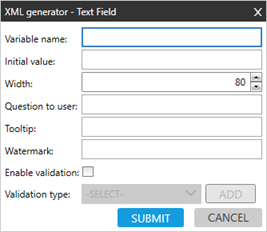
Configure the attributes.
Attribute
Description
Variable name The symbolic name (an identifier) that collects the answer Initial value Displays the default answer in the text box. Width The width of the text box in pixels. Question to the agent The question text to prompt the agent.
Note: This attribute is not available if you are using this element in the Question Block Designer. If you want to build a dialog box with a text field and define a question and define a question in the Designer, you need to use both TextBlock and TextBox.
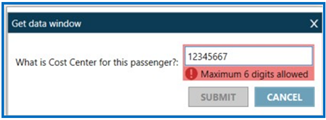
Tooltip The hover text that displays over the selection box. Watermark Adds a watermark to the box. Enable validation Limits answers to a specific format for example, such as only alphanumeric or a maximum of six digits.
Validation type When Enable validation is checked, select the type of validation.
Optional. If Click ADD to enter and error message that displays to the agent if the text enter does not meet the validation criteria. You can add many validation rules to each <TextBox>

- Click SUBMIT.
Configuring with XML
If you do not want to use the Text Field Editor, you can enter the XML directly in the Travelport Smart Buttons Editor.
Tip! You can add the XML code directly to the editor by dragging and dropping the blue button for this control.
This is the structure of the TextBox XML element.
<TextBox Watermark="" VarName="" Question="" Width="80" ToolTip="" />Example
You want to ask question to the agent about the name of company that the agent is making a booking. Then you want to use this name and enter as a DI remark.
<ButtonConf ButtonName="Company name ." Description="" QuickCommand="">
<TextBox Watermark="" VarName="CompanyName" Question="What is the Company Name?" Width="80" ToolTip="" />
<RunCommand>DI.FT-[CompanyName]</RunCommand>
</ButtonConf>
Tips!
To change the window title for TextField from the default Get data window:
-
Insert a TextBox XML element within a QuestionsBlock XML element.
-
Change the @WindowFormTitle value to desired name.
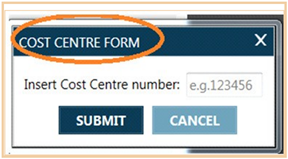
<ButtonConf ButtonName="Cost Center form" Description="" QuickCommand="">
<QuestionsBlock WindowFormTitle="COST CENTER FORM">
<TextBox VarName="CostCenter" Question="Insert Cost Center Number" Width="80"></TextBox>
</QuestionsBlock>
</ButtonConf>
Validating Text Input
It is possible to set validation for text input (TextBox).
Functions of text validation:
-
“Submit” button is enabled only if the form is valid.
-
Validation feature works for both Standard Mode and Easy Mode.
-
Construction of all (above) validation rules contains an error message definition.
-
Validation rules can be used jointly (if needed).
-
Error message is displayed below the text input if validation fails.
Validation can check:
-
Minimum length
-
Maximum length
-
Mandatory field (is required)
-
Numeric only
-
Alphabetical only
-
Alpha-numeric only
-
Regular expression
-
Minimum number value
-
Maximum number value
The default value of the text input should be moved to nested node of the TextBox control in <DefaultValue>...</DefaultValue>.
Example
<TextBox VarName="COSTCENTER"Question="Enter Cost Center number" Width="180">
<ValidationRules>
<MinLength ErrorMessage="Minimum is 3 length ">3</MinLength>
<MaxLength Value="10"ErrorMessage="Maximum length is 5">5</MaxLength>
<Require ErrorMessage="This field is mandatory" />
<NumericOnly ErrorMessage="Only numeric characters allowed" />
<AlphabeticalOnly ErrorMessage="This field is alphabetical only" />
<AlphaNumericOnly ErrorMessage="Letters and digits only are allowed here" />
<RegEx ErrorMessage="Valid format is 3 letters [RegEx val]"><![CDATA[^[A-Z]{3}$]]></RegEx>
<MinNumberValue ErrorMessage="Min number here is 1">1</MinNumberValue>
<MaxNumberValue ErrorMessage="Max number here is 22">22</MaxNumberValue>
</ValidationRules>
<DefaultValue>3897</DefaultValue>
</TextBox>