Smart Buttons
Controls/XML Elements
Text Label <TextBlock>
The TextBlock control adds a label, which is a line with text, to a prompt.
Important! You can use this XML element only as a child element of QuestionsBlock .
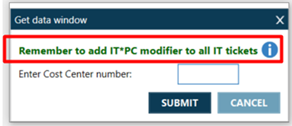
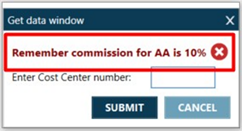
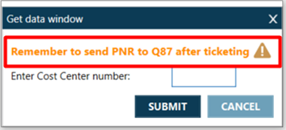
Within the TextBlock element, three icon types, which corresponding text color can be defined: Information, Warning, and Error.
-
Information
Green text and “i” icon
-
Error
Red text and “X” icon
-
Warning
Orange text and “!” icon
Configuring
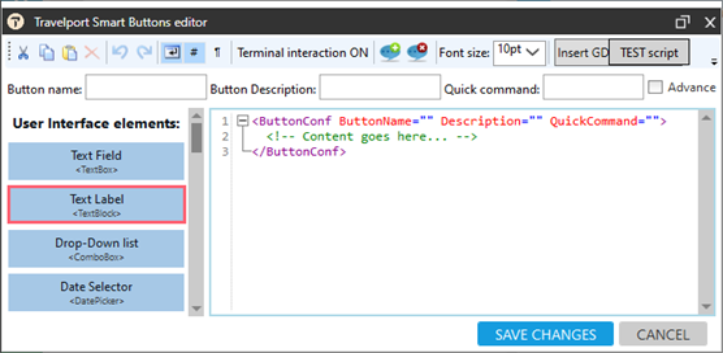
To configure with the Text Label Editor:
-
Open the Smart Buttons Editor to create a script.
-
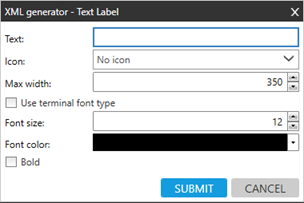
Click Text Label <TextBlock> to display the Text Label Editor.
-
Configure the attributes.
Attribute
Description
Text Text to be displayed to the agent.
Icon Icon to be displayed to the agent mapped with text color: Information (green text) – “i”, Warning (orange text)- “!”, Error (red text) - “X” Max width Maximum width of the text line. Use terminal font type Font size select font size, max that can be selected is 32 Font color Select color of your text Bold Check if you want your text to be bold
Text Block Placement
Text Block must be used inside of the QuestionsBlock element.
<ButtonConf ButtonName="Example of a TextBlock" Description="" QuickCommand="">
<QuestionsBlock WindowFormTitle="" DoNotAllowCancel="false" ShowWarningWhenCancel="false" SubmitButtonName="SUBMIT">
<TextBlock FontColor="#FFFF0000" FontSize="32" Bold="True">Check if CC has been added to the booking file</TextBlock>
</QuestionsBlock>
</ButtonConf>