Remarks
Other Remarks
You can create and edit the several types of remarks by clicking on the Other Remarks tab in the PNR/Booking File Remarks screen.
| Type | Description |
|---|---|
|
Notepad Remarks |
|
|
Confidential Notes (Travelport+ (1G) only) |
|
|
Historical Notes (Travelport+ only) |
|
|
General information or comments that print at the bottom of the itinerary/invoice. These remarks are not associated to a specific segment or passenger. Itinerary Remarks allow the Apollo user to add freeform information to a PNR/Book File that prints on the itinerary/invoice. In the PNR/Booking File, Unassociated Remarks display in the Itinerary Remarks. |
|
|
Invoice Remark |
In Smartpoint 11.1, support was added for these invoice remarks:
|
Managing Other Remarks
You can manage remarks associated to a PNR/Booking File by clicking on the Other Remarks tab in the PNR/Booking File Remarks screen.
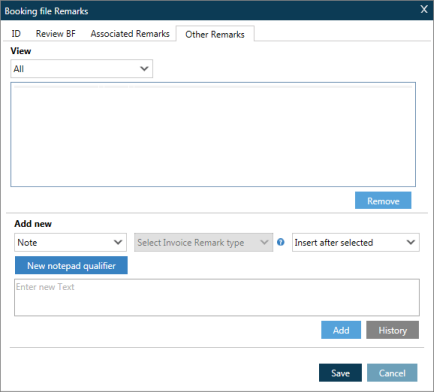
From the Other Remarks screen, you can:
- View details for types of Other Remarks.
- Add remarks.
- Delete notes and remarks.
- Create and manage notepad qualifiers to add specific types of remarks.
To view Other Remark types:
Click View arrow and select All or a specific Other Remark type:
- Notes
- Confidential Note (Travelport+ (1G) only)
- Historical Note (Travelport+ (1G) only)
- Unassociated Remark.
- Invoice Remark
To add Other Remarks:
-
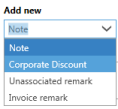
In the Add New section, click the Note arrow to select the Other Remark type.
-
If you select Invoice Remark, click the Select Invoice Remark type arrow to select a type.
-
Click the Insert after selected arrow to choose a location in the PNR/Booking File for the new remark.
-
Insert after selected adds the new remark after an existing remark that is selected in the remarks list.
-
Insert at Top adds the new remark at the beginning of the PNR/Booking File.
-
Insert at Bottom adds the new remark at the end of the PNR/Booking File.
-
-
Enter the new remark in the text box.
-
Click Add.
-
Click Save to store the new remark.
To delete Notes, Invoice Remarks, or Unassociated Remarks:
-
In the View list, select a remark. Or, to select more than one remark, press the CTRL or SHIFT key while you select the remarks.
-
Click Remove.
-
Click Save to update the Remarks file.
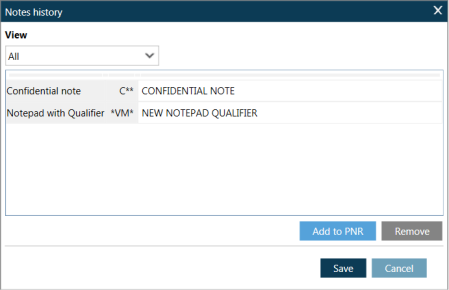
To manage Historical Notes, Invoice Remarks, or Unassociated Remarks:
You can add historical notes and remarks back into a PNR/Booking File or delete the remark entirely.
-
Click the History button in the lower right corner of the Other Remarks tab. The Notes History dialog box displays.
-
In the View list, select the remark.
-
Click Add to PNR to add the remark back to the PNR/Booking File or click Remove to completely delete the remark from PNR/Booking File history.
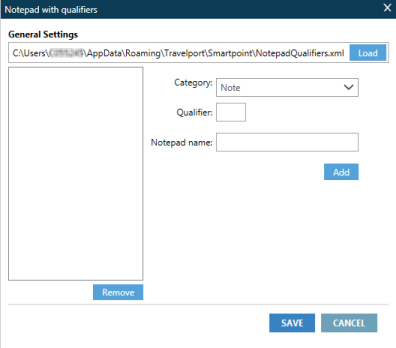
To create your own notepad qualifiers:
You can create your own new notepad qualifiers. These qualifiers can then be stored and used to create
For example, the following instructions show how to create a notepad qualifier for Corporate Discounts.
-
In the Add New section, click New notepad qualifier to display the Qualifiers screen.
-
In Category, click the arrow to select from Note, Historical Note, or Confidential Note.
-
Travelport+ (1G) supports general Note, Historical Note, and Confidential Note.
-
Apollo (1V) supports general Note.
-
-
In Qualifier, enter the notepad qualifier code.
-
For Confidential Notes and Historical Notes, Travelport+ (1G) supports a qualifier code of one upper-case letter is supported. For example: "X".
-
For general Notes:
-
Travelport+ (1G) supports a qualifier code of two upper-case letters. For example: 'XX'.
-
Apollo (1V) supports a qualifier code of two upper-case letters or the following special characters: $ % * ( ) ¤ : < . ? . For example: 'XX' or '%X'.
-
-
-
Notepad name, enter a name for the notepad qualifier.
-
Click Add. The new notepad qualifier is now added as a list option for viewing and adding new qualifiers.
-
Click Save to store the remark and redisplay the PNR/Booking File Remarks screen.
-
Click Save on the PNR/Booking File Remarks screen to close that screen.
Tip! You must click Save for both the Notepad with Qualifiers screen and the PNR/Booking File Remarks screen to properly store your new qualifier. -
Open PNR/Booking File Remarks screen and select the Open Remarks tab again. The new qualifier displays in the Note drop-down list in the Add New section. In this example, a Corporate Discount qualifier was added. See the following section for an example of adding and using the Corporate Discount qualifier.
Example: Adding a Corporate Discount Qualifier and a Corporate Discount Code
If the required corporate discounts are not already included in a Client File/PRO-file associated to the PNR/Booking File, you can also add corporate discounts by creating a remark using either:
- A terminal entry.
- The Other Remarks tab. You can also create a Corporate Discount qualifier to use as a shortcut for adding future corporate discount codes.
Terminal entry examples
Where ZD is the vendor code and 2345678 is the corporate discount identifier.
Apollo (1V): >³:5C/ZD CD-2345678
Travelport+ (1G): NP.ZD CD-2345678.
Note that 1G adds corporate discount codes as notepad remarks.
Corporate discount codes can also be added through profiles.
- Display the Other Remarks screen.
- Apollo (1V). From the PNR menu, select Create/Edit PNR Remarks, then select Other Remarks.
- Travelport+ (1G). From the Booking File menu, select Create/Edit Booking File Remarks, then select Other Remarks.
- In the Add new section, click New notepad qualifier to display the Notepad with Qualifiers screen.
- In Category, click the arrow to select Note.
- In Qualifier, enter C.
- In Notepad name, enter a name such as Corporate Discount.
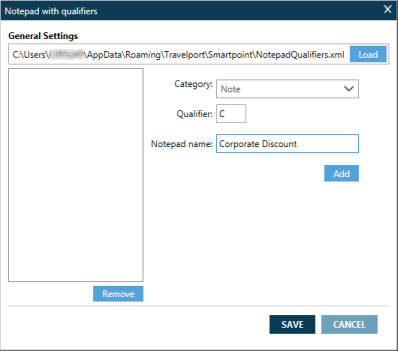
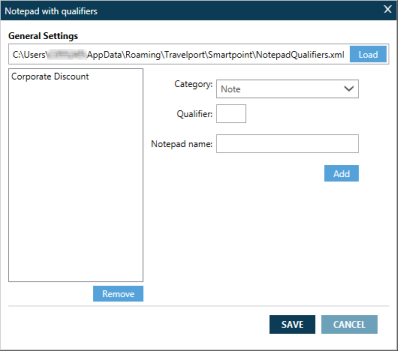
- Click Add. The new Corporate Discount qualifier is added as a list option.
- Click Save to store the remark and redisplay the PNR/Booking File Remarks screen.
- Click Save on the PNR/Booking File Remarks screen to close that screen.
Hint! You must click Save for both the Notepad with Qualifiers screen and the PNR/Booking File Remarks screen to properly store your new qualifier.
- Redisplay the Other Remarks screen.
- In the Add New section, click the Note drop-down arrow and select the new Corporate Discount qualifier.
- In the text box, enter the format for corporate discount codes: [Car Vendor] CD-[Corporate Discount Code]. For example: ZD CD-2345678.
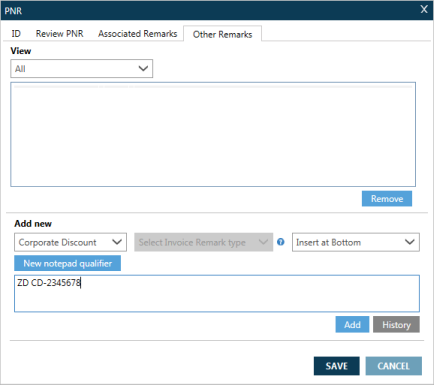
- Click Add to display the corporate discount code in the remark list. The new corporate discount code is also added as a terminal entry in the PNR/Booking File.
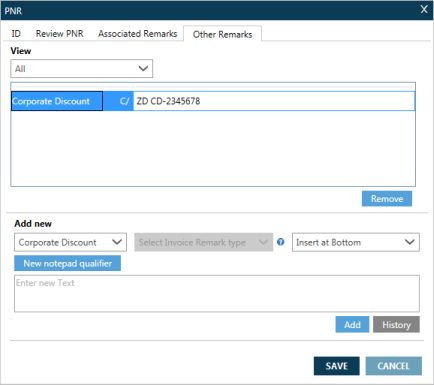
- When you have added all remarks, click Save to store your remarks and close the PNR/Booking File Remarks screen.