Using the Lookup Buttons and Screens
Lookup buttons ( ) appear beside various fields that appear on many GlobalWare screens and dialog boxes. These buttons open lookup screens that enable you to search for and select items of data, which then appear in the fields. For descriptions of these screens, see Lookup Screens below.
For example, the Account ID box on the Invoice Edit & Query screen has a lookup button that opens the Find an Account ID lookup screen.
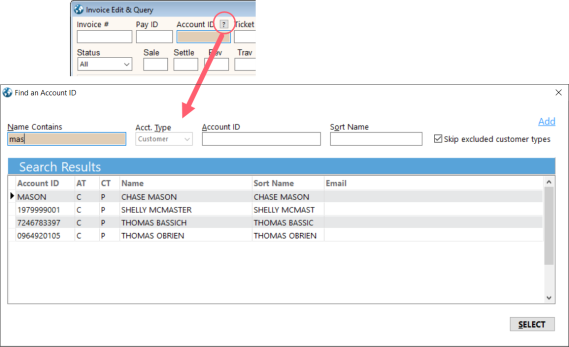
After you search for and select an account ID on this screen, the account ID appears in the Account ID box on the Invoice Edit & Query screen.
Note: The Find an Account ID lookup screen (for customer accounts only) and the Find Group lookup screen provide Add links to add new account IDs or group IDs.
Search relevance
As you type text in the text fields for search criteria in the top area of lookup screens (for example, in the Name Contains field on the Find an Account ID screen), results immediately appear in the Search Results grid in order of search relevance. For example, if you type "ce" in the Name Contains field, name results starting with "ce" appear first in the grid, and then other results containing "ce" follow. Case sensitivity does not apply.
Note: Search relevance works for only one search criterion text box at a time and not in combination. When you type in a search criterion text box, GlobalWare clears the text previously typed in another search criterion text box.
Lookup screens
This section describes the following lookup screens, which appear when you click the various lookup buttons displayed on many GlobalWare screens and dialog boxes.
- Find an Account ID – Opens when you click a lookup button on a field related to account ID. See Find an Account ID Screen below.
- Employee – Opens when you click a lookup button on a field related to employee agent code. See Employee Screen below.
- Employee (for employee sign code lookup) – Opens when you click the lookup button on the Emp. Sign Code field on the Managed Tasks screen. See Employee Screen (for Employee Sign Code Lookup) below.
- Provider – Opens when you click a lookup button on a field related to provider short code. See Provider Screen below.
- Find Branch – Opens when you click a lookup button on a field related to branch. See Find Branch Screen below.
- Find Group – Opens when you click a lookup button on a field related to group. See Find Group Screen below.
- Ticket Location – Opens when you click a lookup button on a field related to ticketing location (also known as satellite ticket printer [STP] location). See Ticket Location Screen below.
- Agent – Opens when you click a lookup button on a field related to agent. See Agent Screen below.
Find an Account ID screen
Use the Find an Account ID screen to search for and select an account. This screen also provides an Add link, which opens the Add New Account dialog box. The Add link is available only if Customer is specified in the Acct. Type field. This dialog box enables you to provide the minimum amount of information needed to create an account.

The top area of the screen displays fields used for finding accounts. After you provide search criteria, accounts that match the search criteria appear in the Search Results grid.
The following table describes the fields on the Find an Account ID screen.
| Field | Description | ||||||||
|---|---|---|---|---|---|---|---|---|---|
|
Name Contains |
Full or partial name of the account. The Search Results grid will display account records that match the full or partial account name. Search relevance applies. See Search Relevance above. |
||||||||
|
Acct. Type |
Type of account (Customer, Employee, Provider, or Vendor). The Search Results grid will display account records that match the account type. Note: Depending on where in GlobalWare you clicked the lookup button, the account type could be automatically selected in this field. |
||||||||
|
Account ID |
Full or partial account ID. The Search Results grid will display account records that match the full or partial account name. Search relevance applies. See Search Relevance above. |
||||||||
|
Sort Name |
Full or partial sort name for the account. The Search Results grid will display account records that match the full or partial sort name. Search relevance applies. See Search Relevance above. |
||||||||
|
Skip excluded customer types |
Indicates whether customer accounts should not display in the Search Results grid if they have a customer type that is flagged for exclusion. To display all customer accounts regardless of exclusion, clear this check box. For information about excluding customer types from display, see Setting Up Market IDs. This check box is available only if Customer is specified in the Acct. Type field. |
||||||||
|
Account ID (in Search Results grid) |
Identifier of the account. |
||||||||
|
AT |
Account type.
|
||||||||
|
CT |
Customer-type code (for customer accounts only) or travel-type code (for provider accounts only). For code descriptions, see Standard Codes Quick Reference. |
||||||||
|
Name |
Name of the account. |
||||||||
|
Sort Name (in Search Results grid) |
Sort name for the account. |
||||||||
|
|
E-mail address for the account. |
Finding and selecting an account
To find and select an account on the Find an Account ID screen:
-
Provide the appropriate search criteria in the top area of the screen.
GlobalWare displays accounts in the Search Results grid that match the search criteria.
- Select the desired account and click SELECT (or double-click the desired account in the grid).
Adding an account
The Add link on the Find an Account ID screen enables you to create an account.
To add an account:
-
On the Find an Account ID screen, click the Add link. The Add New Account dialog box appears.
-
Complete the fields as appropriate. For more information, see Adding Accounts.
Note: The Account ID, Cust. Type, and Name fields are required.
-
Click OK.
An edit account screen appears (Edit Customer, Edit Employee, Edit Provider, or Edit Vendor). For more information, see the appropriate topic:
-
To finish setting up the account, complete the files as appropriate.
-
Click SAVE.
-
To close the edit account screen, click the exit (
 ) icon.
Employee screen
Use the Employee screen to search for and select an employee agent code.
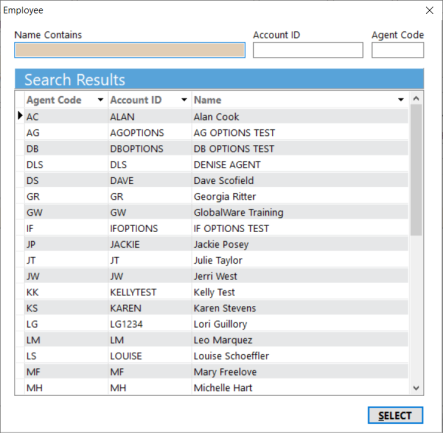
The top area of the screen displays fields used for finding employee agent codes. After you provide search criteria, employee agent codes that match the search criteria appear in the Search Results grid.
The following table describes the fields on the Employee screen.
| Field | Description |
|---|---|
|
Name Contains |
Full or partial name of the employee account. The Search Results grid will display employee account records that match the full or partial account name. Search relevance applies. See Search Relevance above. |
|
Account ID |
Full or partial employee account ID. The Search Results grid will display employee account records that match the full or partial account ID. Search relevance applies. See Search Relevance above. |
|
Agent Code |
Full or partial agent code for the employee. The Search Results grid will display employee account records that match the full or partial agent code. Search relevance applies. See Search Relevance above. |
|
Agent Code (in Search Results grid) |
Agent code for the employee. |
|
Account ID (in Search Results grid) |
Identifier of the employee account. |
|
Name |
Name of the employee account. |
Finding and selecting an employee agent code
Opens when you click the lookup button on the Emp. Sign Code field on the Managed Tasks screen. To find and select an employee agent code on the Employee screen:
-
Provide the appropriate search criteria in the top area of the screen.
GlobalWare displays employee agent codes in the Search Results grid that match the search criteria.
- Select the desired employee agent code and click SELECT (or double-click the desired employee agent code in the grid).
Employee screen (for employee sign code lookup)
Use the Employee screen (employee sign code version) to search for and select an employee sign code.
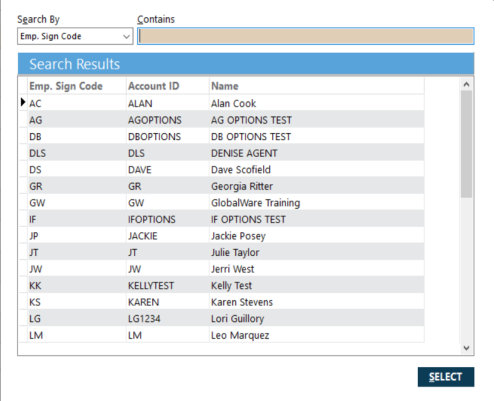
The top area of the screen displays fields used for finding employee sign codes. After you provide search criteria, employee sign codes that match the search criteria appear in the Search Results grid.
The following table describes the fields on the Employee screen (for employee sign code on the Managed Tasks screen).
| Field | Description |
|---|---|
|
Search By |
Indicates the aspect of employee account data you want to search against (Emp. Sign Code, Account ID, or Name). This field works in conjunction with the Contains field. |
|
Contains |
Full or partial employee sign code, employee account ID, or employee account name, depending on the selection in the Search By field. The Search Results grid will display employees that match the full or partial information specified in the Contains field. Search relevance applies. See Search Relevance above. |
|
Emp. Sign Code |
Sign code for the employee. This is also known as the agent code for the employee. |
|
Account ID |
Identifier of the employee account. |
|
Name |
Name of the employee account. |
Finding and selecting an employee sign code
To find and select an employee sign code on the Employee screen:
-
Provide the appropriate search criteria in the top area of the screen.
GlobalWare displays employee sign codes in the Search Results grid that match the search criteria.
- Select the desired employee sign code and click SELECT (or double-click the desired employee sign code in the grid).
Provider screen
Use the Provider screen to search for and select a provider short code.
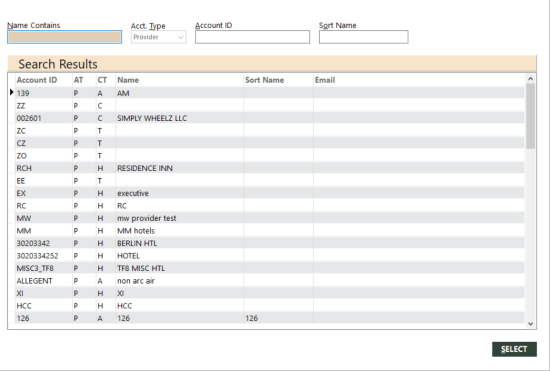
The top area of the screen displays fields used for finding provider short codes. After you provide search criteria, provider short codes that match the search criteria appear in the Search Results grid.
The following table describes the fields on the Provider screen.
| Field | Description |
|---|---|
|
Name Contains |
Full or partial provider account name, provider account ID, or short code, depending on the selection in the Search By field. The Search Results grid will display providers that match the full or partial information specified in the Contains field. Search relevance applies. See Search Relevance above. |
|
Account ID |
Identifier of the provider account. |
|
Name |
Name of the provider account. |
|
Sort Name |
Sort name for the provider account. |
|
Short Code |
Short code for the provider account. This is also known as the alpha airline code. If the account is a hotel property, it is the hotel chain code. |
Finding and selecting a provider short code
To find and select a provider short code on the Provider screen:
-
Provide the appropriate search criteria in the top area of the screen.
GlobalWare displays provider short codes in the Search Results grid that match the search criteria.
- Select the desired provider short code and click SELECT (or double-click the desired provider short code in the grid).
Find Branch screen
Use the Find Branch screen to search for and select a branch. You can also select a location group instead of a specific branch. Only those branches to which an employee has access are considered.
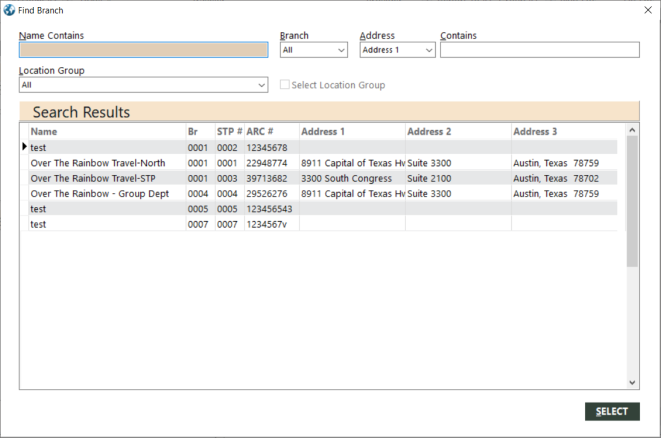
The top area of the screen displays fields used for finding branches. After you provide search criteria, branches that match the search criteria appear in the Search Results grid.
The following table describes the fields on the Find Branch screen.
| Field | Description |
|---|---|
|
Name Contains |
Full or partial name of the branch or satellite ticket printer (STP) location. The Search Results grid will display branches that match the full or partial branch or STP location name. Search relevance applies. See Search Relevance above. |
|
Branch |
Branch number. The Search Results grid will display branches that match the branch number AND to which the employee has access. Select All to display all branches to which the employee has access. |
|
Address |
Indicates the address line you want to search against (Address 1, Address 2, or Address 3). This field works in conjunction with the Contains field. |
|
Contains |
Full or partial address line, depending on the selection in the Address field. The Search Results grid will display branches that match the full or partial address specified in the Contains field. Search relevance applies. See Search Relevance above. |
|
Location Group |
Name of location group. A location group consists of a set of branches. The Search Results grid will display branches that match the location group. Select All to display all branches, regardless of location group. Note: If you want to select a location group instead of a specific branch, select a location group in this field, and then select the Select Location Group check box. |
|
Select Location Group |
Indicates whether to select the location group specified in Location Group rather than a specific branch when you click SELECT. This option is available only if a specific location group is selected in Location Group. |
|
Name |
Name of the branch or STP location. |
|
Br |
Branch number. |
|
STP # |
STP location number. STP location is also known as the ticketing location. |
|
ARC # |
ARC (IATA) number for the branch or STP location. |
|
Address 1 |
First address line of the branch or STP location. |
|
Address 2 |
Second address line of the branch or STP location. |
|
Address 3 |
Third address line of the branch or STP location. |
Finding and selecting a branch or location group
To find and select a branch or location group on the Find Branch screen:
-
Provide the appropriate search criteria in the top area of the screen.
GlobalWare displays branches in the Search Results grid that match the search criteria.
-
Choose one of the following actions:
- To select a specific branch, select the desired branch in the grid and click SELECT (or double-click the desired branch in the grid).
- To select a location group instead of a specific branch:
- Make sure that the desired location group is selected in Location Group.
- Select the Select Location Group check box.
- Click SELECT (or double-click one of the rows in the grid).
Find Group screen
Use the Find Group screen to search for and select a group. This screen also provides an Add link, which opens the Add New Group Item screen. This screen enables you to create a group.
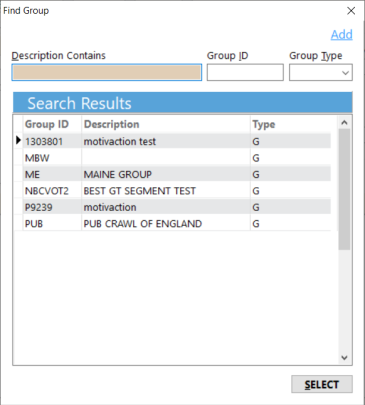
The top area of the screen displays fields used for finding groups. After you provide search criteria, groups that match the search criteria appear in the Search Results grid.
The following table describes the fields on the Find Group screen.
| Field | Description | ||||
|---|---|---|---|---|---|
|
Description Contains |
Full or partial description of the group. The Search Results grid will display group IDs that match the full or partial group description. Search relevance applies. See Search Relevance above. |
||||
|
Group ID |
Full or partial group ID. The Search Results grid will display group IDs that match the full or partial group ID. Search relevance applies. See Search Relevance above. |
||||
|
Group Type |
Type of group (Group or Retail). |
||||
|
Group ID (in Search Results grid) |
Identifier of the group. |
||||
|
Description |
Description of the group. |
||||
|
Type |
Group type.
|
Finding and selecting a group
To find and select a group on the Find Group screen:
-
Provide the appropriate search criteria in the top area of the screen.
GlobalWare displays groups in the Search Results grid that match the search criteria.
- Select the desired group and click SELECT (or double-click the desired group in the grid).
Adding a group
The Add link on the Find Group screen enables you to create a group.
Note: To access the Add link, your employee account profile must have Add/Edit permission selected under Groups on the Employee Security screen. For more information, see Employee Security.
To add a group:
-
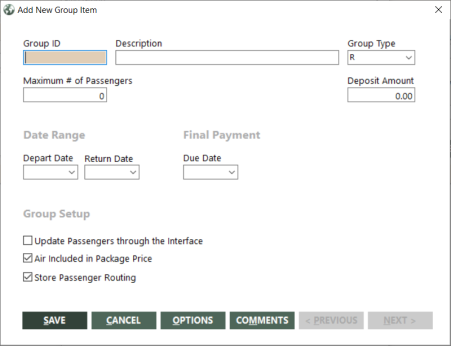
On the Find Group screen, click the Add link.
The Add New Group Item screen appears.
- Complete the fields, and click OPTIONS or COMMENTS to add group options or comments, as appropriate. For more information, see Creating Groups and Adding Group Options or Comments.
- Click SAVE.
Ticket Location screen
Use the Ticket Location screen to search for and select a ticketing location. Ticketing locations are also known as satellite ticket printer (STP) locations.
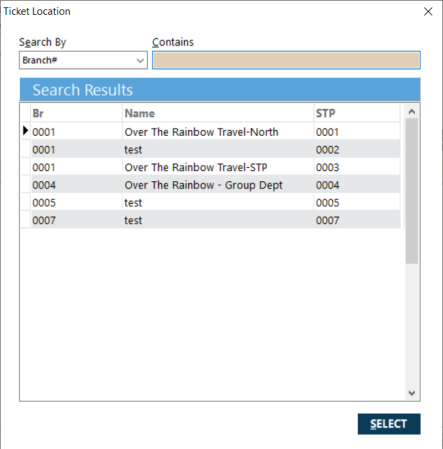
The top area of the screen displays fields used for finding ticketing locations. After you provide search criteria, ticketing locations that match the search criteria appear in the Search Results grid.
The following table describes the fields on the Ticket Location screen.
| Field | Description |
|---|---|
|
Search By |
Indicates the aspect of ticketing location data you want to search against (Stp#, Name, or Branch#). This field works in conjunction with the Contains field. |
|
Contains |
Full or partial STP number, ticketing location name, or branch number, depending on the selection in the Search By field. The Search Results grid will display ticketing locations that match the full or partial information specified in the Contains field. Search relevance applies. See Search Relevance above. |
|
STP |
STP number. |
|
Name |
Name of the ticketing location. |
|
Br |
Branch number. |
Finding and selecting a ticketing location
To find and select a ticketing location (also known as a satellite ticket printer [STP] location) on the Ticket Location screen:
-
Provide the appropriate search criteria in the top area of the screen.
GlobalWare displays ticketing locations in the Search Results grid that match the search criteria.
- Select the desired ticketing location and click SELECT (or double-click the desired ticketing location in the grid).
Agent screen
Use the Agent screen to search for and select a sales agent.
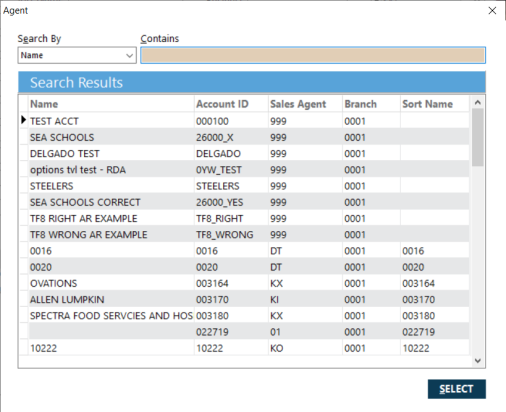
The top area of the screen displays fields used for finding sales agents. After you provide search criteria, sales agents that match the search criteria appear in the Search Results grid.
The following table describes the fields on the Agent screen.
| Field | Description |
|---|---|
|
Search By |
Indicates the aspect of account data you want to search against (Name, Account ID, or Sales Agent). This field works in conjunction with the Contains field. |
|
Contains |
Full or partial customer account name, customer account ID, or sales agent code, depending on the selection in the Search By field. The Search Results grid will display agents that match the full or partial information specified in the Contains field. Search relevance applies. See Search Relevance above. |
|
Name |
Name of the customer account. |
|
Account ID |
Identifier of the customer account. |
|
Sales Agent |
Agent code for the sales agent assigned to the customer account. |
|
Branch |
Number of the branch for the customer account. |
|
Sort Name |
Sort name for the customer account. |
Finding and selecting a sales agent code
To find and select a sales agent code on the Agent screen:
-
Provide the appropriate search criteria in the top area of the screen.
GlobalWare displays sales agents in the Search Results grid that match the search criteria.
- Select the desired sales agent and click SELECT (or double-click the desired sales agent in the grid).