Manual Reconciliation
Use the Manual Reconciliation function to reconcile general ledger items that the Auto Reconciliation function could not reconcile. For example, if you post a cash receipt on account and then apply it to the invoice in Adjust Accounts, they will not automatically reconcile because the Ref1 fields do not match.
Reconciled items are marked closed and the system date is stored in the closed date.
Only open item, non-cash accounts are reconciled. (Use the Bank Reconciliation function to reconcile cash accounts.)
To manually reconcile your open item non-cash accounts:
-
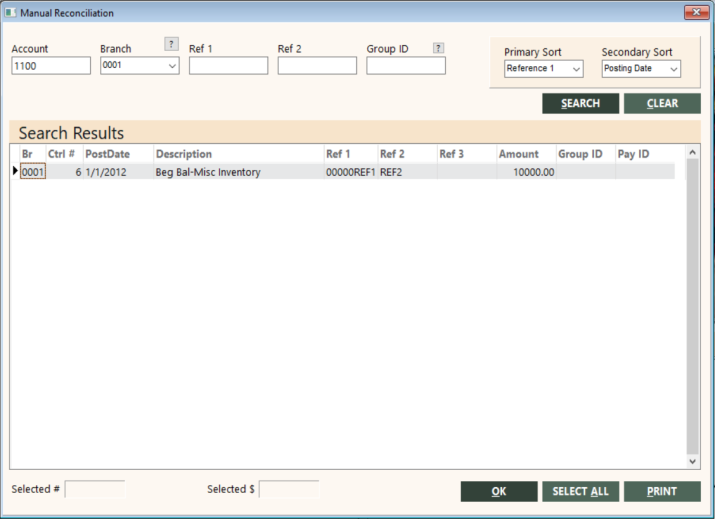
On the GL submenu, click Manual Reconciliation.
The Manual Reconciliation screen appears.
Tip: You can increase the size of this screen by dragging an edge or corner to the desired size. This enables you to more efficiently view and work with data in the Search Results grid.
-
Complete the screen as follows:
Field Description Account
Specify the chart number of the general ledger account you want to reconcile, and then press Enter or the Tab key.
Branch
Select the branch of the general ledger account you want to reconcile from the drop-down list, and then press Enter or the Tab key. Only the branches to which the user has access are available. Select All to reconcile open item accounts against all branches to which the user has access.
To find and select a branch, click the lookup (
 ) button. The Find Branch screen appears. For details, see Using the Lookup Buttons and Screens.
Ref 1
Enter a value if you want to limit the search to general ledger transactions with this value in Ref1.
Ref 2
Specify a full or partial value for Ref 2. If you specify a full reference value, the Search Results grid will display general ledger transaction records for the reference value. Use the wildcard character (*) to specify a partial reference value, as shown in the following examples:
71*
Displays transaction records for reference values that begin with "71" (for example, "7126" and "7153").
*71
Displays transaction records for reference values that end with "71" (for example, "2071" and "10071").
*71*
Displays transaction records for reference values that contain "71" anywhere (for example, "7126", "10713", and "10071").
Group ID
Enter a value if you want to limit the search to general ledger transactions with this group ID.
To find and select a group ID, click the lookup (
) button. The Find Group screen appears. For details, see Using the Lookup Buttons and Screens.Primary Sort
Select the field you want for the primary sort in the Search Results grid and report. The report also has an option to subtotal on this field.
Secondary Sort
Select the field you want for the secondary sort in the Search Results grid and report.
-
Click SEARCH.
The Search Results grid lists the open items that match the search criteria.
To view detail for a listed invoice item, select the item and press F4. The Invoice Display screen appears. For more information, see Invoice Display Screen.
If you want to generate a report, click PRINT. At the question to subtotal on primary sort, select Yes to subtotal or No to only sort. For information about the report destination options, see Printing Overview.
- Double-click or select and spacebar the items that you want to reconcile. Or, click SELECT ALL to select all items and then deselect individual items as needed. The Money Selected amount must equal zero.
- To reconcile the selected items, click OK. The selected items are updated and the Search Results grid is cleared.