Traveler Groups
Traveler groups can be added to the Account and Traveler hierarchy when an agency has a new account customer that does not have an existing account profile (New Account Hierarchy) or when an existing customer wants to expand their hierarchy to include one or more Traveler Groups (Open Account Hierarchy).
The default for an agency’s customer profiles is Account and Traveler. New Account Hierarchy and Open Account Hierarchy need only be used when a customer requires optional Traveler Groups between Account and Traveler. A maximum of eight Traveler Groups can be added between the Account and Traveler profile levels.
Once the Traveler Group has been created in the hierarchy, this level in the hierarchy cannot be deleted. However, even though the level may not be deleted, the named Traveler Group profile can be deleted. Before deleting a Traveler Group Profile all associated travelers must first be unassigned. If a traveler is assigned to a Traveler Group Profile that is being deleted, an error message displays with the list of travelers assigned to the Traveler Group.
There are two ways in which to add Traveler Groups:
-
Create a new account to which a new Traveler Group will be added.
Create a New Account
The following steps describe how to add Traveler Groups to a new Account Template that has no pre-existing Account or Traveler profiles.
Add a Group Level
-
From the Profiles menu, select Hierarchy with Templates, then select New Account Hierarchy to create a template for an account that is new to he company.
-
In General tab, complete the following information:
-
Name (required): type the name of the company (Account) for which the account is being created.
-
Description (optional): briefly describe how the hierarchy will be structured.
-
Associate to profile hierarchy: click the link and associate to the work area branch (WAB).
-
Click Save.
-
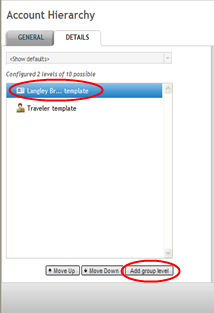
Click the Details tab.
-
Highlight the new account template that was just created, then click the Add group level button to add a Traveler Group.
-
In the dialog that displays, enter a Group name and description. The new Traveler Group now displays in the hierarchy.
Note: The order can be altered by highlighting the group and clicking the Move Up and Move Down buttons.
Create a Traveler Group
Now that a group level exists, the Traveler Group can be created.
-
From the Profiles menu, select New Profile.
-
Select Traveler Group as the profile type.
-
Click the Traveler Group in account link.
-
In the Find Profiles tab, select the Account name, then click Set.
-
Complete the information in the General tab.
-
Click the Details tab and ensure that the Traveler Group Profile is assigned to the Account Profile.
-
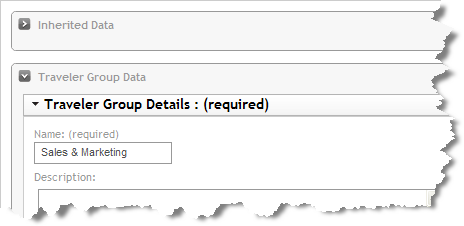
Name the new Traveler Group Profile in the Traveler Group Details section.
-
Add preferences and contact details in the Traveler Group details, as needed.
-
Click Save.
This procedure must be followed for every Traveler Group within this Account’s hierarchy. For example, if a company has four departments (Sales, Procurements, Accounts, and Management), they may create four new profiles, one for each department.
Create a Traveler Group within an Existing Account
To add a Traveler Group to an existing Account hierarchy that contains traveler profiles,
-
Select the Profiles menu, then select Hierarchy with Templates, and then select Open Account Hierarchy.
-
Search or browse for the Account profile to which you will add the Traveler Group, then click Select. The Account Hierarchy template displays; the General tab is pre-populated because this Account profile was previously created.
-
Click the Details tab to display the list of templates.
-
Click the account name template to highlight, then click the Add group level button.
-
Complete the dialogue box. The Group Name should be generic (e.g., Departments), as the actual groups will be named when the new profiles are created.
-
Click Save. The new Traveler Group now displays in the hierarchy. This procedure can be repeated to add more groups. The order may be altered by highlighting the group and clicking the Move Up and Move Down buttons.
Create Traveler Group Profiles
Once a Traveler Group has been added to the hierarchy, you can create the individual Traveler Group profiles that include a name, contact details, and preferences.
-
Select the Profile menu, then select New Profile.
-
From the profile type drop-down menu, select Traveler Group.
-
Click the Traveler Group in account link.
-
Search for the Account name, select it, then click Set.
-
Complete the information in the General tab.
-
Click the Details tab and ensure that the Traveler Group Profile is assigned to the Account profile.
-
In the Traveler Group Details section, name the new Traveler Group profile.
-
Preferences and contact details can also be entered in the Traveler Group details section.
-
Click Save.
This procedure must be followed for every Traveler Group within this Account’s hierarchy.
Associate Travelers to the Traveler Group
Once the Traveler Group has been created, you can re-assign travelers previously associated with the Account to the Traveler Group profile.
-
Open each traveler profile (from the Profiles menu, select Open Profile). See Open Profile for more information on searching for profiles.
-
Click on the Details tab.
-
In Hierarchy Associations, click the manage hierarchy associations link.
-
Find the newly created Traveler Group and click the assign link.
-
Click the Save button.
The new association now displays in the Hierarchy Associations tab. This procedure must be completed for all existing Traveler Profiles that you want to re-assign from the Account profile to a Traveler Group profile.