Smart Buttons
Controls/XML Elements
Configuring Question Blocks with XML
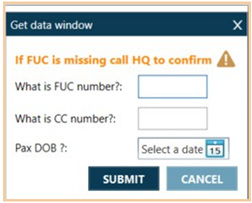
The QuestionsBlock control groups prompts together on one screen.
For example, this Question Block contains a text label (TextBlock), two text boxes (TextBox), and a date selector (DatePicker).
You can configure QuestionsBlock in the Smart Buttons Editor using either:
-
XML to nest other controls as child elements within the QuestionsBlock parent element, which is described in this topic.
-
The Question Block Designer, which provides a user interface to:
-
Design and modify customized dialog boxes, which can include images, color group boxes, single check boxes, and more. Elements (controls) can be placed in any places on the Windows canvas.
-
Define behaviors for all fields. For example, show TextBox A only if CheckBox B is checked.
-
Note: The functionality of certain controls/XML elements may vary depending on whether the control is via XML or the Question Block Designer. For example,
To configure QuestionsBlock with XML:
-
Open the Smart Buttons Editor to create a script.
-
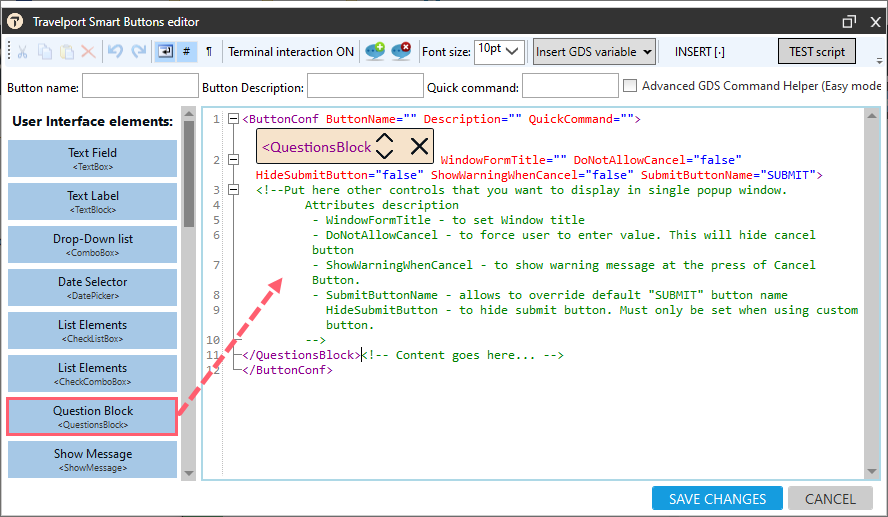
Drag and drop the Question Block <QuestionsBlock> button to the editor. The QuestionsBlock element is displayed.
Tip! If you click the the Question Block <QuestionsBlock> button, the QuestionsBlock Designer is opened.
-
Complete the QuestionsBlock attributes.
Attribute Name Possible attribute values WindowFormTitle Enter the title for the window. The is visible at the top of the form.
If left blank, the default title is Get data window.
The window can be either static text or variable. For example: [PaxName]
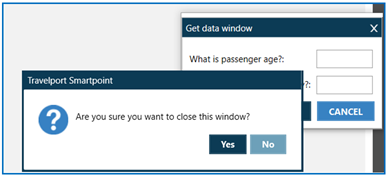
Do Not Allow Cancel Can be set to True or False. When set to True, the form does not have a CANCEL button and agent will not be able to use X to close the window.
Show Warning When Cancel Can be set to True or False. When set to True, an additional warning is displayed when the agent clicks CANCEL at the bottom of the QuestionBlock window.
SubmitButtonName Customizes the name of the Submit button. Depending on the workflow, the button can be labeled NEXT, CONTINUE, or another name.
The Submit button name can be either static text or variable: For example, [PaxName]
- Nest other controls/XML elements as child elements within the QuestionsBlock parent node.
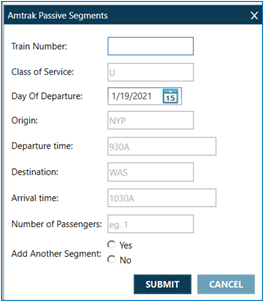
This example displays many prompts in one form the TextBox, DatePicker, CheckListBox, and RunCommand. Each of these prompts collects the answer in a variable. The variables are then used to form the command to create a passive train segment.
 Copy
Copy<ButtonConf ButtonName="Amtrak Passive 44" Description="" QuickCommand="#2VPASS">
<QuestionsBlock WindowFormTitle="Amtrak Passive Segments" DoNotAllowCancel="false" ShowWarningWhenCancel="false">
<TextBox Watermark="681" VarName="Train_#" Question="Train Number" Width="120" ToolTip="Train number">
<ValidationRules>
<Require ErrorMessage="Must Enter" />
<NumericOnly ErrorMessage="Numeric Only" />
<MaxLength ErrorMessage="No More Than 4">4</MaxLength>
</ValidationRules>
<DefaultValue />
</TextBox>
<TextBox Watermark="U" VarName="Class_Service" Question="Class of Service" Width="120">
</TextBox>
<DatePicker VarName="OB_Date" Question="Day Of Departure" DateFormat="ddMMM" />
<TextBox Watermark="NYP" VarName="From_Station" Question="Origin" Width="120">
</TextBox>
<TextBox Watermark="930A" VarName="Dep_Time" Question="Departure time" Width="150">
</TextBox>
<TextBox Watermark="WAS" VarName="To_Station" Question="Destination" Width="120">
</TextBox>
<TextBox Watermark="1030A" VarName="Arr_Time" Question="Arrival time" Width="150">
</TextBox>
<TextBox Watermark=", for example, 1" VarName="PAX_Count" Question="Number of Passengers" Width="120">
<CheckListBox Question="Add Another Segment" ToolTip="" Width="200" VarName="AddAnother" IsRadioButton="True" SingleSelect="True" IsMandatory="False" Display="ValueKey" Return="ValueKey" SelectDefaultAll="True">Yes;No</CheckListBox>
</QuestionsBlock>
<RunCommand StandardCommand="True">02v[Train_#][Class_Service][OB_Date][From_Station][To_Station]ak[PAX_Co unt]/[Dep_Time][Arr_Time]</RunCommand>
</ButtonConf>