Modify an NDC booking
Tip: Tap or select an image in the steps below to view it full sized.
Each airline decides whether it will support modifying an NDC booking before ticketing and/or after ticketing. Refer to NDC airline capabilities and the FAQs for steps to access the list of airline-support features.
Important:
-
Ensure any open bookings are ignored before modifying an NDC booking.
-
NDC bookings on Apollo or Worldspan cannot be modified or divided at this time. Divide is only supported on Travelport+.
-
NDC bookings must be modified via the plugin. If an agent modifies outside of the plugin, the booking will not update the passive segments. American Airlines may charge customers a service fee if they call to make changes. Refer to the American Airlines service fee charges FAQ for more information.
-
NDC bookings can be modified after the passenger has already flown a segment in the itinerary, where supported by the airline.
You can modify an NDC booking by:
-
Changing trip details
-
Modifying passenger information
-
Modifying trip details after ticketing and placing new trip on hold (Qantas and Singapore Airlines only)
-
Modifying the itinerary segments after travel has commenced
-
Dividing booking file
Change trip details
-
Retrieve the NDC booking and open it in the graphical booking file (by clicking the N icon).
-
Expand the Reservations section and select the flight summary. Flight details display in the right panel.
-
Select the Change booking button on the bottom right. Some airlines may not support changing a booking.
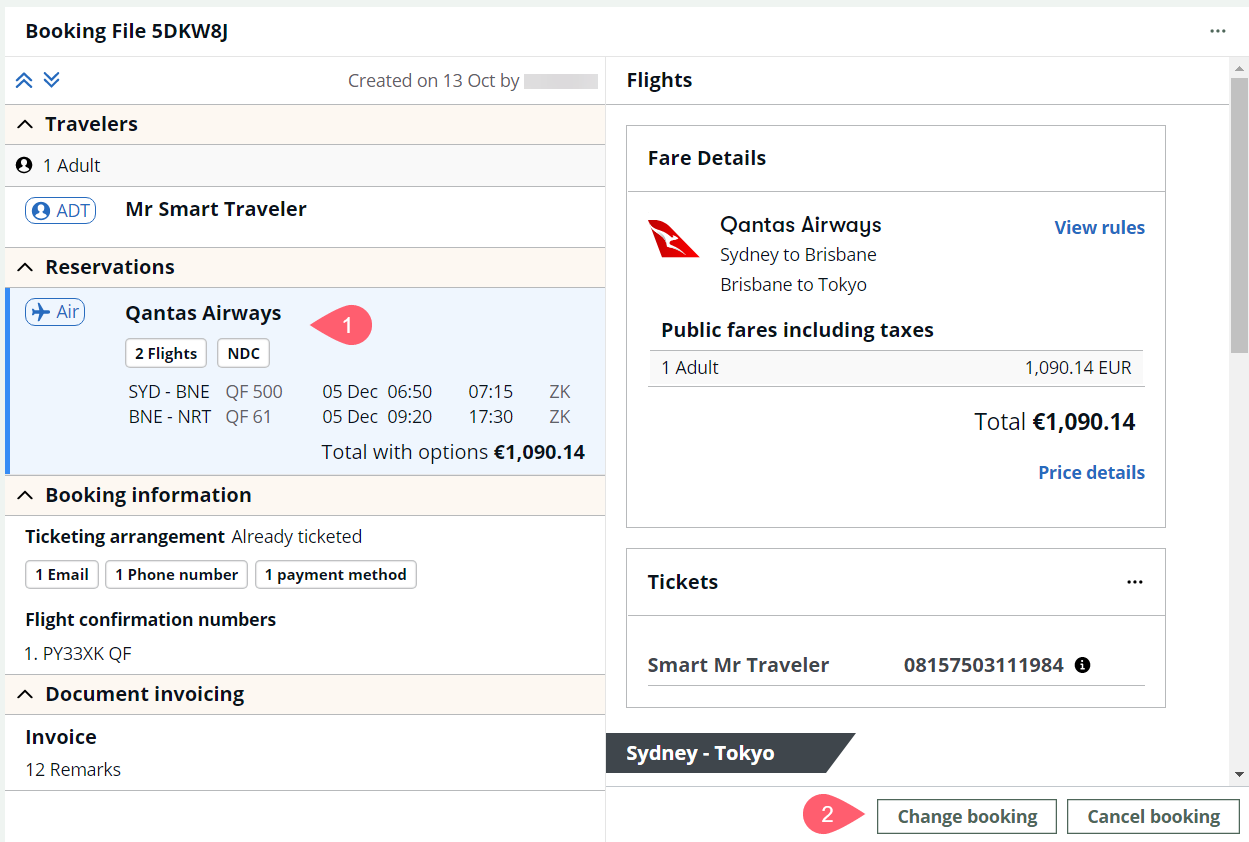 The Change Booking button is only enabled if the airline supports modify functionality.
 -
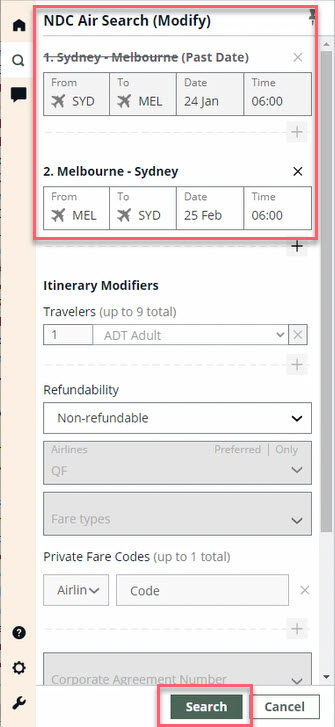
In the NDC Air Search (Modify) shopping panel, enter the new shop criteria. Fields which cannot be changed are locked. The shopping panel is pre-populated with all the same passenger details from the original shop. The number of passengers and associated passenger type codes (PTCs) cannot be edited.
Important: When modifying an NDC booking, modify the city pair, date, and/or time for each flight you want to change. To view other flight options for the same city pair and date, change at least the departure time by at least one minute.
-
Select Search.
If the fare rules do not support itinerary modification, an error displays.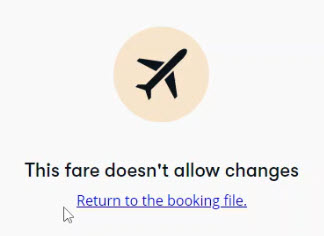
-
Shop results display in the (Modify) Air Search Results panel with the amount owed for the change. Choose Select for the option you want to book.
-
Confirm the change.
-
If you are modifying an unticketed booking or a ticketed NDC booking on Qantas or Singapore Airlines, select the Confirm and hold button to confirm the modified flights. A booking confirmation displays. Refer to the Post-Ticket Modify and Hold section below for more information.
-
If you are modifying a ticketed booking, select the Confirm and ticket button. Depending on the carrier, you may also have the option to Confirm and hold. A booking confirmation displays.
-
-
Select the View booking file button to display the booking. From this screen, you may have the option to issue the ticket (if the booking has not yet been ticketed), change the booking again, or cancel the booking.
Modify passenger data
Agents can update the passenger data in the NDC booking file after the NDC order has been created. Depending on the carrier, some fields may not be modified. Even if the graphical booking file indicates that a field can be modified, not all airlines will accept the change.
Important notes:
-
Currently, SQ does not allow passenger data to be modified.
-
At least one form of contact (phone or email) must be included; otherwise, an error displays.
-
Retrieve the NDC booking and open it in the graphical booking file (by clicking the N icon).
-
To modify traveler name or add membership numbers or security documents:
-
Expand the Travelers section and select the traveler name. The right panel displays the current traveler information.
-
Select the Edit travelers button.
-
Fields that can be modified are active. Modify or add information as needed, then select the Apply changes button.
-
-
To modify traveler contact information or corporate agreement number:
-
Expand the Booking information section and select the ticketing arrangement. The right panel displays the current booking information.
-
Select the Edit button.
-
Fields that can be modified are active. Modify or add information as needed, then select the Apply changes button.
-
For more information about modifying a booking file, refer to View a booking.
Post-ticket modify and hold
Some NDC carriers allow you to modify a ticketed booking and place it on hold. This work flow especially applies to consolidators and their sub agencies who have different ticketing restrictions based on PCC setup.
If this option is available for the booking, modify a ticketed NDC booking, then select Confirm and Hold from the Review and Confirm screen.
Ticketing modified booking
After the modified booking is successfully back on hold, agents can then retrieve the held booking which has been modified and issue the ticket.
The booking file is presented as a standard Held Booking (i.e., Ticketing Arrangement is updated and the option to Issue Ticket is enabled). The ticketing agent can now Issue Ticket on the modified booking.
Once issued, the old ticket which was modified is no longer valid. DI Lines still display the old flight details from the previously ticketed booking, in addition to the new flight details below it.
If agents (specifically sub-agents) do not have ticketing rights based on their PCC, they will receive an error from the carrier when attempting to ticket. Example error: “ERROR AT ISSUANCE TIME: NOT AUTHORISED”.
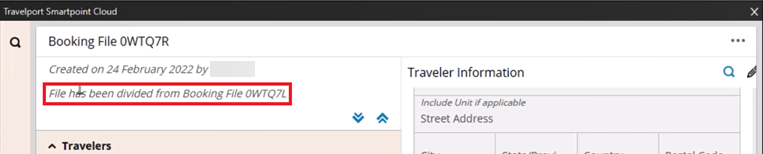
Divide booking file
If allowed by the airline, agents can divide their booking file via the NDC booking file where there are multiple passengers, allowing agents to better support their multi-passenger itineraries. Once a booking has been split, agents can modify or cancel itineraries for select passenger(s) without impacting the other parties in the original booking.
Divide is not available on Apollo and Worldspan.
Known issue: Bookings can only be divided if the passenger names were added separately.
To add passenger names separately, enter:
P.1TRAVELER/JON MR
P.2TRAVELER/SARAH MRS
Booking files with passenger names added using the entry N.[paxnum]... (for example, N.2TRAVELER/JON MR/SARAH MRS) cannot be divided at this time.
Important notes:
-
Order divide is supported by Singapore Airlines, American Airlines, Qantas Airlines, Emirates, Malaysia Airlines, and SAS Scandinavian Airlines.
-
A divide request cannot be combined with any other changes to the order.
-
A single divide must be executed at a time. Only one new child booking file order will be created upon a successful divide request.
-
Child booking files cannot be divided again.
-
If there is an Infant PTC attached to the primary traveler being moved to the new order, the Infant must keep the assignment to the primary traveler. An Infant PTC cannot be moved by themselves to a new order.
-
Only booking files created after implementation can be divided.
-
If several passengers have the same first name, the PNR cannot be divide at this time.
To divide an NDC booking file:
- Retrieve the booking.
-
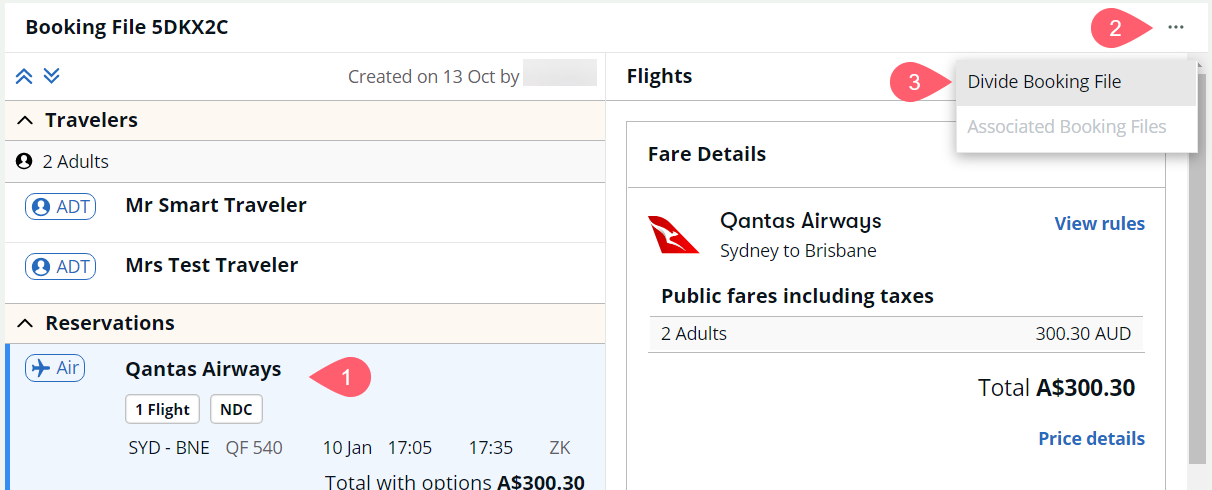
Expand the Reservations section and select the flight summary. Flight details display in the right panel.
-
Select the booking file options button at the top right of the screen, then select Divide Booking File.
-
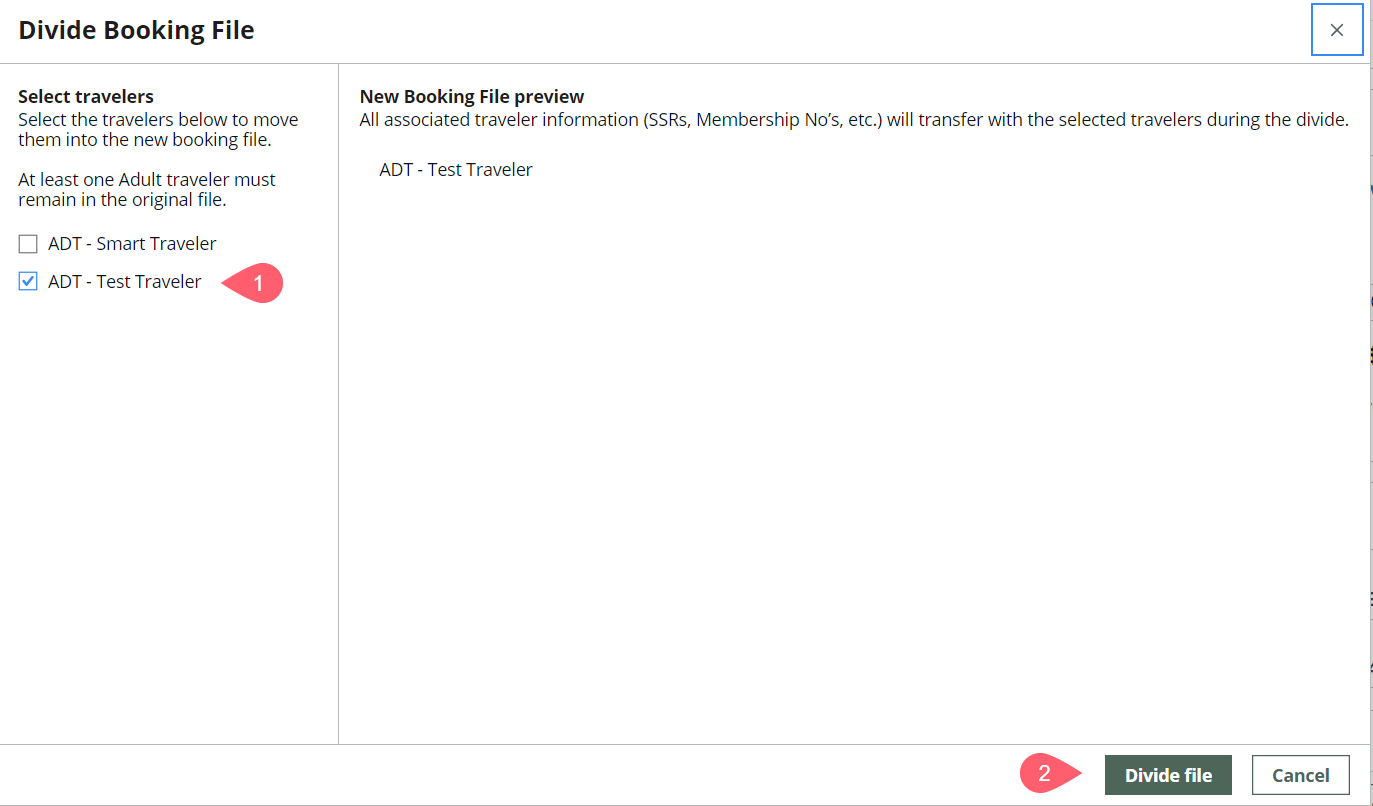
Select the traveler(s) to move into the new booking file. Then select the Divide file button.
Note: If there is an Infant PTC attached to the primary traveler being moved to the new Order, the Infant must keep the assignment to the primary traveler. An Infant PTC cannot be moved by themselves to a new Order.
-
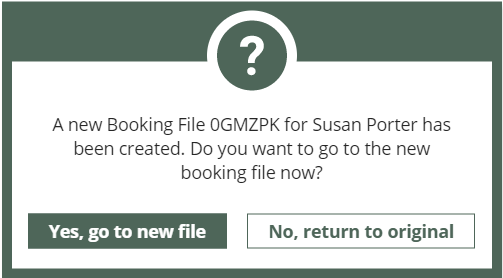
To confirm, select Yes, divide the file.
-
A dialog displays with the new booking file information and the option to open the new booking or return to the original booking.
-
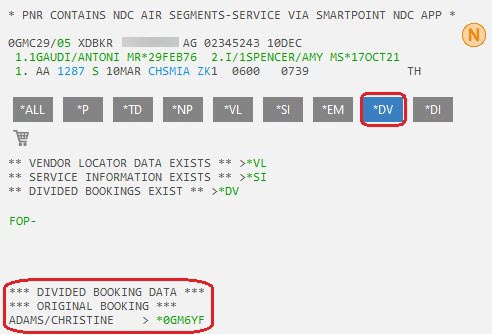
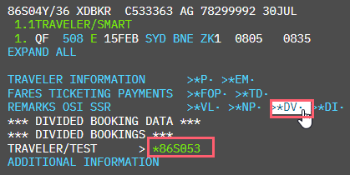
Order divide displays in the DI Lines.
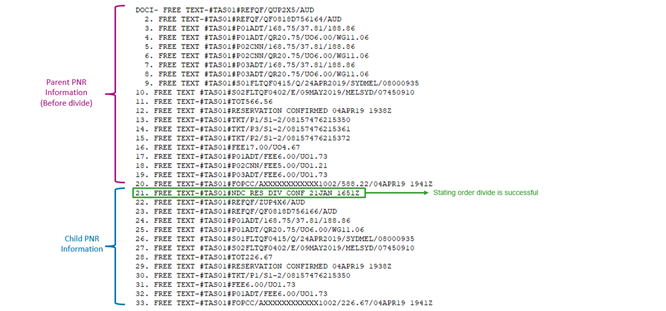
In the *DV field, the locator of the linked Booking File is displayed.
View associated booking file after divide
-
In the graphical booking file, click on the three dots (
 ) in the top right corner, above the Traveler Information panel.
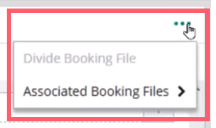
In the terminal view, open a booking file that has been divided, then select the *DV button to view the parent or child booking file information.
Select the green, booking file link to open the parent or child booking.
-
Select Associated Booking Files to see associated PNRs. This applies for both parent and child booking file.
-
Select the associated booking to go to that booking file.

On the child booking file, a banner displays the parent booking file locator.