Queue management
You can manage the work to be done on booking files by performing various queue counts. In addition, Travelport+ (1G) enables you to view a list of booking files in a queue. These functions are important factors in increasing office productivity.
Graphical queues
The graphical queues panel lets you monitor bookings in queues while working in both the graphical and terminal screens. You configure the panel to display the queues and categories you want to monitor. Queues are refreshed at a specific interval; you can also refresh at any time.
Notes:
-
If you try to enter a queue in the graphical queues panel while a booking file is currently active in the host AAA, a dialog offers you the choice to Ignore and continue. Currently, clicking this option only ignores the booking file and does not continue. You have to click on the queue again to enter it.
-
If a queue being monitored in the panel has only one category and that category is not specified, the queues panel shows the queue count incorrectly.
Configure queue panel
-
Select the Settings (
 ) icon then Queue options.
 -
Enter the queue that you want to monitor. You can optionally specify a category and PCC.
-
Enter a PCC if you monitor queues on more than one PCC. You must have queue access permission or Selective Access to monitor another PCC's queues. If you do not have permission to monitor queues on the PCC entered, an error displays: Some queues could not be polled.
-
If no PCC is entered, the queue of the current (or emulated) PCC is used.
-
Refer to the Travelport+ Formats guide for queue terminal commands, including a list of pre-assigned queues.
-
-
Select + to add another queue to monitor. Select X to remove a queue from the list.
-
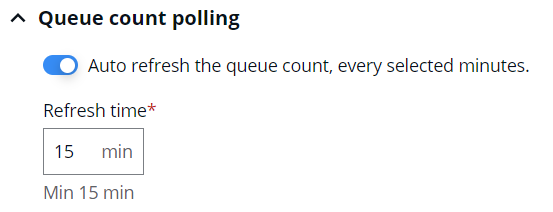
To automatically refresh the queue count at an interval, ensure Auto refresh is turned on and specify the interval (minimum every 15 minutes).
-
Select Save.
Working with queues
-
Select the My queues (
 ) icon in the upper left near the Home icon. If you do not have any queues configured, select the Open settings button and follow the directions above to configure queues.
 -
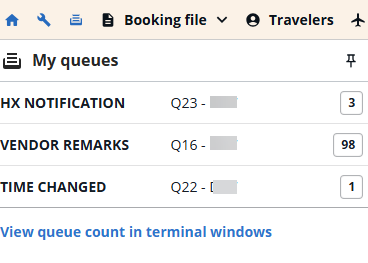
The list of queues you specified display along with the queue count. Select a queue row to view the list of booking files in that queue.
-
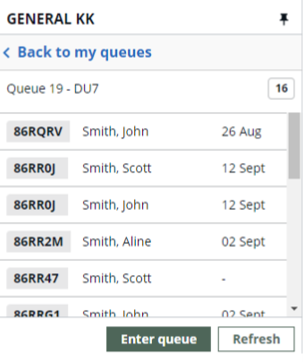
The list of booking files in the queue displays.
-
Select a booking file row to display the booking file. If you are working in the graphical view, the graphical booking file displays. If you are working in terminal, it displays in terminal.
-
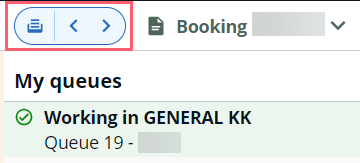
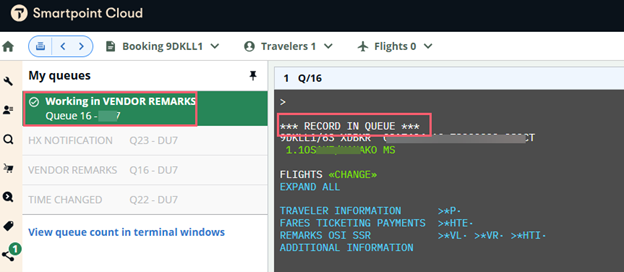
Select the Enter queue button at the bottom of the panel to work the queue. The first booking file in the queue displays. A Working in <queue name> message displays at the top of the booking file list.
When you are in a queue, arrow buttons near the My queues icon display.
-
Select the Previous (
 ) arrow to display the last booking file viewed.
 -
Select the Next (
 ) arrow to display the next booking file in the queue.
-
-
Select Exit queue to exit the queue. When working in a queue, you cannot enter another queue until you exit the queue in which you are working.
-
Select the Refresh button at any time to get the latest queue information (rather than wait for the queue poll interval).
-
If you do not have the queues panel visible when the automatic polling occurs and if the booking file count on a monitored queue increases, the My queues icon displays with an orange dot ![]() to indicate that the booking file count has increased.
to indicate that the booking file count has increased.
You can manage the work to be done on booking files by performing various queue counts. In addition, Travelport+ (1G) enables you to view a list of booking files in a queue. These functions are important factors in increasing office productivity.
Remove booking file from queue with My Queues panel
Select a queue in the My Queues panel by clicking on the row.
In this example, queue 19 is clicked, and the queue list panel is displayed:
Select Enter queue. The first booking in the queue will now be displayed in the terminal or Graphical Booking File (whichever environment the user has active on the right).
If you need to start “working the queue” beginning at a specific PNR, hover over the PNR you wish to display, click on the vertical ellipses' icon (three dots) and select “Retrieve file in queue”.
The PNR will be displayed in the terminal showing “on queue” (queue 10 in this example). The “Working in queue” banner will be displayed in the left panel.
On the top bar (Booking View) click on the “Booking XXXXXX” button which contains the record locator.
An actions menu will be displayed. By selecting ‘Remove file from queue’ the booking file will be removed from the queue and the next booking in the queue will be displayed.

Terminal queues
Refer to the Travelport+ Formats guide for queue terminal commands.
Counting booking files in queue
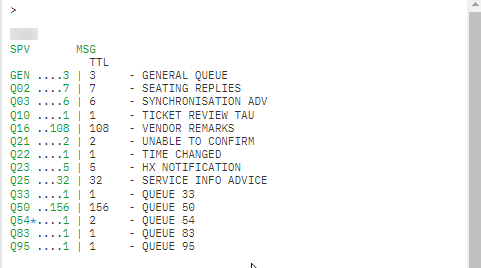
Working queues is easy using Smartpoint Cloud. Entry QCA displays a list of queues with booking files and the number of booking files in those queues.
Queue categories
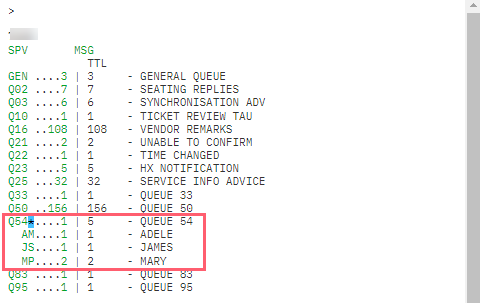
A blue asterisk next to a queue number indicates the queue has categories.
Select the asterisk to display the categories and the booking file count. Select the asterisk again to close the display.
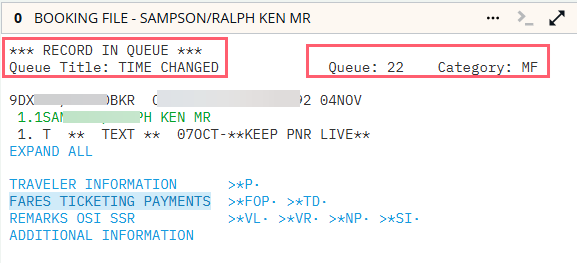
Display a booking from queue in terminal windows
You can display a booking in Queues by pressing on the queue number from the QCA response, or with the entry Q/queue number. For example, Q/22. The first booking in the queue will be displayed in the terminal with a header showing the queue number, the title and, if applicable, the category.
Additional formats H/BFQC
|
Format |
Explanation |
|---|---|
|
QCA |
Count all queues |
|
QCA/AH3 |
Count all queues for branch AH3 |
|
QCA*50 |
Count all queues with more than 50 booking files |
|
QCA/AH3*50 |
Count all queues for branch AH3 with more than 50 booking files |
|
QCB |
Count queues 0 and 1 |
|
QCB/GL2 |
Count queues 0 and 1 for branch GL2 |
|
QCB/37 |
Count Q37 (total number of booking files on that queue and all categories) |
|
QCT/37 |
Count Q37 (number of booking files on that main queue only, with names) |
|
QCDA/37 |
Count Q37 (total number of booking files on that queue and all categories plus a breakdown of associations) |
|
QCB/GL2/15 |
Count Q15 for branch GL2 |
|
QCB/6+12+25 |
Count Q6, Q12, and Q25 |
|
QCT/6+12+25 |
Count Q6, Q12, and Q25 (with names) |
|
QCTA/ALL |
Display a complete count for all queues, categories, and date ranges within your pseudo city |
|
QCT/37*CDM*D1 |
Count Q37, category DM, Date Range 1 |
List booking files in a specific queue
To display a list of the booking files in a specific queue, use the entry QLD/ (queue number).
Example: QLD/23
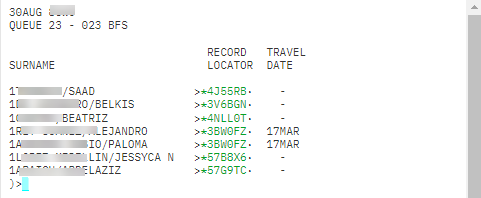
At the top of the response, you see information about the PCC, queue number, and the number of booking files in the queue.
Select any of the record locators on the list (or use the tab), to retrieve and display the booking file. PNRs with travel date information have an active segment.
Additional formats H/QLD
|
Format |
Explanation |
|---|---|
|
QLD/39 |
List all passenger names and record locators in Q39. |
|
QLD/1AA1/39*CAR*D3 |
List all passenger names and record locators in Q39 category AR date range 3 for branch 1AA1. |
|
QLD/1*CPD-@ |
List all past date quick (PDQ) names in Q1, category PD. |