Summary
This page provides instructions for reviewing the Summary page. This is Step 7 of the rule creation flow.
The Summary page lets you review and edit your rule if needed. If any conflicting actions have been added in the previous steps, a warning displays at the top of the page.
To review your rule and fix any errors:
-
Review any error messages at the top of the screen and take note of the areas that need amending.
-
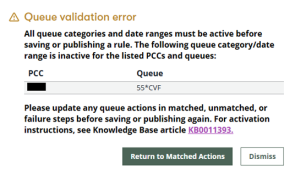
During the creation or editing of a rule, Productivity Automator validates all queue categories and associated date ranges used within the Matched Actions, Unmatched Actions, or Failure Handler steps. A rule can only be saved or published when all referenced categories and date ranges are active in the specified PCC.
-
-
Select the affected area in the associated areas by clicking the Expand or Collapse arrows.

-
Click the Edit button to display the associated page where you can fix a broken rule.
-
Optionally, click Save to save your rule, which saves the rule as inactive.
-
Click the Publish button to publish the rule to the Overview tab dashboard.
-
If any category is inactive or missing, Productivity Automator displays a validation message when the user attempts to Save or Publish the rule. The notification includes a table listing the PCC, queue, category, and date ranges to quickly identify the issue. Return to the Matched Action, Unmatched Action, and/or Failure Handler to update the rule or temporarily dismiss the message while activating the category in Travelport+.
-
For example, if you add a queue category into an Action, and don't set up the associated category, an error message similar to the following bullet may display.
-
For convenience, the notification also includes a link to the relevant knowledge base article, guiding you through the process of activating queue categories and date ranges.
-
The new rule displays at the top of the list of rules.
-
A banner “Rule has been saved” displays for few seconds on the top of the page.
-
-
The rule is published as Active. To Deactivate, click on the rule in the overview page and select Deactivate rule.