Create A New Rule
This page provides instructions for the Rule Setup screen. This is Step 1 of the rule creation flow.
To create a new rule:
-
Click the New rule button to display the Rule setup page.
-
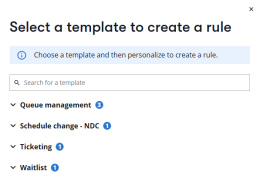
Alternatively, to use a template, which can guide users towards best practice rule implementation, making the creation easier, faster and subsequently making the rule execution more reliable, click the Use template button.

-
The rule template section helps you more easily identify the most relevant rule template. Templates are organized by rule tag, making it simple to navigate and select the option that best fits your needs.
-
A blue circle indicator displays the number of templates available within each tag category, providing a quick visual reference to the volume of templates in each group.
-
-
Enter the name of the rule in the Rule Name text box. Special characters are allowed.
-
Optionally, enter a description of the rule in the Description text box.
-
Select a rule tag (type of rule you’re creating).
-
Optionally, select whether to add a Notepad remark. This ensures that a single notepad remark is added at the time of the rule execution to inform that automation has taken place by Productivity Automator. If this is not selected, no notepad remarks are added by Productivity Automator.
-
Enter your PCC in the PCC text box. If more than one PCC is associated with your account, you’ll be able to select them from the dropdown in the same field. There is no limit to the number of PCCs per rule. Optionally, click Select all to select all PCCs at once.
-
Enter up to 25 Queue Numbers on which this rule will run, separated by a comma. Range is 0-99. For example, a rule could be configured that targets queues 20, 21, and 22, and performs an action on any PNRs that match the rule's triggers within all three of those queues.
Note: Regardless of the order in which you enter queue numbers, (e.g., 1, 99, 2, 75) the queue numbers will be reordered in ascending order (1, 2, 75, 99).
To include categories and date ranges, use an asterisk.

-
Queue Category. This category is a two-digit alpha or numeric designated to your queue. For example, CK. This entry cannot be a combination of alphanumeric, e.g., K7.
-
Date Range This range denotes a particular date range.. For example, D1 - D4.
Note: A Queue Category is required first to select a Date Range.
-
-
Enter a Preferred contact email to communicate any urgent issues with the rule performance or advice on rule efficiencies. Note: Any existing rules are auto-populated with the email address of the user who created the rule. The email address can be manually updated to an alternative.
-
Click Next to display the Triggers screen.