Schedule
This page provides instructions for the creation of a schedule. This is Step 6 of the rule creation flow.
The Schedule page lets you create a schedule to define when your rule should run.
We recommended choosing a minimum rule frequency of 15 mins or more. Using a frequency value lower than this is only recommended when targeting queue sizes of less than 1000 PNRs.
To create a schedule:
-
Set Frequency. Select how often the schedule runs. The Run every menu changes based on the option selected.
-
Minutes The Run every menu lets you select 5-minute intervals from 5 to 55. For example. if you publish a rule with a 15-minute frequency, the rule runs on the 15, 30, 45, 00 of every hour, regardless of publish time.
Note: A Recommended Information pop-up message displays when either a 5 or 10 minute frequency has been selected: "We recommend choosing a minimum rule frequency of 15 minutes or more. Using a frequency value lower than this is only recommended when targeting queue sizes of less than 1000 PNRs." -
Hours The Run every menu lets you select between 1 and 72 hours (3 days). If you publish a rule with a 1-hour frequency, the rule runs on the hour (00) every hour, regardless of the time you publish.
-
Days The Run every menu lets you select Once or Twice a day. If you publish a rule with Once a day frequency, and there is no time given, the rule runs at 12:00 midday, each day.
Note: Where there has been more than one queue added to a rule, the lowest rule frequency that can be applied is 15 minutes. If you require the rule to run every 5 minutes,
-
Copy the rule.
-
Apply only one queue number per rule.
-
-
Set Time lets you set the time your rule runs based on previous selections. Optionally, select the Set time check box.
-
If either Minutes or Hours were selected in step 1, enter the times in the From and To field. Alternatively, click the clock icon
 and select the time from the menu.
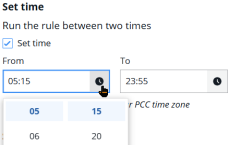
-
If you selected Once a Day in Set Frequency, enter the time in the At time field.
-
If you selected Twice a Day in Set Frequency, enter the first and second run time.
-
Times set will be based upon your main CIDB PCC time zone.
-
-
Set Date(s) lets you run the rule on a specific date, or between a range of dates. Select date(s) for this rule to run by clicking the Set Date(s) check box. The Start Date and End Date fields display.
-
Select the field to display a calendar pop-up, and choose both a begin date and end date for the rule to run.
-
Choose the same start date and end date to have the rule run only one day.
-
-
Set Day(s). Select the Set Day(s) check box to select which days the rule will run during the selected dates. When selected, the Days of the week area displays with Monday - Sunday check boxes. Select the specific days for the rule to run.
-
Review the schedule summary at the bottom of the screen and adjust your schedule as necessary.
-
Click Next to display the Summary screen.