Check Queue Maintenance
|
|
|
Training demonstration related to this topic (click to start):
|

The Check Queue Maintenance table contains check requests that were stored for later printing from the Write Individual Checks and Batch Checks functions.
In Check Queue Maintenance, you can edit or delete check requests, as needed, and then print check requests. You can also print a report by clicking REPORT.
To access the Check Queue Maintenance function:
-
On the A/P submenu, click Print Checks. Alternatively, click the Print Checks (
 ) icon on the GlobalWare icon toolbar.
The Print Checks screen appears.
-
In the field directly under the Check Entry heading, select Check Queue Maintenance if the field is not already set to this selection.
The Print Checks screen changes to accommodate the Check Queue Maintenance function.
-
In the Cash Account field, select the appropriate cash account to display check requests for that account, or ALL to display check requests for all cash accounts. Only those branches to which an employee has access are available.
You must choose a specific cash account if you want to print checks.
-
In the Account ID field, specify a full or partial account ID. If you specify a full account ID, the Search Results grid will display checks for this account ID only. Use the wildcard character (*) to specify a partial account ID, as shown in the following examples:
71*
Displays checks for account IDs that begin with "71" (for example, "7126" and "7153").
*71
Displays checks for account IDs that end with "71" (for example, "2071" and "10071").
*71*
Displays checks for account IDs that contain "71" anywhere (for example, "7126", "10713", and "10071").
Leave this field blank to display check for all accounts.
To find and select an account ID, click the lookup (
 ) button. The Find an Account ID screen appears. For details, see Using the Lookup Buttons and Screens.
 -
In the Check Type field, select the type of checks you would like to display:
- ALL – Displays all of the following types of check requests.
- Provider Checks – Displays check requests that are to a provider for travel-related services for your customers.
- Customer – Displays check requests that are to customers for refunds or for any credit they might have on their account (such as unapplied funds, gift certificates, or layaways).
- GL/Expense – Displays general ledger check requests from Write Checks and expense checks from Batch Checks.
- On Account – Displays on-account check requests from Write Checks.
- Click SEARCH to display checks.
-22_726x518.png)
Editing Check Requests
To edit a check, double-click the check, or select the check and click EDIT.
The Edit Check - Invoice Check screen appears.
You can edit all fields on this screen except Account ID and Cash Account.
The Offset Description grid contains information about what the check is paying, invoice items, or general ledger distributions.
- For general ledger checks that are not accrued payables, you can edit all fields, and you can add and delete lines.
- For On Account checks, the Amount to Pay field must be greater than zero.
- For checks that are for invoices or adjustments, you can only edit the Amount to Pay field. The amount to pay must be less than or equal to the amount due.
Make
the necessary changes to the check, and click the SAVE
button to save your changes. To revert to the original
information, click the exit (![]() ) icon,
then click No when
asked to save changes.
) icon,
then click No when
asked to save changes.
To display the previous or next check, click the PREVIOUS and NEXT buttons on the Edit Check - Invoice Check screen. If you have made changes to the current check, but have not yet saved the changes, you are prompted to save the changes. If you select Yes, the changes are saved. If you select No, the check reverts to the original information.
Click the exit (![]() ) icon to return to the
Check Queue Maintenance screen.
) icon to return to the
Check Queue Maintenance screen.
Deleting Check Requests
If you need to make any changes that are not allowed within Check Queue Maintenance, delete the check request. You might want to delete a check if you need to make changes to an invoice item that the check will pay for.
To delete a check print request, click the check request on the Check Queue Maintenance screen, and then click DELETE.
Report
The check request report is useful for determining before printing how much check stock you need and how much cash you need.
- Select the check requests you want on the report. You can click SELECT ALL, or, to select individual checks, press the Ctrl key and click on the check using your mouse.
- Click REPORT.
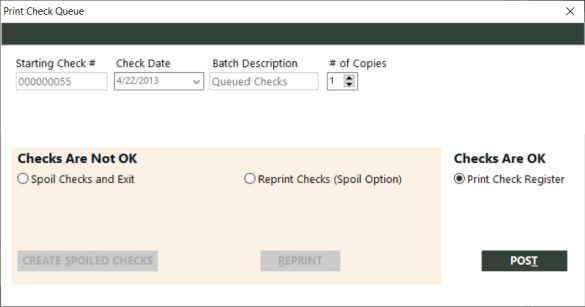
Printing Check Register at Posting
To print the check register at posting, select Print Check Register on the Print Check Queue dialog box.