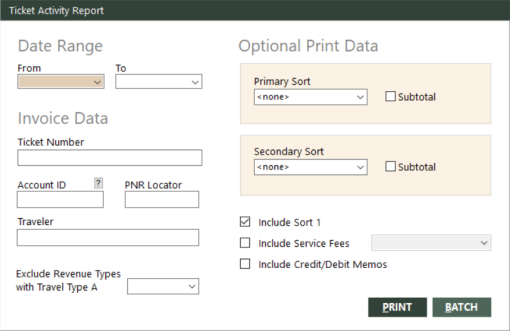
Ticket Activity Report
The Ticket Activity Report enables you to query exchanged, refunded, and voided tickets. It also provides options to show service fees and credit/debit memos associated with the tickets. You can use this report to quickly see what happened to a ticket and its associated items.
Running the report
To run the report:
-
On the Invoice menu, click Ticket Activity Report.
The Ticket Activity Report dialog box appears.
 Field descriptions
The following table describes the fields on the Ticket Activity Report dialog box.
Field Description From (for date range)
Beginning date of a range of dates. These dates represent most recent ticket activity. Ticket activity occurring within the specified range of dates will be included on the report. You must use this date in conjunction with the To date to define a range.
To (for date range)
Ending date of a range of dates. These dates represent most recent ticket activity. Ticket activity occurring within the specified range of dates will be included on the report. You must use this date in conjunction with the From date to define a range.
Ticket Number
Number of the ticket to include on the report. The report will include activity for this ticket only. Leave this field blank to include all tickets.
Account ID
Full or partial customer account ID. If you specify a full account ID, the report will include tickets for this account ID only. Use the wildcard character (*) to specify a partial account ID, as shown in the following examples:
71*
Includes tickets for account IDs that begin with "71" (for example, "7126" and "7153").
*71
Includes tickets for account IDs that end with "71" (for example, "2071" and "10071").
*71*
Includes tickets for account IDs that contain "71" anywhere (for example, "7126", "10713", and "10071").
You can also specify @TAGGED to include tickets for tagged accounts only, or @ followed by a customer interest code (for example, @SKI) to include tickets for only accounts with that interest.
Leave this field blank to include tickets for all customers.
To find and select a customer account ID, click the lookup (
 ) button. The Find an Account ID screen appears. For details, see Using the Lookup Buttons and Screens.
PNR Locator
Passenger Name Record (PNR) locator. The report will include ticket activity associated with this PNR locator only. Leave this field blank to include all ticket activity, regardless of PNR locator.
Traveler
Name of the traveler to include on the report. The report will include ticket activity associated with this traveler only. You can use the wildcard character (*) to specify a partial traveler name. For example, type SMITH/* to include all travelers with the last name SMITH.
Exclude Revenue Types with Travel Type A
Indicates the revenue types with travel type A (Air) to exclude from the report. This field enables you to specify one or more revenue types to exclude. To exclude one, select the revenue type from the drop-down list, and then press Enter. To exclude more than one, select the desired revenue types while pressing the Ctrl key, and then press Enter.
Primary Sort
First-level field to use for sorting report data. The following fields are available from the drop-down list: AccountId, Branch, and TicketNum. You can also select <none>.
Subtotal (for primary sort)
Indicates whether to subtotal based on the field specified in the Primary Sort field.
Secondary Sort
Second-level field to use for sorting report data. The following fields are available from the drop-down list: AccountId, Branch, and TicketNum. You can also select <none>.
Subtotal (for secondary sort)
Indicates whether to subtotal based on the field specified in the Secondary Sort field.
Include Sort 1
Indicates whether to include sort 1 data for the invoice item (if any) on the report. This data comes from the Sort 1 field on the Invoice screen. See Using the Invoice Screen.
Include Service Fees
Indicates whether to include service fees on the report.
Include Credit/Debit Memos
Indicates whether to include credit/debit memos on the report.
-
Complete the fields as appropriate.
Note: The date fields for Date Range are required.
- Choose one of the following print options:
To print the report immediately, click PRINT.
The Send to dialog box appears. Select a report destination. For more information, see Printing Overview.
To store the report as part of a batch for printing later, click BATCH.
The Choose a Batch dialog box appears. For more information, see Batch Printing.