Standard GL Entries
GlobalWare enables you to create standard general ledger entries for transactions that recur frequently in your business. They are recurring journal entries made on a periodic basis, such as monthly. To use the entry, post it. See Journal Entries. When you are ready to pay it again the following month, post it again. This entry is always available to you until you delete it.
You can use standard general ledger entries to populate Journal Entries, checks posted to the general ledger in Write Checks, and Expense Payables. When you use standard general ledger entries in these programs, you can change the amounts while retaining all the account information. This helps minimize your data entry, even for entries that you do regularly for different amounts.
Standard general ledger entries save significant time when entering general ledger checks because you can set up a standard entry for every check you write on a regular basis, such as phone, rent, and payroll checks. This significantly reduces data entry in Write Individual Checks. Or, if you prefer to create expense payables and write checks against the payable, you can use standard general ledger entries to create the payables and eliminate most of the data entry in Create Expense Payables.
You can create standard general ledger entries for other general ledger recurring items, such as depreciations, and use them to populate Journal Entries. Typical uses of standard general ledger entries include Payroll, ARC Draft, Rent, and Phone Bill.
To use a standard general ledger entry for general ledger checks:
- The name of the standard general ledger entry must be the same as the account ID to which the check will be written.
- You must enter the cash account transaction with a negative amount first, then the associated debit transactions. The cash account must be the same as the one you will use in Write Checks.
To use a standard general ledger entry for expense payables:
- The name of the standard general ledger entry must be the same as the account ID the payable is for.
- You must enter the payable transaction with the Accrued Payables chart (usually 2120) with a negative amount first, then the associated debit transactions.
You can set up only one standard general ledger entry per account ID.
Adding Standard General Ledger Entries
To add a standard general ledger entry:
-
On the GL submenu, click Standard GL Entries.
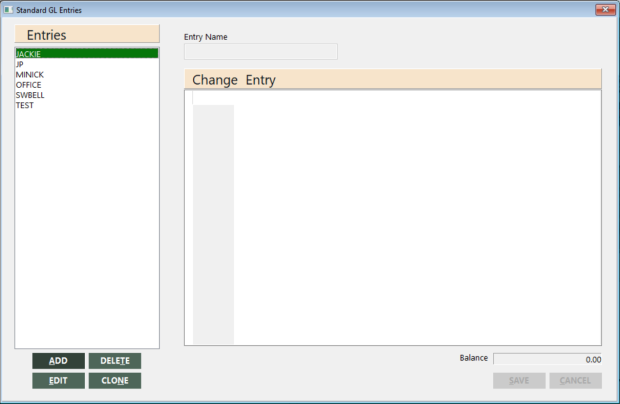
The Standard GL Entries screen appears.
The Entries area on the screen lists the existing standard general ledger entries (if any) for the branches to which the user has access.
-
Click ADD. Add is only available for those branches to which the user has access.
-
In the Entry Name field, type a name for the new standard general ledger entry, and then click OK. A transaction row appears in the Change Entry grid.
-
For each transaction row, specify the general ledger account number, branch, reference one, two, and three, a comment explaining the entry, and the amount (positive for debits, negative for credits).
- A zero dollar entry is not allowed and will not be saved. If you load 0.00 standard journal entries lines, they will not store.
- For the general ledger account number, you can also select the account; see Locating/Selecting General Ledger Chart Numbers.
- For subsequent entries, you can press F10 to copy the data from the row above for each field (thus eliminating repetition). Pressing F10 in the Amount field stores the amount needed to make all transactions net to zero.
- To add a transaction row at the end of the list, press the Down Arrow key or press the Tab or Enter key at the end of the last transaction row. To add a transaction row within the list, click the transaction row below where you want to add the transaction row, and press Insert. To delete a transaction row, click the row and press Ctrl+Delete. A message appears, asking you to confirm deleting the transaction. Click OK.
-
When finished, click SAVE.
GlobalWare adds the entry and lists it in the Entries area of the screen.
Deleting Standard General Ledger Entries
To delete a standard general ledger entry:
- Select the entry you want to delete in the Entries area of the Standard GL Entries screen.
-
Click DELETE or press Delete.
A message appears, asking you to confirm deleting the entry.
-
Click Yes.
GlobalWare deletes the entry and removes it from the Entries area of the screen.
Editing Standard General Ledger Entries
To edit a standard general ledger entry:
-
Select the entry you want to edit in the Entries area of the Standard GL Entries screen, and then click EDIT.
Note: Alternatively, you can double-click the entry in the Entries area to edit it.
The transaction rows for the entry appear in the Change Entry grid.
- Change the transaction rows as appropriate. You can also add and delete rows. For details, see Adding Standard General Ledger Entries above.
- When finished, click SAVE.
Cloning Standard General Ledger Entries
To clone an existing standard general ledger entry:
- Select the entry you want to edit in the Entries area of the Standard GL Entries screen.
- Click CLONE.
-
In the Entry Name field, type a name for the new standard general ledger entry, and then click OK.
A message appears, asking you to confirm cloning the selected entry to the new entry.
- Click Yes.
- To edit the transactions for the cloned entry, see Editing Standard General Ledger Entries above.