Import Invoices Procedure
You can use the Import Invoices function to validate and import the following types of data into the GlobalWare database:
- New customer and provider accounts
- New invoices (including any comments, sort lines, and non-accounting data associated with them)
- Comments, sort lines, and non-accounting data for invoices that already exist in GlobalWare's Invoice and Comments tables
This topic also explains using Travelport's COMTIMP.XLS template to create the comment import file (COMTIMP.TXT), which the import process uses to import comments, sort lines, and non-accounting data. See Creating the Comment Import File (COMTIMP.TXT).
Important: Before you import data, be sure to carefully read the information in Before You Begin Importing Invoices.
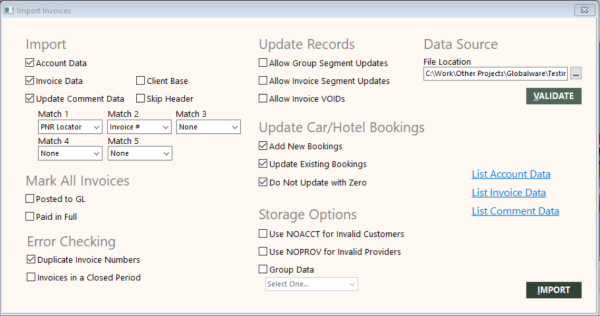
Validating and Importing Invoice Data
To validate and import invoice data:
-
Back up your GlobalWare database. See Backing Up GlobalWare Data.
-
On the Interface submenu, click Import Invoices.
The Import Invoices screen appears.
-
In the Import section, select which files you want to import. If you select Account Data, Invoice Data, and Update Comment Data, the account file is imported first, followed by the invoice file, and then the comment file.
-
Choose Account Data to import provider and/or customer accounts that are not yet in GlobalWare by using the file IMPACCT.DAT. It is recommended that you import accounts using this method. By choosing this option, NoACCT isn't used for invalid customers or providers. Account ID import allows special characters (numbers, spaces, period (.), dash (-), slash (/), comma (,), semicolon (;), colon (:), and @).
This file can be imported through the Command Line Import. Refer to the IMPACCT.DAT section of the Invoice Data Import Specification for the record layout.
-
Choose Invoice Data to import invoices, related comments, segments, and exchange information by using the file IMPINV.DAT. It does not update the tax table. This option will import comment data for new invoices only. Comment data for invoices that already exist in GlobalWare will not be imported unless Update Comment Data is selected.
Tip: This option is commonly selected.
This file can be imported through the Command Line Import. Refer to the IMPINV.DAT section of the Invoice Data Import Specification for the record layout.
-
Choose Update Comment Data to update comment, sort, and non-accounting data by using the file COMTIMP.TXT. When selected, choose which items you want to use for matching. Match 1 and Match 2 are required. This data applies to invoices that already exist in GlobalWare. Comment data is imported for new invoices if Invoice Data is selected.
If you used the COMTIMP.XLS template provided by Travelport to create the COMTIMP.TXT file, select Skip Header. For information about using the COMTIMP.XLS template to create COMTIMP.TXT, see Creating the Comment Import File (COMTIMP.TXT) below.
This file cannot be imported through the Command Line Import. Refer to the COMTIMP.TXT section of the Invoice Data Import Specification for the record layout, as well as which non accountable fields are updated.
-
Select Client Base to import invoices from Client Base. When invoices are imported from Client Base, hotel booking invoices store the current daily rate for the hotel.
-
-
Important: Use these options with caution. These options are typically used for historical reference. You may choose to use these options if you are consolidating two databases and want records from one database to exist in a second database.
-
If Posted to GL is checked, then the imported invoice is marked as posted to GL.
-
If Paid in Full is checked, then the imported invoices are marked as paid in full.
-
-
When Duplicate Invoice Numbers is checked, duplicate invoices are not imported. However, if Add New Booking is checked, then new bookings are added to the original invoice and a message log displays. If Update Existing Bookings is selected, then updated bookings are imported and a message log displays with the invoice numbers updated and action taken.
If Duplicate Invoice Numbers is not checked and if Update Existing Bookings is selected, invoices with a status of J or V are updated but no message log displays. You will need to go to the Invoice Change Log to find out what was updated.
-
When Invoices in a Closed Period is checked, new invoices are not imported if in a closed period. Therefore, no status (Y, N, J, or V) is updated if in a closed period. If checked, all status are updated.
This option is commonly selected because users do not want to run old invoices. However, do not select this option if you want to update existing bookings in order to gather tracking information. When not checked, all status are updated. If unchecked and if Allow Invoice VOIDs is checked (status = V), then the voided invoices are updated.
-
To update air segments and group air segments, select Allow Group Segment/Invoice Updates. These segments will match on invoice number, PNR locator (can be blank), traveler, revenue type (A or R), provider, destination (can be blank), and ticket/confirmation number (can be blank). It is recommended to also select Duplicate Invoice Numbers to see messages during import.
-
To update existing car and hotel bookings, select Allow Group Segment/Invoice Updates. It is recommended to also select Duplicate Invoice Numbers to see messages during import.
-
When Allow Invoice VOIDs is checked, invoices with a status of V are updated. This option is available with release 9.5. Invoice voids are only allowed if the record is not posted to GL, the invoice has not been previously billed, and the return date is later than today's date.
-
Select Add New Bookings to add new bookings to existing invoices if the invoice is not in a closed period and if the invoice number matches. This option is available with release 9.5.
-
When Update Exiting Bookings is selected, bookings with a status of J are updated. Existing car and hotel tracking items (settle type T) are updated. This option is available with release 9.5.
Note: Records are not changed if "No Auto-Update" is checked in the invoice.
Existing bookings are updated by matched criteria:
-
Not in closed period (only if checked in the Error Checking section)
-
Invoice number
-
PNR locator (note can be blank)
-
CCRecFlag=N
-
Settle type=T
-
Traveler
-
Revenue type
-
Provider
-
Destination (note can be blank)
-
Ticket/Confirmation # (note can be blank)
-
-
When Do Not Update with Zero is checked, then when matches are found for Update Existing Bookings, no updates are made if the total value is zero.
-
When Use NOACCT for Invalid Customers is checked, the value NOACCT is used for invalid customer account IDs and Report To IDs. If not selected, the import process does not store invalid customers because customers in an invoice must exist in the Account ID (AccountId) table. Also, if selected, the validation report does not record errors for invalid customers.
Tip: If your interface preferences do not allow creation of new customers or providers, you may choose not to select Use NoACCT and Use NOPROV, then validate, review the error list, and fix errors before importing.
-
When Use NOPROV for Invalid Providers is checked, the value NOPROV is used for invalid provider account IDs. If not selected, the import process does not store invalid providers because providers in an invoice must exist in the Account ID (AccountId) table. Also, if selected, the validation report does not record errors for invalid providers.
-
When Group Data is selected, group passengers and segments are imported.
-
Ensure that File Location indicates the path to the import files.
Note: You can put these files anywhere on your computer in an encrypted file system (EFS) folder. It is recommended that you put them in an Import folder in the GlobalWare\GWUser folder within your local user folder (C:\Users\userfolder\GlobalWare\GWUser\Import). Wherever you put them, ensure that the files are in an EFS folder to meet PCI and PII compliance requirements.
-
Click VALIDATE.
Tip: By clicking Validate, the formats and layouts are validated and a minimal list of errors is returned without importing data. It is highly recommended that you validate the data before importing because the import process does not import records if those records contain errors. The import files are validated in the following order if Account Data, Invoice Data, and Update Comment Data are selected: IMPACCT.DAT, IMPINV.DAT, and then COMTIMP.TXT.
-
Fix all reported issues. GlobalWare creates each validation report based on whether you selected Account Data, Invoice Data, or Update Comment Data.
- For accounts, IMPACCTERRdate.CSV
- For invoices, IMPINVERRdate.CSV
- For comment data, IMPCMTERRdate.CSV
where date is the date on which the report was created.
-
You can preview the data in a report format for each file to be imported.
-
Select List Account Data to display customer and provider account data contained in the account import file (IMPACCT.DAT).
-
Select List Invoice Data to display invoice data contained in the invoice import file (IMPINV.DAT).
-
Select List Comment Data to display comment data contained in the comment import file (COMTIMP.TXT).
-
-
Click IMPORT.
GlobalWare imports all accounts, invoices, and/or comments based on your selections. To optionally review imported accounts and invoices, see Optionally Reviewing Imported Data below.
Import section
Mark All Invoices section
Error Checking section
Update Records section
The ImpPrevBilled field in the Invoice Data Import Specification was updated with values J for update and V for void.
Update Car/Hotel Bookings section
The ImpPrevBilled field in the Invoice Data Import Specification was updated with values J for update and V for void.
Storage Options section
These options are available if Invoice Data is selected.
Data Source section
List Data section
Import Data
Optionally Reviewing Imported Data
After the import process finishes, you can optionally review the following items, if applicable, and make changes as needed.
-
Imported customer and provider accounts
To view the imported accounts on GlobalWare's Account ID screen:
- Select Customer or Provider from the Account Type drop-down list.
- Specify today's date (or the date on which you ran the import process) in the Opened From and To fields.
- Click SEARCH.
For details, see Using the Account ID Screen.
-
Imported invoices
To view the imported invoices on GlobalWare's Invoice Edit & Query screen:
- Specify an appropriate date range in the Invoice Dates From and To fields.
- In the Conditions area of the screen, select Converted from the Invoice Field drop-down list.
- Select = from the Comparison drop-down list.
- Type I (for imported) in the Value field.
- Click SEARCH.
For details, see Accessing the Invoice File.
Creating the Comment Import File (COMTIMP.TXT)
A third party can supply you with the comment import file (COMTIMP.TXT) or you can create it.
To create the comment import file:
- Right-click the following link and save the file to your computer: COMTIMP.XLS.
-
Open the COMTIMP.XLS file.
A Microsoft Excel spreadsheet appears. The row across the top is the header row.
IMPORTANT: The COMTIMP.XLS file must contain a header row. The import process will fail without it.
- In the row below the header row, type the information for the first record to include in the comment import file. The information you provide must comply with GlobalWare's file specifications for COMTIMP.TXT. For specifications, see COMTIMP.TXT in GlobalWare Invoice Data Import Specifications.
- For each additional record, type the appropriate information in an additional row.
- When finished, save the file as COMTIMP.TXT. Choose a text file format that uses tab-delimited data. (If you do not use this format, you will receive a syntax error.)
- Put the text file into the folder you specified in the File Location field on the Import Invoices screen.
IMPORTANT: Before you run the import process, be sure to select Skip Header on the Import Invoices screen so that the header row in the COMPTIMP.TXT file will be ignored during processing. The import process will fail without this selection. For information about Skip Header, see Validating and Importing Invoice Data above.