Distribution List
Distribution Lists allow for a creation of groups of agents so that alerts, to-dos, and notes can be sent to multiple users in one message. Distribution Lists are used within the Inbox widget.
Create a Distribution List
-
From the Editors menu, select Open Distribution Lists.
-
Click the Add List button, located below the Distribution Lists box.
-
Enter a distribution list name and click Save.
-
Add your login to the "Users Permitted to Send to List."
Note: At least one agent must be in the "Users Permitted to Send to List." Only users in this list are able to see the Distribution List in the Universal Desktop GUI, and only these users are able to use the list to send to the Distribution List / Inbox Recipients. -
Click the Add Permitted button. The Search dialog opens with the Agent profile type selected.
-
To search for an Agent, select the field by which to search (i.e., User name or Surname), then enter the search value. Click the Search button.
Note: Optionally, you can add more search values by clicking the add search field link. When multiple search fields are used, only results that match all search fields display.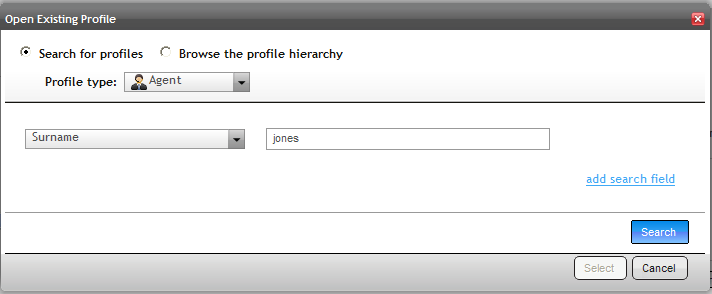
-
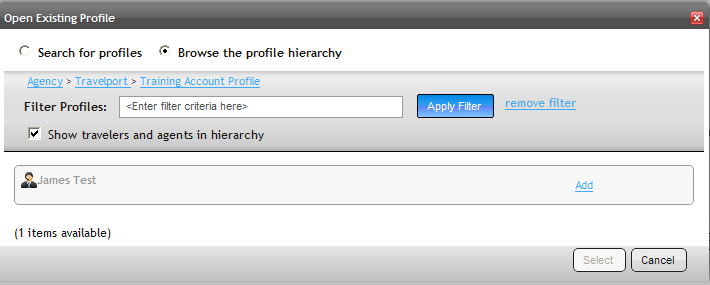
To browse the hierarchy for a user, select the Browse the profile hierarchy option. Click a hierarchy level to view the hierarchy levels below it and the agents and users within that level. To add agents to the list, click the Add link to the right of the name. When all agents have been added, click the Select button.
-
Click the Add Recipient button under the "Distribution List / Inbox Recipients" area. Search for profiles or browse the profile hierarchy to find the recipients of the Distribution List. Select the recipients by clicking Add, then click the Select button.
Note: The agents in the "Distribution List / Inbox Recipients" area cannot use this distribution list to send messages unless they are specified in the "Users permitted to Send to List."
The Distribution List is now available in Universal Desktop. To use the Distribution List,
-
In Universal Desktop, go to the Inbox.
-
Click Add Item.
-
Click Add.
-
Select the Search for Distribution Lists option.
-
Enter the list name or part of the name, then click Search. Distribution list matches display.
-
Click on assign and then Set.
When you open Distribution Lists in the Travelport Admin Portal, all distribution lists created throughout the entire agency are displayed.
For more information, see Ask Travelport 28369 - How do I create and use a Distribution List in the Universal Desktop?