Smart buttons
Adding GDS Variables
GDS Variables are information that you can extract from the Travelport+ (1G) host data in a PNR/Booking File.
There are a number of GDS variables, but the following set of GDS variables may be useful for many scripts:
-
%RecordLocator%
-
%OriginalPCC%
-
%CurrentPCC%
Entering GDS Variables in a Script
To enter GDS variables in a script:
-
Open the Travelport Smart Buttons Editor.
-
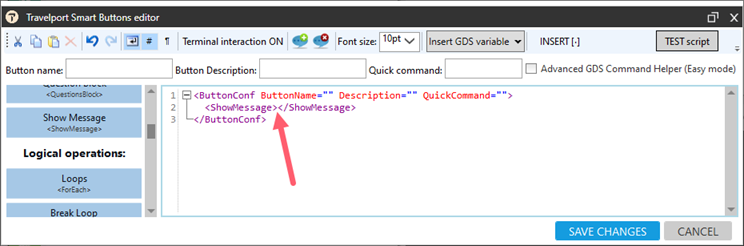
Add a control (XML element) to consume the GDS Variable. For example, drop and drag the ShowMessage button.
-
Place the cursor between the ShowMessage element tags where the value of the element goes.
-
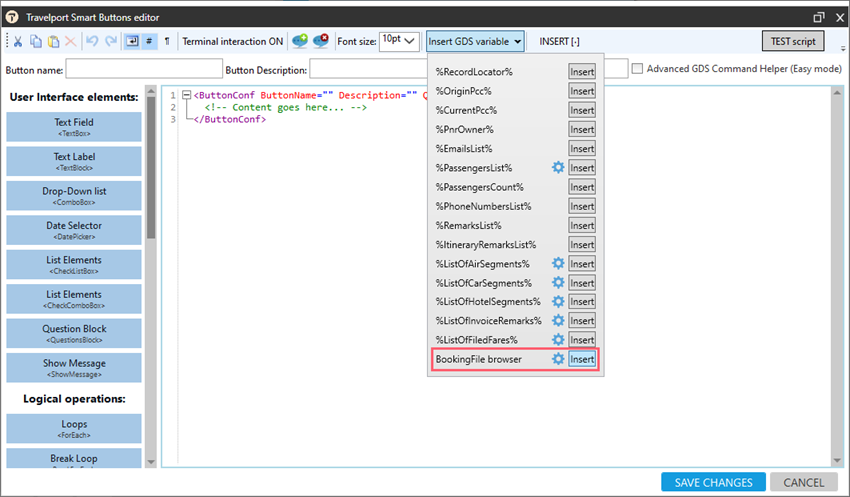
Click Insert GDS variable arrow to display a list of all available GDS variables.
Note: The Settings
 icon indicates that a variable can be configured.
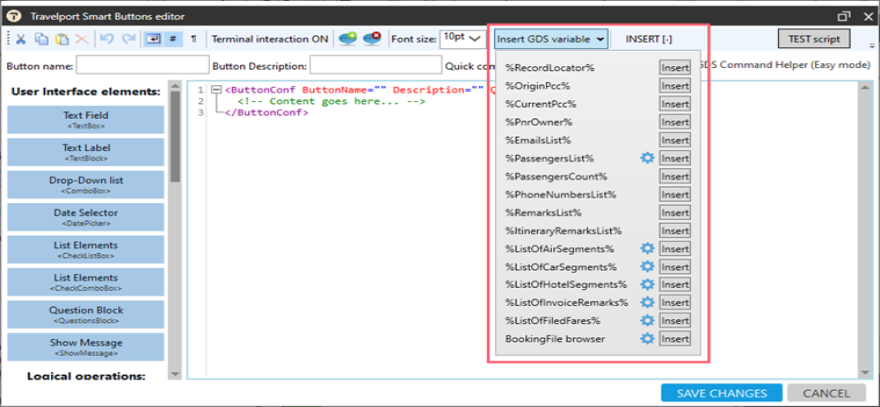
-
Click Insert next to selected GDS Variable to insert the Variable code as a value in the element (ShowMessage).
The XML code is generated:
Copy<ShowMessage>%CurrentPcc%</ShowMessage>
Configuring GDS Variables
Configurable GDS Variables allow you to decide which elements you want to use and in what format.
For example, you can use only the first name of the passenger, or the name of the passenger in a specific format. The names can be configured in different formats, such as:
-
FirstName/LastName
-
LastName/FirstName
The Settings ![]() icon indicates that a GDS Variables can be configured.
icon indicates that a GDS Variables can be configured.
-
%ListOfAirSegments%
-
%ListOfCarSegments%
-
%ListOfHotelSegments%
-
%PassengersList%
-
%InvoiceRemarks%
-
%ListOfFiledFares%
To configure a GDS variable:
This example shows configurations for the %PassengersList% variable. However, the same workflow is also used for the other GDS variables, except BookingFile browser.
-
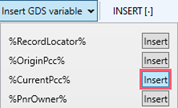
In the Smart Buttons Editor, click the Insert GDS variable arrow to display a list of all available GDS variables.
-
Click Insert next to a variable that displays a Settings
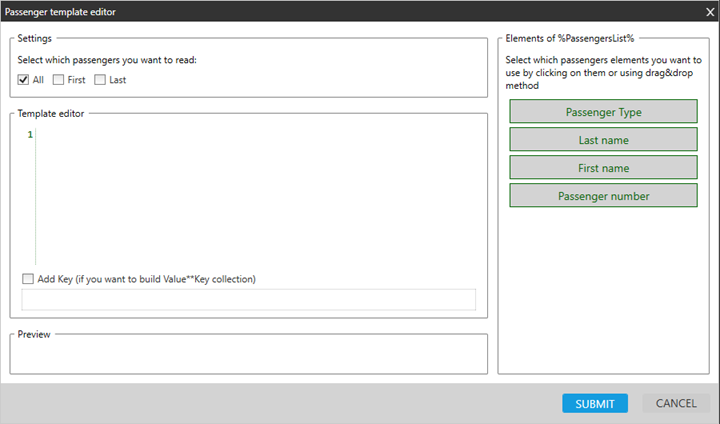
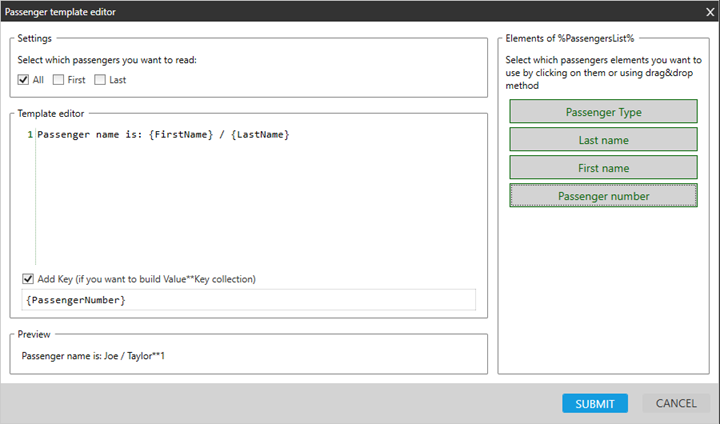
icon, which indicates that a variable can be configured. An editor window is displayed for the configurable variable. In this example, the %PassengersList% variable is inserted to display the Passenger Template Editor.
-
In Settings, select the passengers to be read.
-
All: Read information from all passengers
-
First: Read information from the first passenger only
-
Last: Read information from the last passenger only
-
-
In Template editor, enter any static text, if applicable. In this example, Passenger name is: is entered.
-
In Elements of %PassengersList%, click the desired elements to add to the editor. Or, you can drag and drop the elements to the desired location in the editor.
In this example, First name and Last name are selected as the format of data we want to keep in the variable.
-
Optional. Select Add Key and click an element from Elements of %PassengersList% to define the Key part of the element, which creates a Value**Key type of collection.v
-
In Preview, review an example of the displayed entry.
-
Click SUBMIT to enter the GDS Variable in the Smart Buttons Editor.
In this example, the variable is %PassengersList({FirstName}{LastName})%.
-
Enter this can now be entered as a value in a control (XML Element).
 Examples
The following examples show the PassengersList variable used in the Variable, ShowMessage, CheckListBox, ManageCollection, and QuestionsBlock controls.
Copy<Variable VarName="PaxName">%PassengersList({FirstName}{LastName})%</Variable>Copy<ShowMessage>%PassengersList(first - {FirstName}/{LastName})%</ShowMessage>Copy<CheckListBox Question="sadas" Width="200" SelectDefaultAll="True"
VarName="PaxNames" IsRadioButton="False" SingleSelect="False">
%PassengersList({LastName}/{FirstName})%
</CheckListBox>Copy<ManageCollection VarName="NrOfPassengers" ActionType="Count">
%PassengersList({LastName}/{FirstName})%</ManageCollection>Copy<QuestionsBlock>
<TextBlock>%PassengersList({LastName}/{FirstName})%</TextBlock>
</QuestionsBlock>
Using Configurable GDS Variables
Following are examples of using configurable GDS Variables.
Example 1
You want to have a script that allows to request SSR: CKIN for selected passengers and segments. Use GDS Variable- %ListOfAirSegments% and configure which part of the air segments you want to use.
In our example we selected that as a Value we use: SegmentNumber, CarrierCode, FlightNumber, BookingClass, DepartureDateTime, OriginCityCode, DestinationCityCode, SegmentStatusCode and this is displayed to the user ( Display="Value) and as a Key uses SegmentNumber which is returned to variable SelectedSegments (Return="Key"). This variable is then used in <ForEach> loop.
<ButtonConf ButtonName="Segments" Description="" QuickCommand="">
<CheckListBox Question="For which segment do you want to book CKIN SSR?" Width="300" VarName="SelectedSegments" IsMandatory="True" Display="Value" Return="Key">%ListOfAirSegments({SegmentNumber}. {CarrierCode} {FlightNumber} {BookingClass}{DepartureDateTime(ddMMM, en)} {OriginCityCode} {DestinationCityCode} {SegmentStatusCode}**{SegmentNumber})%</CheckListBox>
<QuestionsBlock><CheckListBox Question="Select passenger you want to send CKIN SSR" Width="200" VarName="PaxNr" IsRadioButton="True" SingleSelect="True" IsMandatory="True" Display="Value" Return="Key">%PassengersList({PassengerNumber}.{LastName}/{FirstName}**{PassengerNumber})%</CheckListBox><TextBox VarName="CKINText" Question="Enter free form text for CKIN SSR" Width="120"></TextBox></QuestionsBlock>
<ForEach><ElementsList>[SelectedSegments]</ElementsList><Action><RunCommand>SI.P[PaxNr]S[@]/CKIN*[CKINText]</RunCommand></Action></ForEach></ButtonConf>
Example 2
You want to have a script that reads text of first DI remark, and if the value of this remark is 12345 then you want the script to remove that remark.
Booking File Browser
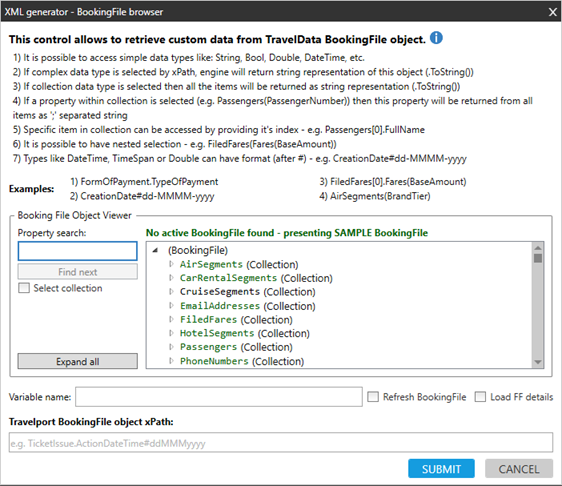
Using preconfigured GDS Variables, agents can search for any specific element of the booking file in TravelData and retrieve the value to variable as a single element or collection of elements.
This functionality create the BookingFileBrowser XML element.
How to use it:
-
Open the Travelport Smart Buttons Editor.
-
Click the Insert GDS variable arrow.
-
In BookingFile browser, click Insert.
-
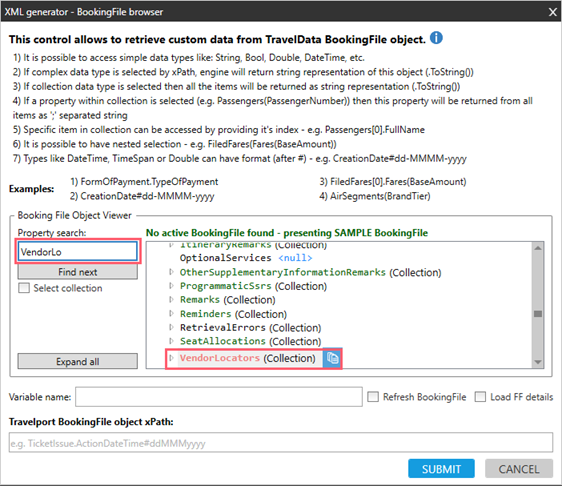
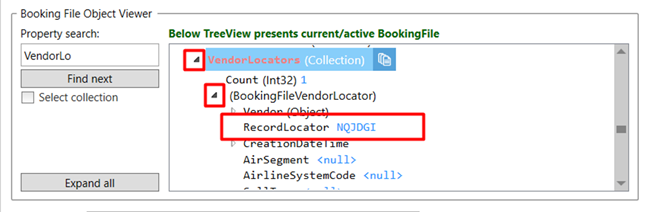
In Property search, start to enter the name of the element from the Start writing the name of the element from the Booking File that you are searching. A list of similar names is displayed.
-
Open up the next tree levels to find the desired property.
-
Highlight the property and click Copy icon.

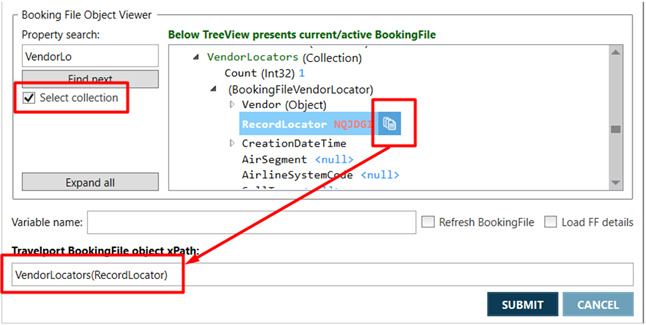
Tip! If you want to return all Vendor Locators and create a collection, before copying the property, select the check box Select collection. VendorLocators(RecordLocator) returns the collection of all Vendor Locators.
-
Paste the property information in the Travelport BookingFile object xPath field.
For VendorLocators[0].RecordLocator, the “0” in the property name means the first VendorLocator is returned. Change the number to "1" to return second Vendor Locator, etc.
-
Add Variable name that holds the returned value.

-
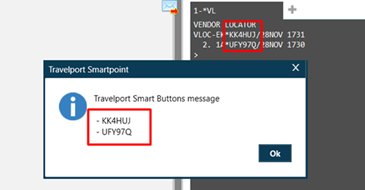
Click Submit and check if the Variable returns the value that you expected, by printing this variable in message box.
Copy<ButtonConf ButtonName="Collection of VL" Description="" QuickCommand="">
<BookingFileBrowser VarName="CollectionOfAllVendorLocators" RefreshBookingFile="False" LoadFiledFaresDetails="False">VendorLocators(RecordLocator)</BookingFileBrowser>
<ShowMessage>[CollectionOfAllVendorLocators]</ShowMessage>
</ButtonConf>
Important! Smart Buttons supports variables in any part of the BookingFileBrowser equation.
For example, this value returns a segment from the first Filed Fare (0):
FiledFares[0].SegmentNumbers
Instead of specific number of Filed Fare we can use variable in square brackets:
-
FiledFares[[CurrentIndex]].SegmentNumbers or
-
FiledFares[[@]].SegmentNumbers if using current element in a loop.