Queues
The graphical Queue panel lets you monitor, sort, and manage bookings files. You specify which queues and categories you want to monitor, as well as the refresh (polling) interval. Each pseudo city code (PCC) has a set of numbered queues. Some of these queues are reserved for predetermined functions, while other queues can be customized by your agency for internal use.
You can also use terminal entries to display and manage queues.
Graphical queues
The graphical queues panel lets you monitor bookings in queues while working in both the graphical and terminal screens. You configure the panel to display the queues and categories you want to monitor. Queues are refreshed at a specific interval; you can also refresh at any time.
Known issues
-
If you try to enter a queue in the graphical queues panel while a booking file is currently active in the host AAA, a dialog offers you the choice to Ignore and continue. Currently, clicking this option only ignores the booking file and does not continue. You have to click on the queue again to enter it.
-
If a queue being monitored in the panel has only one category and that category is not specified, the queues panel shows the queue count incorrectly.
Configure queue panel
-
Select the Settings (
 ) icon in the upper right corner of the window, select App preferences and settings, then select the Queue options tab.
 -
Enter the queue that you want to monitor. You can optionally specify a category and PCC.
-
Enter a PCC if you monitor queues on more than one PCC. You must have queue access permission or Selective Access to monitor another PCC's queues. If you do not have permission to monitor queues on the PCC entered, an error displays: Some queues could not be polled.
-
If no PCC is entered, the queue of the current (or emulated) PCC is used.
-
Refer to the Travelport+ Formats guide for queue terminal commands, including a list of pre-assigned queues.
-
-
Select + to add another queue to monitor. Select X to remove a queue from the list.
-
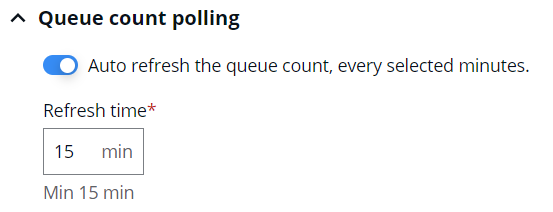
To automatically refresh the queue count at an interval, ensure Auto refresh is turned on and specify the interval (minimum every 15 minutes).
-
Select Save.
Working with queues
-
Select the My queues (
 ) icon in the upper left near the Home icon. If you do not have any queues configured, select the Open settings button and follow the directions above to configure queues.
 -
The list of queues you specified display along with the queue count. Select a queue row to view the list of booking files in that queue.

-
The list of booking files in the queue displays.
-
Select a booking file row to display the booking file. If you are working in the graphical view, the graphical booking file displays. If you are working in terminal, it displays in terminal.
-
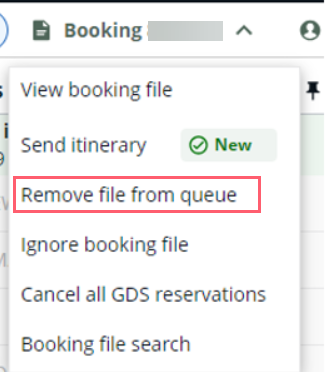
To remove a booking file from the queue, select the Booking button with the record locator, then select Remove file from queue. The booking file is removed and the next booking file in the queue displays.
-
Select the Enter queue button at the bottom of the panel to work the queue beginning at the first booking file in the queue. To begin working the queue from a different booking file, hover over the booking file row where you want to start, select the options (
 ) icon at the far right, then select Retrieve file in queue.
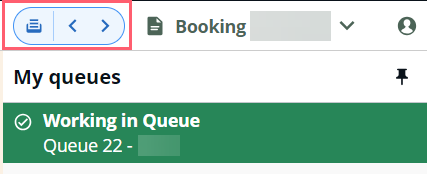
A Working in <queue name> message displays at the top of the booking file list.
When you are in a queue, arrow buttons near the My queues icon display.
-
Select the Previous (
 ) arrow to display the last booking file viewed.
 -
Select the Next (
 ) arrow to display the next booking file in the queue.
-
-
Select Exit queue to exit the queue. When working in a queue, you cannot enter another queue until you exit the queue in which you are working.
-
Select the Refresh button at any time to get the latest queue information (rather than wait for the queue poll interval). The Refresh button does not display when you are working in a queue.
-
If you do not have the queues panel visible when the automatic polling occurs and if the booking file count on a monitored queue increases, the My queues icon displays with an orange dot ![]() to indicate that the booking file count has increased.
to indicate that the booking file count has increased.
You can enter queue formats in the terminal window. Currently, you cannot remove a booking file from a queue in the graphical queue panel. Instead, you need to use a terminal format (e.g., QR removes the current booking file from the queue). Refer to the Travelport+ Formats guide for more queue terminal commands.
Terminal queues
Refer to the Travelport+ Formats guide for queue terminal commands.
Agencies can restrict terminal access and require agents to use the graphical view only. Refer to Restrict terminal access for more information.
Queue count
Entry QCA displays a list of queues with booking files and the number of booking files in that queue. A blue asterisk next to the queue number (for example,  ) indicates the queue has categories. Click the asterisk to display the categories and the booking file count.
Click on a queue number to enter that queue.
Queue placement for Schedule Change Notifications
For NDC bookings only, the following Schedule Change Notifications are placed on specific queues and also generate DI line messages. After the itinerary is updated, the booking is routed to specific queues based on the type of schedule change received:
-
Queue 11 – For schedule changes, including flight number changes, route changes, retiming, and partial involuntary cancellations
-
Queue 23 – For full involuntary cancellations, TTL expiry, no-shows, and voluntary changes made outside the NDC channel.