Manual Exchanges
Use Manual Exchange screens
In the March 2023 release of Smartpoint Cloud, graphical screens were added for manual exchanges for voluntary ticket changes.
Please Note! This Early Adopter release for the manual exchange screens is available only for ARC (US) agencies with a limited eligibility for exchangeable tickets. For BSP agencies and other tickets outside of the current scope, please continue to use Travelport+ formats for manual exchanges.
To make a manual exchange:
-
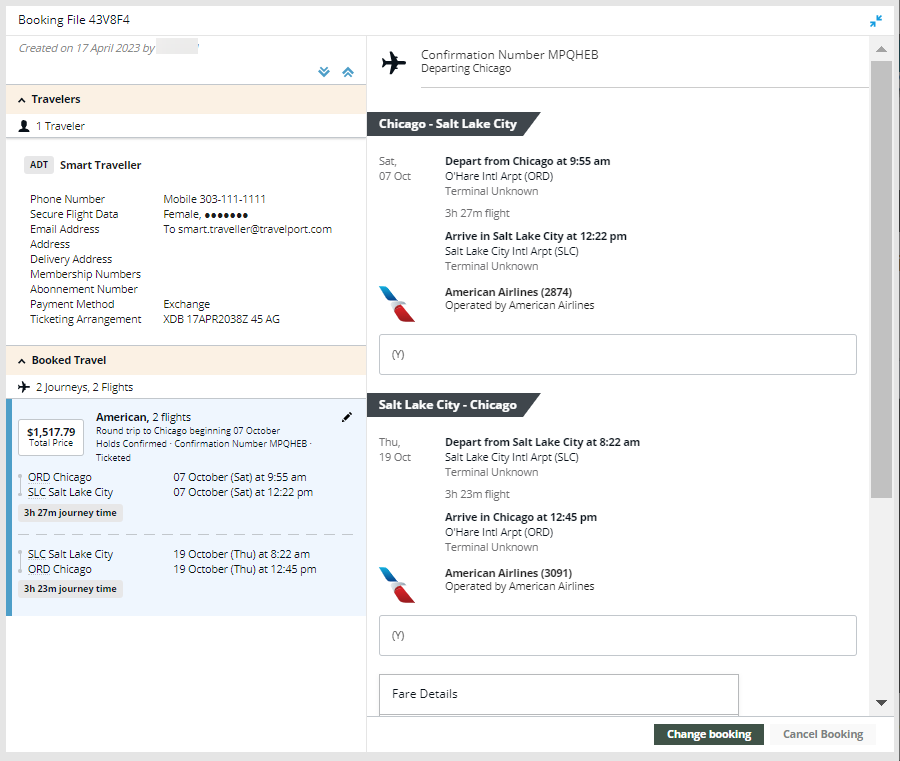
Open a PNR/Booking File with a ticketed fare that is eligible for manual exchange.
-
Segments must have an HS or HK status.
-
The ticketed fare must meet the current scope for eligibility with the Early Adopter manual exchange screens.
 Early Adopter scope
The scope for graphical manual exchanges will be expanded in future releases. However, for the current release, the manual exchanges screen is eligible only for tickets that meet the following requirements:
-
ARC (US) agencies.
-
Single passengers.
-
One Filed Fare (stored fare) per passenger.
-
One ticket number on a PNR/Booking File.
-
Wholly unflown itineraries. No past-date air segments are currently supported.
-
Originally issued tickets. Previously reticketed PNR/Booking Files are not currently supported.
-
PNR/Booking Files that do not contain NDC or Direct Payment Carrier segments.
-
Tickets issued outside of the PNR/Booking File are not yet supported. For example, a new PNR/Booking File that was created to replace a previous booking.
-
Bookings can be made using alternate currencies, but currently fees and commissions related to the exchange are displayed in US dollars (USD).
Tip! For BSP agencies and other tickets outside of the current scope, please continue to use Travelport+ formats for manual exchanges. -
-
-
Change the PNR/Booking File by adding a new fare quote that includes a supported voluntary change.
Supported Changes
These voluntary changes are supported:
-
The new itinerary has same origin and destination (O/D), but different dates and/or classes from the original ticket.
-
The new itinerary has a different origin and destination from original ticket.
-
The new itinerary has a different number of origins and destinations from original ticket.
-
The new fare has any status except X.
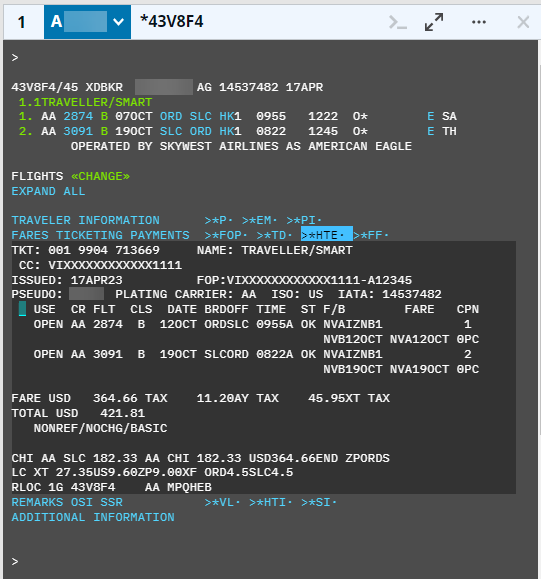
In this example, the itinerary was rebooked in a different fare class.
-
-
File a new fare (FQ). In this example, the new Filed Fare (FF) has a status of G. Note that there is no ticket number.
-
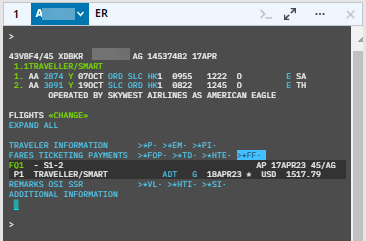
End transact (ER) the PNR/Booking File.
-
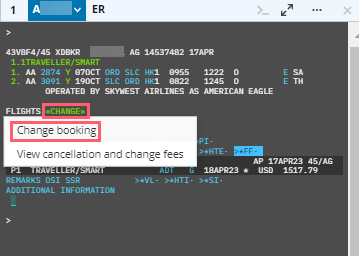
Select <<CHANGE>> then Change booking.
The Agent responsibility message is displayed. The manual exchange screens do not provide any guarantee against ADMs. Therefore, agents should obtain all necessary approvals and check all stored fare (Filed Fare) elements before ticketing.
Tip! If the ticket is eligible for automated exchange, the Enhanced Exchanges screen is displayed.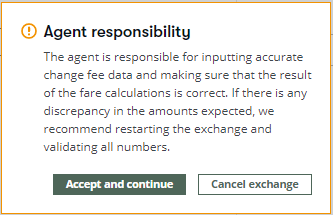
-
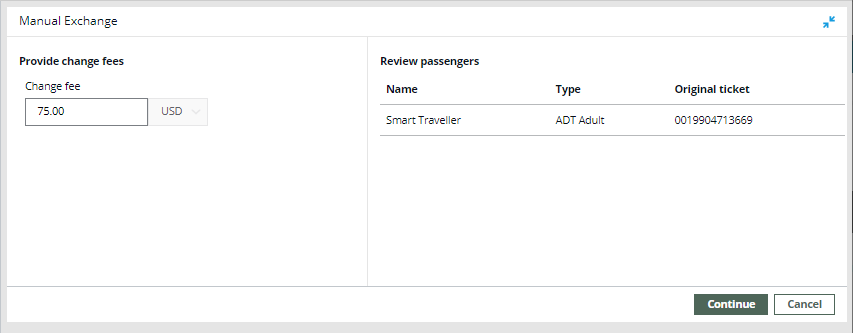
Select Accept and continue to display the Manual Exchange screen.
-
In Change fee, confirm or change the change fee for the new stored fare.
-
Review the passenger name, Passenger Type Code (PTC), and original ticket information.
-
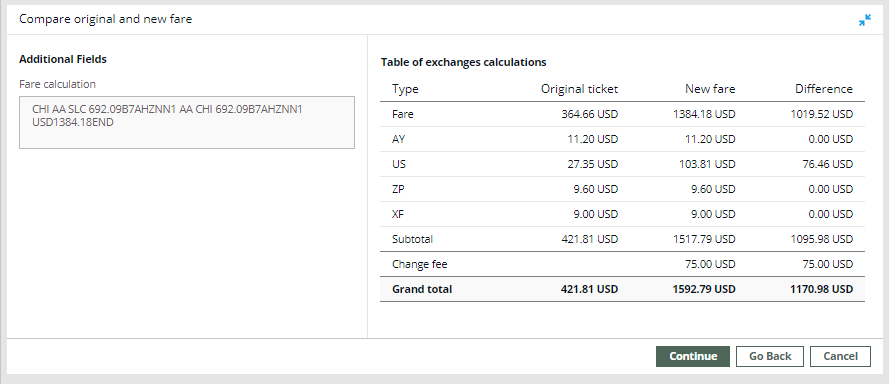
Select Continue to display the Compare original and new fare screen.
-
Review the new fare and fare difference information.
-
Select I have reviewed the calculations.
-
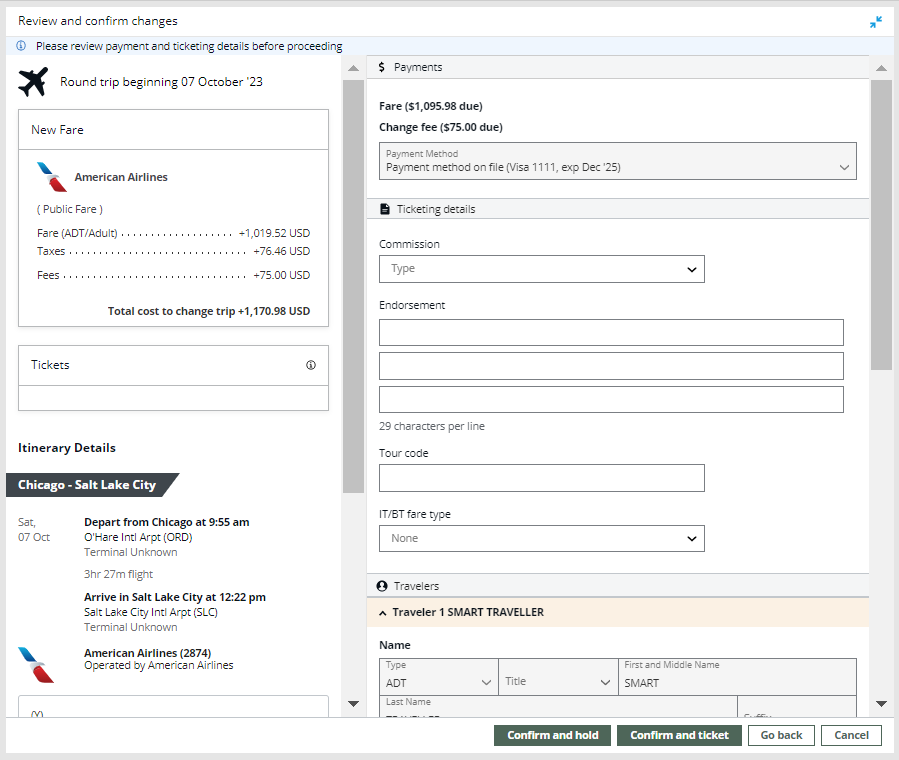
Select Continue to display the Review and confirm changes screen.
-
Review the fare and itinerary details.
If applicable. In the Payments section, review or select the payment options for add collect or the refund options for residual values. Per ARC requirements, change fees are collected at the time of ticketing.
Optional. In Payments, click the Payment Method arrow to change the form of payment for add collect options. Available forms of payment vary depending on the carrier and itinerary.
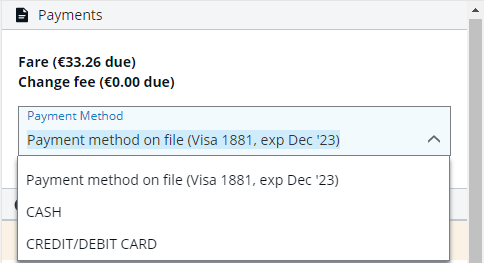
Note: For this release:
-
Multiple forms of payment are not yet enabled.
-
Change fee collected as tax is not yet supported.
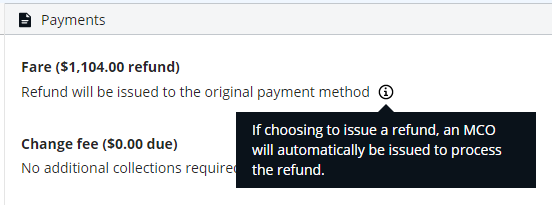
In the Payments section, either the original form of payment (FOP) or an MCO is used for residual values.
-
For this release, check and non-refundable are not supported as forms of payment for refunds.
-
If the refund method is unknown, a message indicates that you must contact the airline to confirm the refund method and process the refund outside of Smartpoint.
-
If permitted by the carrier, the residual value may be returned as an automatically generated MCO (Miscellaneous Charge Order). If an MCO is automatically issued for a residual exchange with a negative value, a message is displayed when you click the Information icon in the Payments section.
If applicable, agents can choose to forfeit (ignore) the refund value of (base fare and/or taxes), by selecting either:
-
Do not issue the refund to forfeit both the base fare and all applicable taxes.
Known issue: Selecting this option does not result in the expected behavior.Workaround: Enter any residual (negative) fare amount as a change fee on the initial launch screen, causing the exchange to be processed as an "even exchange" (fare differential of "0.00"). -
Refund all except certain taxes to forfeit only the selected taxes.
Sometimes agents want to forfeit (ignore) the refund value of (base and/or taxes) of an exchange so that the passenger does not receive the refund amount. Agencies may choose to forfeit refunds for a number reasons. For example, forfeiture may be desired if:
-
The refund has a very low amount, such as USD 0.10.
-
The refund has a low amount, such as lower than USD 10.00, and requires an EMD. EMDs can be relatively expensive transactions, and it may be preferable to avoid the fee for a small refund.
-
There is no EMD support for the applicable country, airline, and/or agency.
-
Agency business critera
-
An airlines
Agency business criteria and/or airline criteria for not to refund for a certain value
To forfeit fares, you can select either:
-
Do not issue the refund forfeits both the base fare and all applicable taxes.
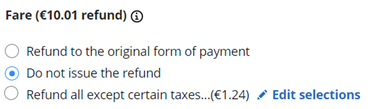
-
Refund all except certain taxes to forfeit only selected taxes.
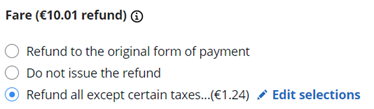
After you select this option, the list of taxes for the fare is displayed.
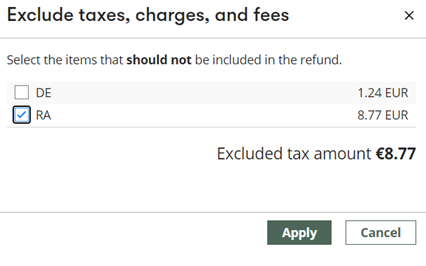
Select a tax code to EXCLUDE that tax from the refund, then click Apply.
In this example, €1.24 (DE) is refunded to the passenger, and €8.77 (RA) is not included in the refund.
-
If applicable. In the Ticketing details section, add commission information, endorsements, IT/BT modifiers, and tour codes.
Ticketing details
Ticketing Modifier
Description
Commission Click the arrow to select a commission option:
-
Base fare amount for a flat amount.
-
Base fare (%) for a percentage commission.
In the text box, enter the corresponding flat fare amount or percentage.
Note: For this release, fees and commissions related to the exchange are displayed in US dollars (USD).More Information
When you issue a ticket, Travelport+ (1G) automatically defaults to the commission rates that are held in the commission table provided by Travelport+ (1G) or stored in your AAT table.
However, you may need to change the commission level if either:
- An agency arrangement exists with an airline.
- The airline has changed their standard commission but not yet advised Travelport+ (1G) .
The new specified commission level is displayed on both the ticket (BSP remit area) and on the BSP sales return.
Terminal Format Equivalent: MU1TC02315478/Z2, where:
- Z = commission entry code
- 2 = percentage for commission
Tip! When selling a Bulk Tour (BT) or Inclusive Tour (IT) fare, use the Commission modifier to reduce commission levels to 0 percent.
Terminal Format Equivalents:
- TMU1TC02315478/Z0/IT
- TMU1TC02315478/Z0/BT
ET: Is the BT/IT information accurate and useful to include for Assisted Ticketing?
Endorsement
Endorsements specify restrictions applicable to a ticket. These remarks are created based on the fare for the ticket.
More Information
Each endorsement line contains a maximum of 29 characters. Endorsements can be added programmatically or manually:
-
System-generated (programmatic) endorsements, automatically added as part of a Fare Quote (FQ) response.
-
Manual endorsements can be added by agents.
Travelport+ (1G) send a maximum of six lines of endorsements, each with a to the e-ticket suppliers. However, only three endorsement lines can be added manually.
Terminal Format Equivalents:
-
Single line
TMU1EBVALID BA ONLY -
Multiple lines with lines separated by an asterisk *
TMU1EB VALID BA ONLY*EB VALID FLTS DATES SHOWN*EBNONREF
Note: Not all characters display on the issued e-ticket or in the order entered. Each airline has its own restrictions for the maximum number of characters displayed on an issued e-ticket.Tour Code (TC)
A Tour Code is issued by an airline to identify a tour deal.
More Information
The tour code must be entered into the fare as a ticket modifier so that both the airline and the local BSP know the source of the fare and the agency's authorization to use the fare.
The Tour Code can be a maximum of 14 characters. The code can also be used in combination with an Inclusive Tour (IT) or Bulk Tour (BT) fare type.
issued by an airline in order to identify the deal an agent has been given.
Equivalent Terminal Format: TMU1TCXX123456.
IT/BT fare type
Click the arrow to select the tour fare type for Inclusive Tour (IT) or Bulk Tour (BT).
This indicator be used in conjunction with a Tour Code and other modifiers.
Inclusive Tour
Inclusive Tour fares include charges in addition to the airfare, such as accommodations or ground transportation as part of a "package".
Inclusive Tour (IT) suppresses the fare and does not print the fare construction on the passenger receipt.
Terminal Format Equivalents:
- Without tour code: TMU1IT
- With tour code: TMU1TCXX123456/IT
Bulk Tour
Bulk Tour fares are usually given to agencies who book a high volume of seats such as a consolidator or wholesaler. Typically accommodations or other package items are not required for this fare.
Bulk Tour (BT) suppresses the fare and does not print the fare construction on the passenger receipt.
Terminal Format Equivalents:
-
Without tour code: TMU1BT
-
With tour code: TMU1TCXX123456/BT
-
-
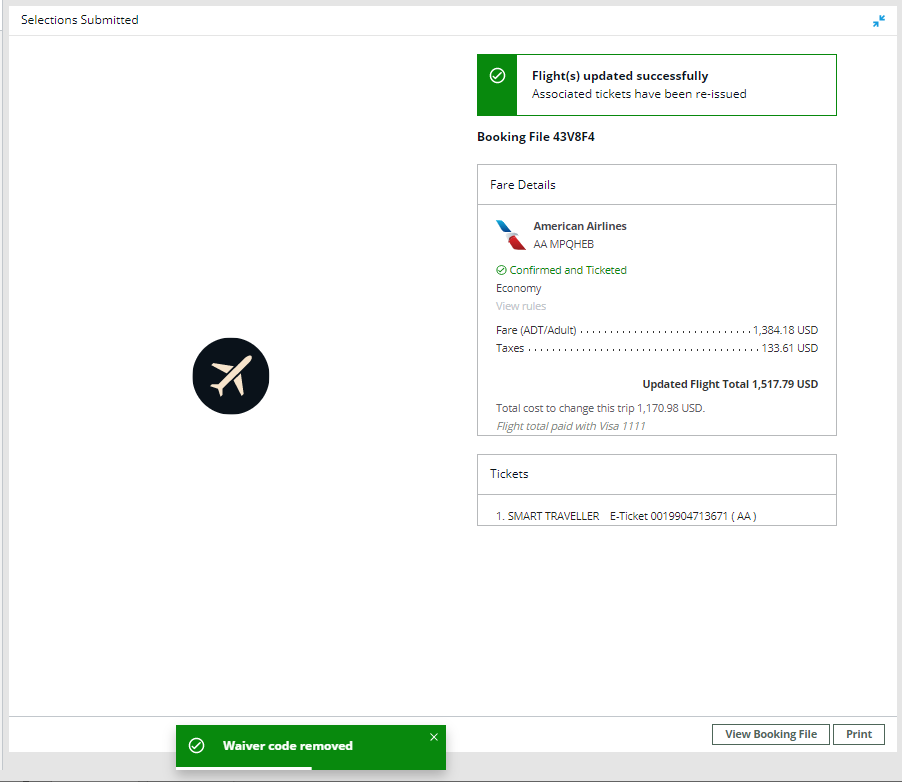
After all reviews and changes are made, select either:
-
Confirm and Hold to hold the exchange for ticketing at a later time. The time limit for the hold varies based on the carrier and the fare rules for this itinerary.
-
Confirm and Ticket to complete the exchange and issue the new tickets.
Both confirm options display a Selections Submitted confirmation screen with the new itinerary and fare information. This example shows a Confirm and Ticket confirmation screen, which also includes a confirmation of the ticket reissue.
-
-
Optional. Select View Booking File to display the updated PNR/Booking File with the new ticket information.