Custom Shortcuts
Custom Shortcuts provides a way to personalize Smartpoint Cloud with shortcuts or favorites you use most often.
From the Custom Shortcuts panel, you can:
Import your Galileo Programable Keys (Pkeys)
If you work with shortcut keys in Smartpoint Desktop or have been given the Pkeys to use, follow this process.
-
Press the Tools icon if the panel is not pinned open.
-
Expand the selections. The drop-down arrow should point up.

-
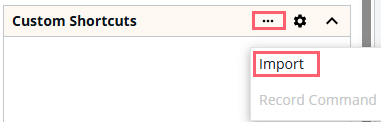
From the Custom Shortcuts header, press the More
 icon.
icon. -
Select Import.
-
Select Browse and locate the Pkey file stored on your local drive.
-
Press Open.
-
Select whether to overwrite existing shortcuts.
-
Press Next.
All imported Pkeys are visible with the new keyboard shortcuts. To launch the custom shortcuts, use the keyboard shortcut combination or press the key.
Troubleshooting:
-
If the error PKeys file provided is not valid is returned, try each entry in the Smartpoint Cloud terminal window to verify that it works. Some entries are not supported. If an entry doesn’t work, remove it from your PKeys file and try the import again.
-
If any of keyboard shortcuts in the imported file match a shortcut that is used by the browser, that keyboard shortcut is automatically reassigned. When this situation occurs, the following warning message displays:

Create a custom shortcut
To create a keyboard combination:
-
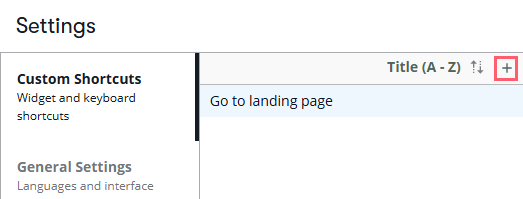
Press the Settings
 icon in the Custom Shortcuts header. You can also access this window by pressing the Settings icon in the upper right of the main window, and then selecting App preferences and settings thenCustom Shortcuts tab.
 -
Press the plus sign + above the current list of shortcuts.
-
Enter a title.
-
Select whether the shortcut will be a custom command or will open a URL.
-
Complete the fields.
Custom command
You can enter the commands manually or select the Command tags helper option (located under the Custom Command field) to view a list of commands.
To select a command tag from the list, press the  icon.
icon.
Use the <PAUSE> command tag in a custom command to pause a workflow. To resume the workflow, use one of the following keyboard shortcuts:
-
Shift + ~ (Shift + tilde)
-
Control + ´ (Control + accent)
Open a website
-
Enter the URL.
-
Select Refresh Booking File after execution if you want the booking file refreshed after the shortcut has finished running.
-
Optionally, assign a keyboard shortcut.
-
Optionally, select a category. You can filter the list of shortcuts by category.
-
Press Save.
Record a command
Ensure a terminal window is open and active.
-
Press the Tools icon if the panel is not open.
-
From the Custom Shortcuts header, press the More
icon.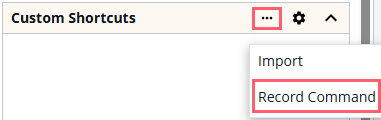
-
Select Record Command.
-
The first time you launch this feature, a dialog opens explaining how to use it. The Custom Command editor will take the next free terminal window, capture everything you type into it, put it in the correct format, and build a Custom Command.
-
Select Do not show message again if you don’t want the dialog to display again. Select Try recording now to launch the record feature.
-
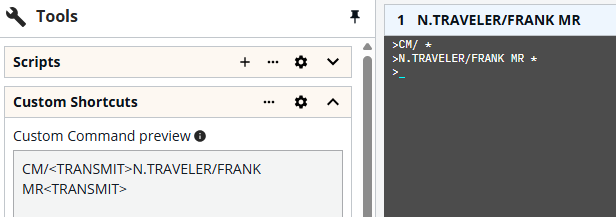
Enter the terminal commands. The commands are formatted and display in the Custom Command preview.
-
Press Finish recording when done. This opens the Custom Shortcuts editor where you can view, edit, and save your newly recorded Custom Command. The command title defaults to the day and time it was recorded.
-
Select the Refresh option to refresh the booking file after execution.
-
You can also assign a keyboard shortcut.
-
Optionally, select a category. You can filter the list of shortcuts by category.
-
Press Save when you’ve finished editing the command.
Create a graphical custom shortcut
This process provides a pop-up window to enter variable information.
Here is an example:
You are required to add a retention line to canceled bookings. Your manager created an itinerary profile that has the exact verbiage needed. Your responsibility is to add a date to the TUR segment.
-
From the custom shortcuts title bar, select the Settings (
) icon. -
Press the + icon to add a new custom shortcut.
-
Provide a title for this shortcut.
-
The function is custom command.
-
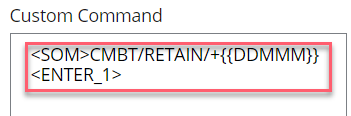
In the custom command box, enter the format that needs the variable information. The variable information must be preceded by {{ and ended with }}. Remember if Enter is needed, add that command as well. If you need assistance with those commands, select Command tags helper below the custom command box.

Your options display. Once finished, deselect the Command tags helper box. In this example, you will blind move the profile and add the retention date.
-
Choose your keyboard access combination. You can also place the key in a specific category.
-
Press Save.
When testing, a pop-up box displays where you will add the variable information. In this example, a future date must be provided.
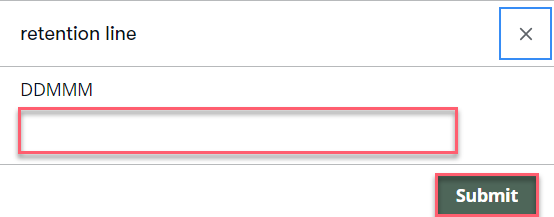
Once submitted, the task is completed. In this example, a TUR segment is created.

Use a custom shortcut
To use a custom shortcut, ensure a terminal window is open and active. Select a shortcut or use the assigned keyboard combination.
You can also sort by title, newest first, or oldest first.
Edit a custom shortcut
To edit a keyboard combination:
-
Press the Settings
icon in the Custom Shortcuts header. -
Select a row to display the current settings for you to modify as needed.
-
To make a shortcut a favorite, press the star in the shortcut title.

-
Press Save.
Export custom shortcuts
You can export your custom shortcuts to share with your coworkers.
-
From the Custom Shortcuts header, press the More
icon. -
Press Export.
-
The file is available in your browser's download location.