Agency Settings Tab
The Agency Settings tab allows you to create, configure, and update Productivity Automator settings for agencies using Productivity Automator within their organization.
Released with Productivity Automator 2.4, users with the Productivity Automator Agency Manager permission now see a new Agency Settings section.
Configuration Overview
Existing configurations are displayed in the overview and can be expanded to view their details. Configurations can be edited or deleted unless they are currently being used by an action.
Once a configuration has been applied to an action:
-
Removing PCCs is restricted. PCCs can only be added to a configuration already in use.
-
Configuration deletion is not permitted until the configuration is removed from all associated actions.
This prevents active rules from referencing deleted or incomplete configuration data.
Configuration Creation
This area lets you configure criteria to reissue a ticket when no additional collection or change-fees apply. Only e-tickets with a status of OPEN or APRT can be reissued.
-
Reissuing EMDs is not currently supported.
-
Any ancillaries or EMDs linked to previous flights must be handled manually.
-
To avoid processing EMDs, use an EMD trigger to filter them out in your rule.
To create a new configuration:
-
Select New Configuration to create a configuration. The New configuration side modal displays.
-
Enter the mandatory fields of Configuration Name and select one or more PCCs. If you select multiple PCCs you can use this configuration across multiple rules.
Note: Many airlines require specific endorsement text and waiver details when processing involuntary schedule change exchanges. Use the following options to configure these and use as part of the involuntary exchange action. Each configuration requires a default, which is used during the involuntary exchange process when no airline specific criteria are defined. Use airline triggers to exclude specific airlines from this action if appropriate.
-
Optionally, choose to Export configuration or Import configuration.
-
Clicking Export configuration allows you to:
-
Download Template: Click Export configuration to download a standardized spreadsheet template directly from Agency Settings to fill in airline endorsement and waiver details in the correct format.

-
Export Configuration: After adding values to the on-screen fields, you can export the existing endorsement and waiver setup at any time to maintain offline backups or prepare bulk updates.
-
-
Clicking Import configuration allows you to:
-
Bulk Import:Upload the completed Excel file to automatically populate endorsement and waiver configurations into Productivity Automator.
-
Review and Edit: After importing, all rules and waiver details display directly in the Productivity Automator interface, where they can be reviewed, fine-tuned, or edited individually.
-
-
-
Enter the Default airline group configurations. The first airline group in every configuration is the Default Group. This configuration is applied to any airline that does not have a dedicated airline group defined elsewhere in the file.
-
For example, if a PNR is processed for an airline that is not included in any other airline group within the selected configuration file, the Default Airline Group configuration will be used.
-
If exchanges should not be processed for certain airlines, exclude them through your trigger group configuration. This ensures that only PNRs for airlines intended for exchange processing reach the exchange action.
If certain airlines should not use the default configuration, either:
-
Exclude them through a trigger group, or,
-
Create a group for those airlines within the configuration file.
The Default airline group:
-
Cannot be removed or deleted.
-
Must contain at least one of the following updates:
-
Endorsement
-
Tour code
-
OSI remark
-
Note: All three fields cannot be left blank. It is mandatory to enter either an Endorsement, Tour Code, OSI remark, or a combination of these options.
-
Enter the Airlines code(s) for the default group which this configuration applies to.
-
Optionally, enter the Endorsement, text to be added to the updated fare, or click the plus sign to Insert the PNR extract.
-
You can enter text at the beginning or end of the extract(s).
-
You can enter one or more PNR extracts. If you enter multiple extracts, the only character you can use to separate each extract is a hyphen or dash (-), or a space ( ).
-
If you enter an endorsement, you must enter an endorsement location.
-
Select the Endorsement location from the drop-down list to choose how the endorsement text should be applied.
-
Inherit: Keep the text from the previously filed fare only. Select a location other than Inherit when endorsement text is provided.
-
At the end: Retains the original endorsements and adds to the end.
-
At the beginning: Retains the original endorsements and adds at the beginning.
-
-
-
Optionally, enter the Tour Code.
-
If you enter a tour code, you must enter a tour code location.
-
Select the Tour code location from the drop down menu.
-
-
Optionally, enter the OSI or click the plus sign to Insert the PNR extract.
-
With the 2.4 release, the OSI will go in as an SI. and then the plating carrier.
-
With the 2.5 release, there will be a checkbox to add in the SI remark as YY rather than specific to the carrier.
-
-
Create Airline-Specific Groups
You can create as many airline groups as you need. To create a configuration for one or more airlines,
-
Select New airline(s) group. Multiple airlines can be included in the same group if they share identical configuration requirements.

-
Enter one or more airline codes. Duplicate airline codes are not permitted either:
-
Within the same airline group, or
-
Elsewhere in the same configuration.
-
-
Optionally, enter the endorsement text to be added to the updated fare. Endorsement text may include PNR extracts to dynamically populate values. When using PNR extracts:
-
Free text may display before the first extract and after the last extract.
-
Free text cannot be inserted between extracts.
-
Extracts may be separated by a hyphen (-) or a space.
-
If endorsement text is entered, an endorsement location must be selected.
Note: The option to inherit the endorsement from the original fare is not available when custom endorsement text is provided. Inheritance is only available when the endorsement field is left blank.
-
-
Optionally, enter the text to be added to the updated fare's tour code field. If tour code text is entered, a tour code location must be selected. As with endorsements, inheritance from the original fare is only available when no custom tour code text is entered.
-
Optionally, enter the OSI (Waiver) text to be added as an OSI remark in the PNR. OSI text may include PNR extracts. When using PNR extracts:
-
Free text may appear before the first extract and after the last extract.
-
Free text cannot be inserted between extracts.
-
Extracts may be separated by a hyphen (-) or space where required.
-
-
Optionally, select the Insert PNR Extract button. A range of Endorsement and OSI PNR extracts are available to dynamically populate values within the configured text. Each extract description indicates whether the value is sourced from either:
-
The affected flight segments, which are the flights impacted by the involuntary schedule change, or
-
The new flight segments accepted as part of the schedule change.
-
Endorsement Example
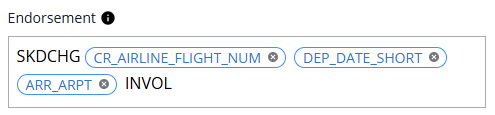
If an airline requires the endorsement to contain the affected flight number, departure date, and arrival airport, and two flight segments were impacted by the schedule change, the endorsement would be generated as follows:
SKDCHG XX123 12AUG LHR XX566 12AUG MXP INVOL
This example represents the format required in the endorsement field:
When using PNR extracts:
-
Free text may appear before the first extract and after the last extract.
-
Free text cannot be inserted between extracts.
-
Extracts may be separated by a hyphen (-) or a space.
PNR Extracts
These extracts allow endorsement and OSI content to be generated dynamically, which reduces manual configuration while ensuring the correct flight information is included.
| Name | Description |
|---|---|
| Airline code | Extract 2-letter airline code from the segment(s) affected by the schedule change (BA) |
| Departure date (full) | Extract the full departure date from the segments(s) affected by the schedule change (ddMMMyy). |
| Departure date (short) | Extract the short departure date from the segment(s) affected by the schedule change (ddMMM). |
| Destination airport code | Extract destination airport code from the segment(s) affected by the schedule change (JFK). |
| Flight number including airline code | (Extract the 2-letter airline code and flight number from the segment(s) affected by the schedule change (SQ123). |
| Flight number only | Extract the flight number from the segment(s) affected by the schedule change (123) |
| New departure date (full) | Extract the full departure date from the new segment(s) (ddMMMyy) |
| New departure date (short) | Extract the short departure date from the new segment(s) (ddMMM). |
| New destination airport code | Extract destination airport code from the new segment(s) (JFK). |
| New flight number only | Extract the flight number from the new segment(s) (123). |
| New origin airport code | Extract origin airport code from the new segment(s) (JFK). |
| Origin airport code | Extract origin airport code from the segment(s) affected by the schedule change (JFK). |
| Original ticket issue date (full) | Extract the full ticket issue date from the original ticket (ddMMMyy) |
Disclaimer
After all required airline groups are configured, the mandatory disclaimer must be reviewed and accepted before the configuration can be saved. By selecting the acknowledgement checkbox, you confirm that you have read, understood, and agree to the disclaimer:
This configuration is used during the process of creating a filed fare for an even exchange. It is the user’s responsibility to ensure that all endorsement text, tour codes and OSI remark formats are correct and meet airline requirements. This action is not covered by the Travelport Fare Guarantee, and Travelport is not responsible for any ADM (Agency Debit Memo) issued by an airline as a result of this exchange.
To save the configuration, you must select the disclaimer checkbox.
I understand that I am responsible for ensuring the accuracy of the endorsement and waiver information, and that Travelport is not liable for any ADM issued by an airline due to this exchange.
Managing Configurations
After a configuration has been created, whether the default or a new configuration group, they will display on the Agency settings screen. The table displays all configurations and who last modified that configuration. From the table, you can potentially edit or delete a configuration.
Editing configurations
You can edit configurations you or someone else has created. However, if the configuration is being used in an action, you can't remove PCCs, only add new PCCs. To edit a configuration:
-
Click the pencil icon (
 ) next to the configuration you wish to edit to display the Edit configuration side modal.
 -
Edit the configuration as desired.
-
Select the Disclaimer checkbox.
-
Click the Override button.

-
Click the Override button a second time in the Warning pop-up.
Deleting configurations
If a configuration is in use within an action, you cannot delete it from this screen. If the configuration is being used in an action, you can't remove PCCs, only add new PCCs. You must first remove the configuration from all associated rules, and then it can be deleted.
To delete a configuration:
-
Click the trash can (
 ) next to the configuration you wish to delete.
 -
Click the Delete button in the Delete configuration pop-up.
