Budget Import
Important: During validation, employee security is checked to ensure that the employee has access to the branch.
The Budget Import function imports budget amounts for specific period end dates into expense-related accounts in your chart of accounts. This method requires you to create a budget import text file that includes lines of budget data corresponding to specified combinations of account and branch. Each line must include four tab-delimited items: account number, branch, budget amount, and period end date. The following example shows a few lines of possible data:
6005 0001 10.00 08/31/2017
6010 0001 50.00 08/31/2017
6011 0001 25.00 08/31/2017
The first item in the row (account number) must have four numeric characters, but you can use multiple formats for the other row items, as follows:
- Branch can have up to four numeric characters; you can precede a branch number with one or more zeros (for example, 1, 01, and 0001 are valid)
- Budget amount must be numeric with comma ( , ) or period ( . ) allowed as the decimal character (for example, 12, 12.00, and 12,00 are valid)
- Period end date can be in the format DD/MM/YY or DD/MM/YYYY; you can also use single digit days and months (D/M/YY or D/M/YYYY); use the slash mark ( / ), dash ( - ), or period ( . ) as the separator character (for example, 08-31-2017, 8.31.17, and 8/31/2017 are valid)
You can create and maintain the budget import file in Microsoft Excel and export it as a tab-delimited text file. It is recommended that you use the supplied budget import template, as described in Creating the Budget Import File below.
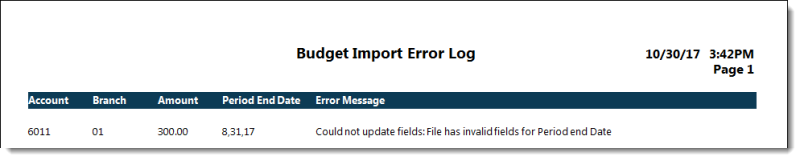
The import process validates the file data. It imports only the data that is not in error and generates the Budget Import Error Log to report errors. You can validate the data without importing it.
The Edit GL Account screen, which is accessible from the Chart of Accounts screen, displays the budget amounts for the selected combination of account and branch. For more about the Edit GL Account screen, see Editing an Account in the Chart of Accounts.
Validating and Importing Budget Data
To validate and import budget data:
- Create the budget import file. For details, see Creating the Budget Import File below.
-
On the GL submenu, click Budget Import. The Budget Import screen appears.
Note: You must be a GlobalWare user with Full Access permission selected under Journal Entries on the Employee Security screen to access this functionality. For more information, see Employee Security.
-
In the File to Import field, specify the full path to the budget import file.
Note: You can use the ellipsis (
 ) button to navigate to the file. By default, GlobalWare opens the GlobalWare\GWUser folder within your local user folder (C:\Users\userfolder\GlobalWare\GWUser). It is recommended that you put the file in this location. If you use a different location, navigate to that location.
 -
Click VALIDATE.
The Send to dialog box appears.
-
Select a report destination. For more information, see Printing Overview.
GlobalWare generates the Budget Import Error Log report.
- Review the report and modify the budget import file to fix all reported issues (if any).
- Repeat steps 3 through 5 until the report does not show errors.
-
When you are ready to import, click IMPORT.
The Send to dialog box appears.
-
Select a report destination. For more information, see Printing Overview.
GlobalWare generates the Budget Import Error Log report and imports the budget data.
Creating the Budget Import File
To create the budget import file, it is recommended that you use the supplied budget import template, as follows:
- Right-click the following link and save the file to your computer: Budget_Import_Template.xlsx.
-
Open the Budget_Import_Template.xlsx file.
A Microsoft Excel spreadsheet appears. This spreadsheet provides you with a template to add your budget import data.
- Starting in the fourth row, type the first record of data you want to include in the budget import file.
- For each additional record, type the appropriate information in an additional row.
- After you finish, remove rows 1 through 3.
-
Save the file as Budget_Import_File.txt. Choose a text file format that uses tab-delimited data.
The following Microsoft Excel message appears.

- Click OK.
- To validate and import the data in this file, continue with step 2 of the procedure under Validating and Importing Budget Data above.
Report Example
Budget Import Error Log report example (with error)