Edit Payment Options
The Edit Payment Options function enables you to create or modify merchant payment profiles you can use with the Import Agency Plastic Payments function. See Creating a Payment Profile or Modifying a Payment Profile below. With these profiles, you can customize settings that control auto-posting and depositing of receipt transactions. This means you can find these items in the general ledger, the Bank Deposit function, the Void Cash Receipt function, and wherever cash receipt functionality applies.
After setting up and saving a payment profile, you can select the profile in the Import Profile field on the Import Agency Plastic Payments screen. For details, see Import Agency Plastic Payments. You can also delete the profile on the Edit Payments Options screen. See Deleting a Payment Profile below.
Note: Only those branches to which the employee has access are considered.
Accessing the Edit Payment Options Screen
To access the Edit Payment Options screen, on the A/R submenu, click Edit Payment Options. The Edit Payment Options screen appears.
The following table describes the fields on the Edit Payment Options screen. These fields are view only.
| Field | Description |
|---|---|
|
Profile |
Name of the payment profile. |
|
File Name |
Name and location of the import payments file. Payment profiles can specify varying names and locations for the import payments file. However, if you do not select an import profile on the Import Agency Plastic Payments screen (<none> in the Import Profile field), GlobalWare uses the default name IMPCCPMT.DAT, and it expects this file to be stored in the database subfolder within the GlobalWare program folder (Gblware\db). You indicated where the Gblware folder should be located when you installed GlobalWare. For related information, see Import Agency Plastic Payments. Note: For multi-user GlobalWare, the import payments file must be stored on the workstation in the database subfolder within the GlobalWare program folder (Gblware\db). You indicated where the Gblware folder should be located when you installed GlobalWare. |
The following table describes the buttons and links on the Edit Payment Options screen.
| Button or Link | Description |
|---|---|
|
Add |
Opens the Payment Profile Setup screen. Use this screen to create a payment profile. For details, see Creating a Payment Profile below. |
|
EDIT |
Opens the Payment Profile Setup screen. Use this screen to modify the selected payment profile. For details, see Modifying a Payment Profile below. |
Creating a Payment Profile
To create a payment profile:
-
On the Edit Payment Options screen, click Add.
The Payment Profile Setup screen appears.
 Field and button descriptions
The following table describes the fields on the Payment Profile Setup screen.
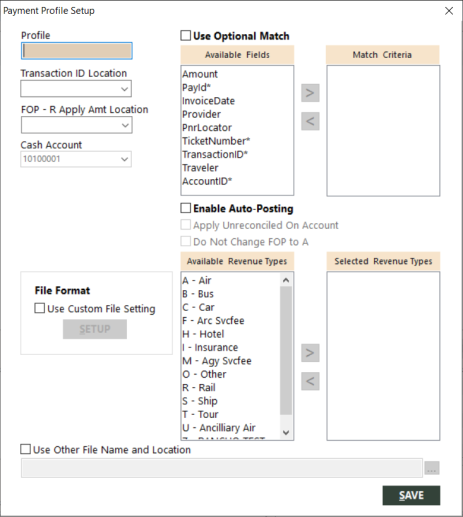
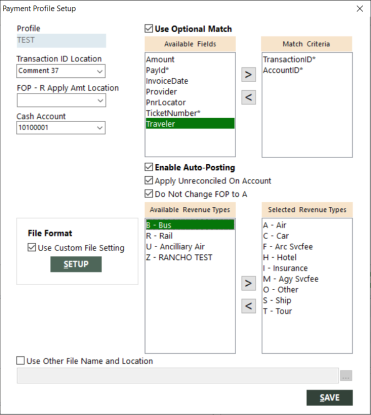
Field Description Profile
Name of the payment profile associated with the merchant.
Transaction ID Location
Location of the transaction ID in the invoice. Use this field if you use TransactionID as one of your optional match criteria.
The drop-down list shows invoice fields, which are possible locations where you might have a transaction ID. To select one location, double-click the desired location in the drop-down list. This field enables you to specify more than one location if you have multiple transaction IDs in the invoice. To select multiple locations, click the desired locations in the drop-down list while pressing the Ctrl key. Complete your selections by double-clicking the last desired location while continuing to press the Ctrl key.
FOP - R Apply Amt Location
Location of the amount (for example, 20.00) to apply as an accounts receivable (R) form of payment to the invoice item. The drop-down list shows comment fields in the invoice, which are possible locations where you might have this amount. Double-click the comment field that holds this amount.
Cash Account
Cash account to use for auto-posting if you select Enable Auto-Posting. This is the same cash account used for bank deposit.
Use Optional Match
Indicates whether matching should occur based on fields displayed in the Match Criteria box. The Available Fields and Match Criteria boxes become available when Use Optional Match is selected.
- To select a field on which you want to match, click the field name in the Available Fields box, and then click the right-arrow (
 ) button to move it to the Match Criteria box. GlobalWare uses all fields listed in the Match Criteria box to match on.
 - To remove a field from the Match Criteria box, click the field name, and then click the left-arrow (
 ) button. The field name moves to the Available Fields box.
Note: You must select at least one of the fields marked with an asterisk (*).
Enable Auto-Posting
Indicates whether GlobalWare should auto-post receipts from the import payments file to the invoices.
Apply Unreconciled On Account
Indicates whether GlobalWare should deposit/post unreconciled items on account. To use this option, you must specify the AccountID field as one of the matching criteria. If you map the Traveler field, GlobalWare will put it in the comment field when storing the unreconciled transaction. This option is available only if Enable Auto-Posting is selected.
Do Not Change FOP to A
Indicates whether the form of payment should remain as R or A (interfaced invoice). If you do not select this option, GlobalWare will change all matched items to form of payment A before it begins auto-posting. This option is available only if Enable Auto-Posting is selected.
Available Revenue Types and Selected Revenue Types boxes
If you are auto-posting, you can specify the order of your deposit posting by revenue type. The Available Revenue Types and Selected Revenue Types boxes become available when Enable Auto-Posting is selected.
- To select a revenue type, click it in the Available Revenue Types box, and then click the right-arrow () button to move it to the Selected Revenue Types box.
- To remove a revenue type from the Selected Revenue Types box, click it, and then click the left-arrow () button. It moves to the Available Revenue Types box.
Use Custom File Setting
Indicates that you want to customize the file format mapping. If you select this option, click SETUP to map columns in the import payments file to GlobalWare fields. If you do not select this option, GlobalWare assumes that the import payments file is set up according to the standard file specifications. For specification details, see Import Agency Plastic Payments.
Use Other File Name and Location
Indicates that you want to change the name and/or location of the import payments file. If you select this option, specify the name and location of the import payments file in the file name field under this check box.
Note: When the import payments file is imported, GlobalWare changes the name of the file so that it cannot be imported again.
File name (under Use Other File Name and Location)
Name and location of the import payments file. This field is available only if Use Other File Name and Location is selected. By default, GlobalWare sets the file name and location to C:\Program Files (x86)\Gblware\db\IMPCCPMT.DAT. Change this setting to the appropriate name and location.
Payment profiles can specify varying names and locations for the import payments file. However, if you do not select an import profile on the Import Agency Plastic Payments screen (<none> in the Import Profile field), GlobalWare uses the default name IMPCCPMT.DAT, and it expects this file to be stored in the database subfolder within the GlobalWare program folder (Gblware\db). You indicated where the Gblware folder should be located when you installed GlobalWare. For related information, see Import Agency Plastic Payments.
Note: For multi-user GlobalWare, the import payments file must be stored on the workstation in the database subfolder within the GlobalWare program folder (Gblware\db). You indicated where the Gblware folder should be located when you installed GlobalWare.
The following table describes the buttons on the Payment Profile Setup screen.
Button Description SETUP
Opens the File Format screen. Use this screen to customize the import file format mapping. You must save the payment profile before you click SETUP. This button is available only if Use Custom File Setting is selected. For more information, see Setting Up Import Payments File Mappings below.
SAVE
Saves the payment profile.
- To select a field on which you want to match, click the field name in the Available Fields box, and then click the right-arrow (
-
Complete the fields as appropriate.
Note: The AccountID field in the import payments file is required for auto-posting, the InvoiceDate field is required if you want to validate the date before import, and matching criteria must be mapped if you are using custom file format. When auto-posting, all remainder amounts will be applied on account. Traveler will be included from the import payments file if it is mapped.
-
Click SAVE.
The Payment Profile Setup screen closes.
- If you want to map columns in the import payments file to GlobalWare fields, see Setting Up Import Payments File Mappings below.
Account ID Wildcard Hierarchy
The hash sign (#) can be used at the end of the AccountID in the import payments file. If the hash mark is used, GlobalWare will auto-post it in AccountID order, then by Revenue Types selection, with the remainder amount posted to the first AccountID in the hierarchy.
Example: TEST#
In this example, GlobalWare auto-posts to TEST, then TEST001, then TESTA, and so forth. Finally, GlobalWare posts the remainder to TEST.
Setting Up Import Payments File Mappings
You can use the File Format screen to map some or all columns in the import payments file to GlobalWare fields. Data in the file must be tab delimited. You can use the File Format screen to view the file format and skip header and trailer lines if applicable.
To set up mappings:
- On the Edit Payment Options screen, select the payment for which you want to set up mappings.
-
Click EDIT.
The Payment Profile Setup screen appears.
- Select Use Custom File Setting.
-
Click SETUP. The File Format screen appears.
Column data from the import payments file appears in the File Layout View grid.
Field descriptions
The following table describes the fields on the File Format screen.
Field Description Column1 through Columnxx
Column data for lines in the import payments file. Columns in the File Layout View grid match columns in the import payments file.
Note: Header lines in the import payments file (if any) appear first in the grid, and trailer lines (if any) appear last.
Ignore Header
Indicates whether to ignore header lines in the import payments file when using the Import Agency Plastic Payments function to import the file. Specify the number of header lines to ignore in the Header Lines field.
Header Lines
Number of header lines to ignore in the import payments file. This field is available if Ignore Header is selected.
Ignore Trailer
Indicates whether to ignore trailer lines in the import payments file when using the Import Agency Plastic Payments function to import the file. Specify the number of trailer lines to ignore in the Trailer Lines field.
Trailer Lines
Number of trailer lines to ignore in the import payments file. This field is available if Ignore Trailer is selected.
Import payments file columns (the two left-side boxes under File Format Settings)
Indicates columns in the import payments file you want to map to GlobalWare fields.
- To add a column for mapping, select the appropriate column in the left-side box and click the right-arrow (
 ) button to move it to the right-side box.
 - To remove a column from mapping, select the appropriate column in the right-side box and click the left-arrow (
 ) button to move it to the left-side box.
GlobalWare fields (the two right-side boxes under File Format Settings)
Indicates fields in GlobalWare you want to map to import payments file columns. At a minimum, you must map all GlobalWare fields that are listed in the Match Criteria box on the Payment Profile Setup screen.
- To add a GlobalWare field for mapping, select the appropriate field in the right-side box and click the left-arrow () button to move it to the left-side box.
- To remove a GlobalWare field from mapping, select the appropriate field in the left-side box and click the right-arrow ()button to move it to the right-side box.
IMPORTANT: Columns in the box to the left of the equal sign must correlate with GlobalWare fields in the box to the right of the equal sign, as shown in the example below. There must be a one-to-one correlation in these boxes.
_389x157.png)
- To add a column for mapping, select the appropriate column in the left-side box and click the right-arrow (
- If needed, select Ignore Header and Ignore Trailer, and then specify the appropriate number of lines to ignore in the import payments file when using the Import Agency Plastic Payments function to import the file.
-
Use the boxes under File Format Settings to select the columns and fields you want to map. For details, see the relevant field descriptions above.
At a minimum, you must map all GlobalWare fields that are listed in the Match Criteria box on the Payment Profile Setup screen. However, the more fields you map, the more complete the Validation Error Log will be when you click VALIDATE on the Import Agency Plastic Payments screen, and the more complete the Reconciled and Unreconciled reports will be when you click IMPORT. In addition, if you map the Traveler field, GlobalWare will put it in the comment field when storing the OnAcct remainder or unreconciled transaction (if selection is applicable).
IMPORTANT: Columns in the box immediately to the left of the equal sign must correlate with GlobalWare fields in the box immediately to the right of the equal sign, as shown in the example below. There must be a one-to-one correlation in these boxes.
- Click SAVE.
Modifying a Payment Profile
To modify a payment profile:
- On the Edit Payment Options screen, select the payment profile you want to modify.
-
Click EDIT.
The Payment Profile Setup screen appears with current setup information displayed for the selected payment profile.
- Modify the fields as appropriate. For field descriptions, see Creating a Payment Profile above.
- Click SAVE.
- If you want to map or change the mapping of columns in the import payments file to GlobalWare fields, see Setting Up Import Payments File Mappings above.
Deleting a Payment Profile
To delete a payment profile:
- On the Edit Payment Options screen, select the payment profile you want to delete.
-
Press Ctrl+Delete.
A confirmation message appears.
- Click OK.