Edit Vendor Screen
This topic describes the Edit Vendor screen.
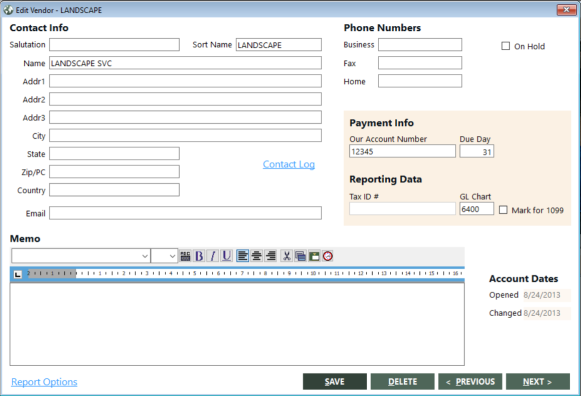
Field, Button, and Link Descriptions
The following table describes the fields on the Edit Vendor screen.
| Field | Description |
|---|---|
|
Salutation |
Salutation as it should appear in mail merge documents. This field allows up to 24 alphanumeric characters. |
|
Sort Name |
Sort name for the account. This field allows up to 13 alphanumeric characters. |
|
Name |
Name for the account. This field allows up to 60 alphanumeric characters. |
|
Addr1 |
Account's first address line. This field allows up to 60 alphanumeric characters. |
|
Addr2 |
Account's second address line. This field allows up to 60 alphanumeric characters. |
|
Addr3 |
Account's third address line. This field allows up to 60 alphanumeric characters. |
|
City |
City name. This field allows up to 30 alphabetic characters. |
|
State |
State code. This field allows up to 30 alphabetic characters. |
|
Zip/PC |
Zip plus four. This field allows up to 30 numeric characters. |
|
Country |
Country code or name. This field allows up to 20 alphanumeric characters. |
|
|
E-mail address. This field allows up to 30 alphanumeric characters. |
|
Business |
Full business number, including any extension. This field allows up to 15 alphanumeric characters. |
|
Fax |
Full fax number, including any extension. This field allows up to 15 alphanumeric characters. |
|
Home |
Full home phone number. This field allows up to 15 alphanumeric characters. |
|
On Hold |
Indicates whether the vendor account is on hold. |
|
Our Account Number |
Agency's account number with the vendor. |
|
Due Day |
Day of the month on which the vendor bill is due. |
|
Tax ID # |
Vendor's tax ID number. This can be used on the agency's taxes. |
|
GL Chart |
Expense chart number. Four numeric characters are allowed. |
|
Mark for 1099 |
Indicates whether the contractor needs to get a 1099 form at the end of the year. |
|
Memo |
Variable length alpha numeric. This field allows up to approximately 30,000 alphanumeric characters. |
|
Opened |
Date on which the account was opened. |
|
Changed |
Date on which the account was last changed. |
The following table describes the buttons and links on the Edit Vendor screen.
| Button or Link | Description |
|---|---|
|
Contact Log |
Opens the Contact Manager screen. This screen enables you to enter the contacts that an agent has made or needs to make with an account. For more information, see Managing Contacts. |
|
Report Options |
Opens the Report Options screen. This screen enables you to add comments to vendor accounts. For more information, see Report Options (for Vendor Accounts). |
|
SAVE |
Saves the account and any changes made. |
|
DELETE |
Deletes the displayed account. For more information, see Deleting Accounts. |
|
< PREVIOUS |
Displays the account immediately preceding the currently displayed account as listed in the Search Results grid. |
|
NEXT > |
Displays the account immediately following the currently displayed account as listed in the Search Results grid. |