Interactive air
Some responses contain interactive displays. Interactive data is indicated by blue (additional details) and green (actions) text.
This topic covers:
-
The information available from air availability results in interactive mode
-
Filter and sort air availability results
-
How to sell from availability results in interactive mode
Tip: The Travelport+ format online help contains cryptic entries, a printable mini guide, and conversions between Travelport+ and other GDS entries for common requests.
Air availability results
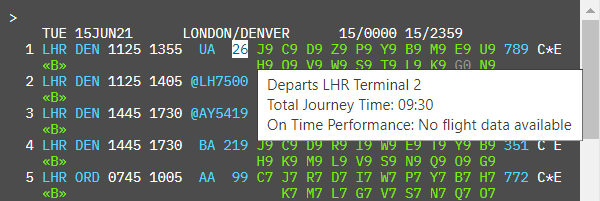
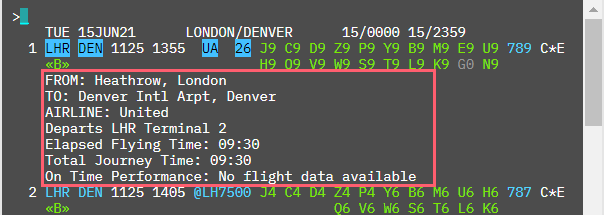
This example contains the air availability response for entry A15JUNLHRDEN:
-
Hover over blue text to display more information in a popup window.
-
Click on one or more blue text to display information the information for each below the segment. Selecting the origin, destination, and flight number displays this information below the segment.
You can use the following availability entries.
|
Entry |
Result |
|---|---|
|
ALONFRA |
Availability for today from London airports to Frankfurt airports. |
|
A#LAXSYD.D |
Availability for direct flights for tomorrow. Use entry A14JULLAXSYD.D to request direct flights for 14 July. |
|
A14JULLONFRA |
One way basic availability search for 14 July. |
|
A22OCTCDG#BRU |
Flights from a specific airport (CDG) of a multi-airport city. |
|
A22OCTPARLHR# |
Flights from a specific airport (LHR) of a multi-airport city. |
|
A14JULLAXSYD.D0 |
Return nonstop flights only As a follow-on request, enter A.D0 after an availability request. |
|
A14JULLAXSYD.D1 |
Return direct flights only with maximum of 1 stop. As a follow-on request, enter A.D1 after an availability request. |
|
A14JULLONFRA+10 |
For the outbound travel, return flights from London to Frankfurt on 14 July. For the inbound travel, return flights departing 10 days later. |
|
AA14JULLONSYD |
Display results in arrival time order. As a follow-on request, enter AA after an availability request. |
|
AD14JULFRAMEL |
Display results in departure time order. As a follow-on request, enter AD after an availability request. |
|
A20JULLHRSYD@2+20AUG@2 |
Request a minimum of 2 available seats in any flight class for outbound and inbound flights. |
|
A14JULLONSYD/BA# |
Request all connecting flights with BA. |
|
A01JANLONSIN8A++05JANSINLON10A A01JANFRABER+5JANBERMUC A20JANLONSIN+30JAN |
Availability for outbound and inbound flights in one entry (round trip, open jaw). |
|
A14JULLONSYD.FRA |
Request flights connecting through FRA. |
|
A14JULLONSYD.BCNDXBSIN |
Request flights connecting through BCN, DXB, or SIN. |
|
A#FRAVIE |
Availability for tomorrow from Frankfurt to Vienna. |
|
A.FRLISJFK |
Availability for next Friday from Lisbon to JFK aiport in New York. As a follow-on request, enter AF after an availability request. |
|
AJ22DECVIEATH |
Display elapsed time in availability results. As a follow-on request, enter AJ after an availability request. |
|
AP14JULFRAMEL |
Return availability of airlines with last seat availability and/or carrier specific display. |
|
AF14JULFRAMEL |
Display first available flight on or after 14 July. |
|
AJ22DECVIEATH |
Display elapsed time in availability. |
|
AU25AUGBKKMNL |
Availability of airlines with secured, super guaranteed, and guaranteed booking functions. |
|
A15JUL |
A follow-on request to change the date of the original availability request. |
|
A6P |
A follow-on request to change the time of the original availability request. |
|
A15JUL6P |
A follow-on request to change the date and time of the original availability request. |
|
A14JULPMILON*BA |
Availability display from the British Airways system. |
|
A14JULSINSYD/QF# |
Availability display for the specified carrier for the entire journey including connecting flights. |
|
A15MARBRUAMS/KL |
Specify one airline in the availability display. To exclude more airlines, add another / and carrier code at the end. |
|
A15MARBRUAMS/KL-/MF- |
Exclude two carriers from the availability display. As a follow-on entry, use A/DL-/US- to exclude two carriers from the availability display. |
|
A15MARBRUAMS/KL- |
Exclude carrier KL from the availability display. |
|
A17APRBRUAMS//*A |
Return availability for Star Alliance airlines. For One World, enter //*O For Sky Team, enter //*S |
|
A14JULSINSYD.0900 or A14JULSINSYD.9A or A14JULSINSYD.9 or A14JULSINSYD0900 |
Specify the departure time for the flight, using 0900, 9A, or 9. |
|
A14JULSINSYD.0800# or A14JULSINSYD.8A# or A14JULSINSYD.8# or A14JULSINSYD0800# |
Return flights for the specified time onwards |
|
A14JULJFKLAX@C |
Return flights with C class with have a minimum of 1 seat available. To return flights with 2 seats available in C class, enter @2C |
|
A14JULJFKLAX@1 |
Return flights with a minimum of one seat available. |
|
A14JULJFKLAX@Y# |
Return flights with classes available equivalent to Y class |
|
A14JULJFKLAX.M |
Return morning flights (0001-1000) with time overlap if no flights available during time band. To return noon flights (1001-1600), enter .N To return evening flights (1601-2359), enter .E To return flights with no overlap, add # at the end (e.g., A14JULJFKLAX.M#). |
|
A14JULJFKSYD.C1 |
Display flights with one connection midpoint. |
|
A22NOVCCULHR.SIN/BA |
Display availability for single connection flights via Singapore with onward British Airways (BA) flight. |
|
A19SEPBLRKUL/SQ.SIN |
Display availability for single connection flights via Singapore with arriving Singapore Airlines (SQ) flight. |
|
A19DECBUFCCU.BOS.DOH |
Display availability for double connection flights via Boston and Doha. |
|
A07JULLONSYD.TYOHKG.BKKMNL |
Display availability for double connection flights via Tokyo or Singapore and Bangkok or Manila. |
|
A12SEPAMSSYD/KL./SQ |
Display connecting flights with first segment on KL and connecting segment on SQ via any point. |
|
A14JULLONSYD/BA-./SQ |
Display connecting flights with any carrier except BA on the first segment with SQ on the second segment via any point. |
|
AF16SEPLHRSAO/BA#@Q |
Display first available flight from LHR to SAO on BA only with seat available in Q class (including seats on request). This entry will show direct flights and connections on BA only. |
|
A25AUGLHRSYD/YY# |
Display direct flights of any carrier and only on-line connections. |
|
A* |
Display the next page of results. |
|
A# |
Display availability for the next day using the same city pair as the original entry. |
|
Enter in the same terminal window as an availability request to view return availability on the same day |
|
|
AR8JUN |
Enter in the same terminal window as an availability request to view return availability on June 8 |
|
AR#7 |
Enter in the same terminal window as an availability request to view return availability 7 days later |
|
AR10JUN/BA.D |
Enter in the same terminal window as an availability request to view return availability on June 10 combined with carrier and direct flights modifiers |
When you search for a roundtrip, the outbound options display in one terminal window and the inbound options display in another window.
Filter results
By default, the results are sorted by direct flights. Select the Sort (![]() ) icon if you prefer to sort them by departure time or journey time.
) icon if you prefer to sort them by departure time or journey time.
You can filter availability and fare shop results in the terminal view by selecting the Filter (![]() ) icon.
) icon.
When selected, a filter panel opens on the left. Select which filters you want to apply to the fare shop results.
-
If non-stop and connecting flights are in the results, select Show non-stop flights only to filter out connecting flights.
-
If one of the cities has multiple airports, remove the check marks from the airports you want to filter out. In the example above, the city code NYC could return results from 3 airports. Deselect which airports you do not want to display in the results.
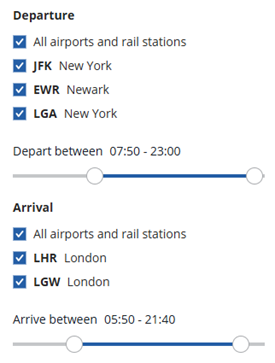
-
Use the departure and arrival time sliders to filter out certain times.
-
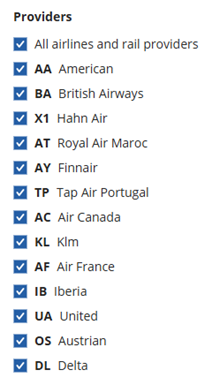
Airlines that are available in the result display in the list of providers. Deselect providers you want to filter out of the results.
-
To remove all filters, select the Reset button at the bottom of the panel. Filters also clear when you enter an ignore format (IR or ER).
-
When filters are applied to fare shop results, the Filter icon displays with a red circle (
 ).
).
Sell from an availability entry
When selling from availability, the selected flights are unpriced flights (not yet fare quoted). Unpriced flights can be viewed in the graphical booking file.
-
To sell from the terminal display, single click on a flight class or enter N1F# (where 1 is the number of seats, F is the class, and # is the index line number). A confirmation displays for the sold segments.
 Manual sell entries
Entry
Result
N1C2
Reference sell flight
N3C2C3
Reference sell all flights
Shortcut: N3C2*
N1J1+N1N1
Sell round trip
@1HK
Change segment status
@2/3
Change segment 2 to 3 passengers
@1/25JUL
Change date
@1/H
Change class
N1X6AK
Passive short sell from availability (AK)
0AY631C11JULHELARNNN1
Direct sell flight
0AZ456C5APRFCOMADNN2/11301300
Sell with departure and arrival time. Time can use either 12- or 24-hr clock.
0BA512M12DECLHRLINLL4
Waitlist if unavailable or sell if availabile
0WT123F29OCTLHRLOSAK2
Add a confirmed flight
0US63Y21AUGPITPHLNN1
Party of 1
0UA456Q15MARIAHCLEHK3
Use passive code HK
-
To sell the same class on all connecting flights, single click on the flight class of the first segment or double click on a flight class from one of the connecting segments. You can also enter N1J#* (where 1 is the number of seats, J is the class, and # is the index line number of the first segment).
-
To sell an infant with seat (INS), the name field must be added to the booking file before the air availability entry is sent.
More information
-
Ensure the infant name field is in the booking file.
-
From the air availability results, click on the required class of service.
-
Based on the names in the booking file, two seats will be sold for the adult and the infant (INS).
-
-
The insert entry format is available for agencies that do not have auto segment placement set up as a default. From an air availability response (e.g., A30NOVMUCFRA), enter the sell request to insert a segment after an existing segment. For example, entry /2+N1W1 sells one seat in W class from line 1 (N1W1) after the second segment (/2) in the booking file.
Sell passive from availability
Passive segments are held in a Travelport+ Booking File for information and ticketing purposes only. For example, your passenger may make reservations directly with an airline, but since they have an account with your travel agency, they want you to issue their ticket. To issue a ticket in the Travelport+ system, there must be a Booking File.
A passive booking should only be used if it is not possible to use the live Booking File/PNR.
To sell passive segments from interactive availability results (e.g., A25JANLONSYD):
-
To sell a single segment, right click on a flight class and choose a passive sell status (AK, BK or YK).
-
For multi-segment flights,
-
Left click on a flight class from the first segment and all segments except the last segment. The selected flight classes are highlighted.
-
Right click on a flight class in the last segment and choose a passive sell status.

Note: Select flight classes in all connecting segments before proceeding with the sell. Otherwise the following error message is returned: Please make sure you include all connecting segments before proceding to sell and try again.
-
When the booking file contains passenger names, if the agent right clicks to sell the passive, the correct number of seats are sold. For example, if the booking file contains two adults and one infant and the agent right-clicks and select Passive Sell (YK), two seats are sold (one for each adult).
Known limitation: Infant with a seat (INS) is ignored and no seat is sold for this passenger type.
The agents can use YK status only if it is configured on the PCC. If the PCC is not set up to allow YK status for passive sell, an error is returned: Unable - YK Passive Sell is not configured on your PCC. Instead, the agent can select AK or BK.
AK, BK, and YK sell status can be used when reference selling using a terminal command. These sell statuses can also be used in the sell command using "0" keyword (e.g., 01N1YK).
-
AK - Passive confirmed status; no message is generated if the flight is canceled.
-
BK - Passive confirmed status; a message is generated to the airline.
-
YK - Passive air segment; no message of any kind is transmitted to the airline.
For more information about passive segments, see the Travelport Knowledge Base article Passive Booking File in Travelport+.