Remarks
You can add remarks fields to the booking file for various purposes. The four most frequently used remarks fields are:
Notepad remarks
HELP NP. or H/NP.
These are freeform remarks and do not appear on any documentation or are transmitted to any airline.
Notepads can be added via the terminal or graphical views.
Add a notepad remark
Graphical view
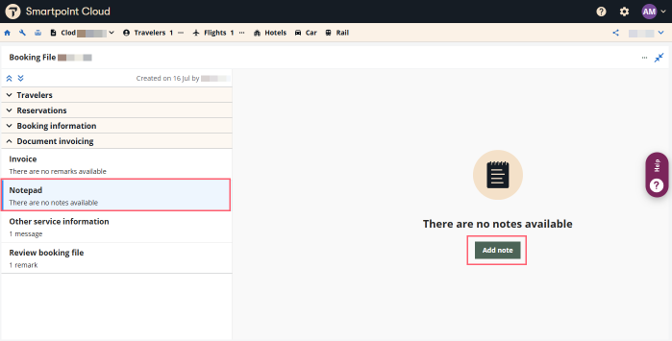
In the graphical view, to enter a notepad, navigate to the Document invoicing section and select Notepad.
If no notepad items already exist, the response will look like this, and click Add note.
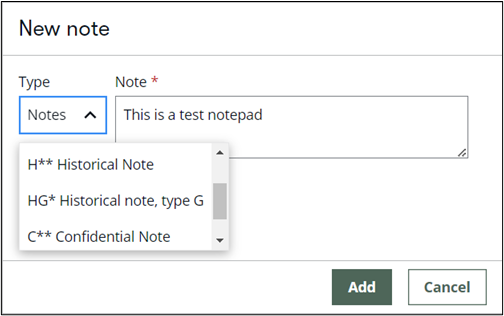
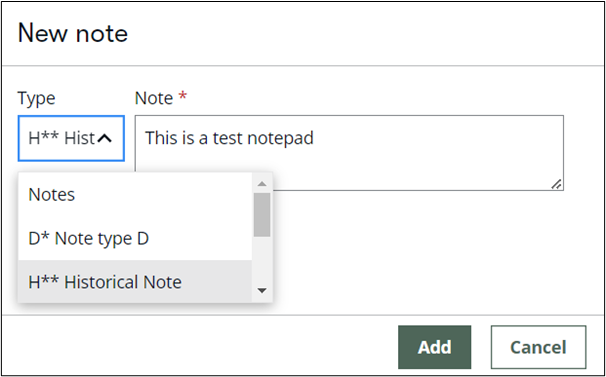
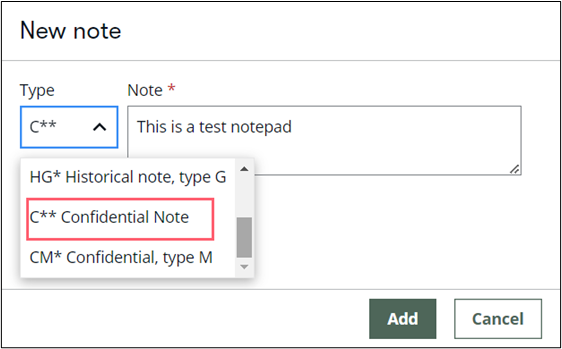
Select the type of notepad from the drop-down menu. The default is Notes, which adds a basic notepad (NP.), enter the freeform text and press Add.
Optionally , you can select a modifier from the drop-down list or add any modifier defined by your agency.
Terminal view
|
Format |
Explanation |
|---|---|
|
NP.FREE TEXT |
Create a notepad item. Will not show in history of the booking file when deleted. |
|
NP.**BUSINESS CLASS ONLY |
Notepad+ remark, will be automatically placed on the first line of the notepad field. Single item field. |
|
NP.C**THIS IS A SECRET |
Create a Confidential notepad item. Only visible in own PCC. |
|
NP.H**TEXT |
Create a notepad that will be saved in the history of the booking file when removed |
|
NP.HX**TEXT |
Historical notepad with additional qualifier |
|
NP.D*TEXT |
Create a notepad item with D qualifier. Qualifiers to be defined by the agency. |
|
NP.HG*TEXT |
Create a Historical notepad item with G qualifier. Qualifiers to be defined by the agency. |
|
NP.CM*TEXT |
Create a Confidential notepad with qualifier M. Qualifiers to be defined by the agency. |
|
NP.VM*TEXT |
Create a notepad item with VM as double qualifier. Qualifiers to be defined by the agency. |
(Max. 87 characters; max. items 999.)
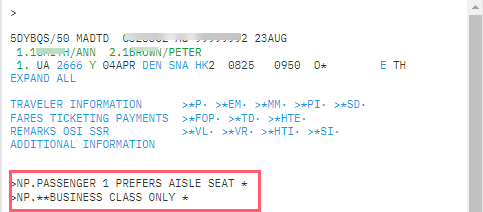
Example:
NP.PASSENGER 1 PREFERS AISLE SEAT
NP.**BUSINESS CLASS ONLY
Display a notepad remark
Graphical view
Press the Toggle view ( ) icon active in the window header to open the booking file in the graphical view. This view will display the NPs added with cryptic formats.
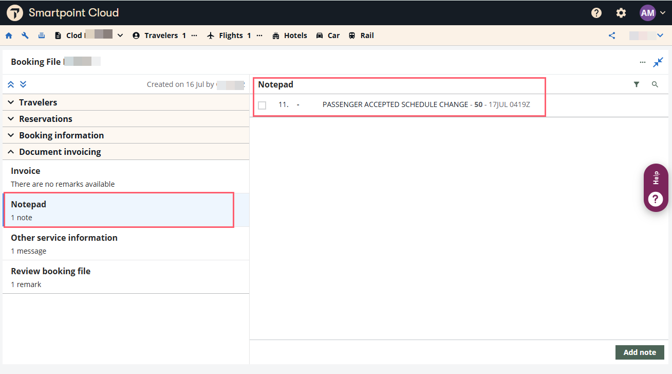
This information will be shown in the Document invoicing section:
Terminal view
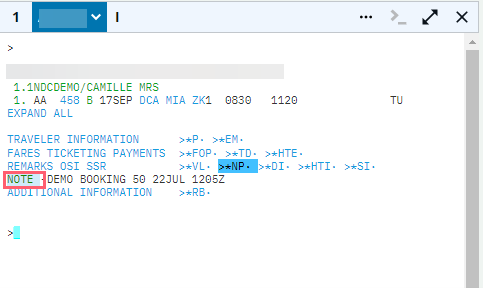
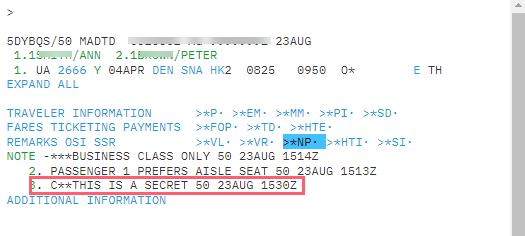
To view the notepad remark added to the booking, press *NP in the REMARKS OSI SSR section of the terminal view.
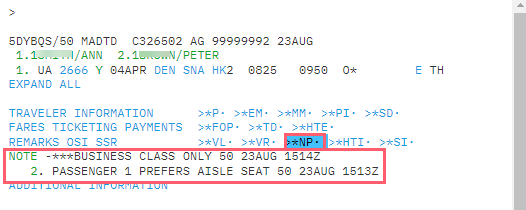
When you click the NOTE green item, the notepad remarks are displayed in the graphical view.
Change or delete notepad remarks in the graphical view
Change a notepad remark
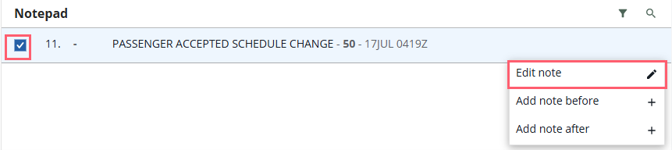
To edit a notepad remark:
-
Select Notepad in the Document invoicing section.
-
Check the box of the item you need to modify and press the options icon (3 dots) on the right of the applicable note.
-
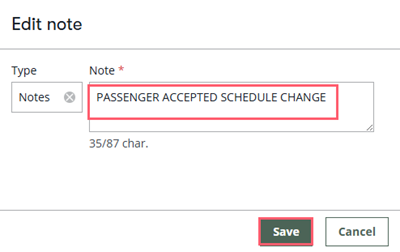
Select Edit note. You can also choose to add a new note before or after the current row.
-
Make the necessary changes and press Save.
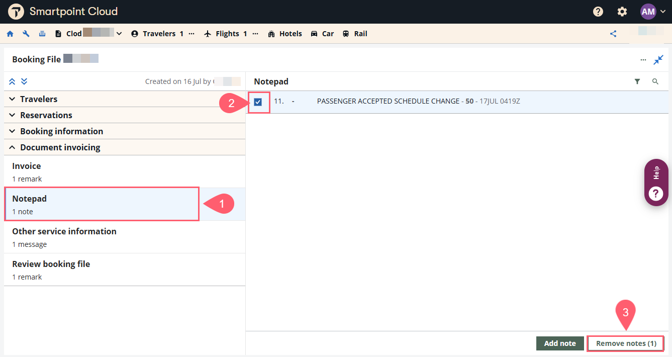
Delete a notepad remark
-
Select Notepad in the Document invoicing section.
-
Select the applicable note.
-
Press Remove notes.
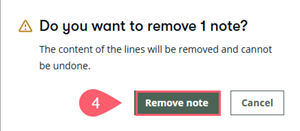
-
Press Remove note again in the confirmation window.
Change a notepad remark using formats
|
Format |
Explanation |
|---|---|
|
NP.2@NEW TEXT |
Change second notepad item |
|
NP.4@P*NEW TEXT |
Change fourth notepad item with P qualifier |
Insert a notepad remark using formats
|
Format |
Explanation |
|---|---|
|
NP./2TEXT |
Insert a notepad item after second notepad item |
|
NP./3V*TEXT |
Insert a notepad item with V qualifier after third notepad item |
Delete a notepad remark using formats
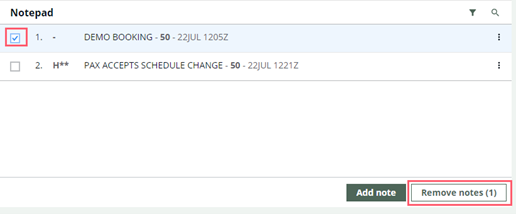
To delete a note, select the checkbox before the note and select the Remove notes button at the bottom right. You can delete multiple notes at once.
To remove notepads with terminal formats, use the following entries:
|
Format |
Explanation |
|---|---|
|
NP.2@ |
Delete second notepad item |
|
NP.1-3.5@ |
Delete notepad items 1, 2, 3 and 5 |
Historical notes
Historical notes are recorded in booking file history.
Historical notepad entries can be added in graphical view by selecting H**Historical Note in the drop-down menu.
|
Format |
Explanation |
|---|---|
|
NP.H**TEXT |
Create a notepad that will be saved in the history of the booking file when removed. |
|
NP.HX**TEXT |
Historical notepad with additional qualifier. |
Confidential notes
A confidential note can only be viewed by the PCC in which it was created.
Confidential notepad entries can be added in graphical view by selecting C**Confidential Note in the drop-down menu.
|
Format |
Explanation |
|---|---|
|
NP.C**THIS IS A SECRET |
Create a confidential notepad item, only visible in its own PCC. |
|
NP.CM*TEXT |
Create a confidential notepad item with qualifier M. Qualifiers to be defined by the agency. |
Example: NP.C**THIS IS A SECRET
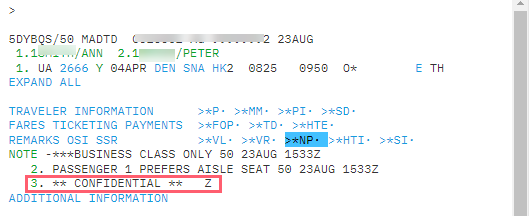
This is how the confidential note appears in its own PCC:
This is how the confidential note appears in another PCC:
Itinerary remarks
HELP ITDI or H/ITDI
Itinerary remarks are freeform messages that you create to be printed on a customer’s itinerary. There are two types of itinerary remarks:
-
Associated to a specific segment
-
Unassociated
In this section, you will learn how to add, display, change, and delete associated and unassociated itinerary remarks. You can create a maximum of 5000 characters for combined associated and unassociated remarks fields.
Associated remarks
Associated remarks are itinerary remarks you create and associate to a specific segment in a booking file. When you generate an itinerary, associated remarks appear immediately after the segment they reference. You can have up to 70 freeform characters per associated remark.
Currently these can be added via the terminal view only.
Add an associated remark
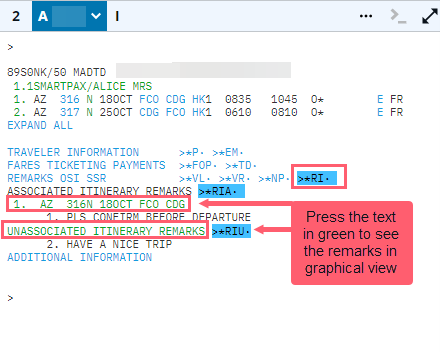
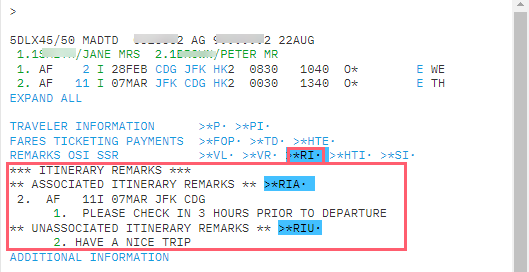
The function identifier to add an associated remark is RI. followed by S and the segment number, and an asterisk * before the free text.
Example: RI.S2* PLEASE CHECK IN 3 HOURS PRIOR TO DEPARTURE
Note: To add one blank line, use the spacebar twice in the free text box rather than typing any text.
Travelport+ numbers each line of associated remarks in ascending order, starting from the first segment in the itinerary. For example, if you associate two remarks to segment 2 and one remark to segment 3, Travelport+ displays them as associated remarks 1, 2, and 3.
Change and re-associate remarks
When you change specific segments or an entire itinerary, the alert ***ITIN RMKS CANCELED UNLESS REASSOC*** appears. The alert indicates that Travelport+ is holding the remarks and will cancel them upon end transaction unless you re-associate them to new segments.
To re-associate associated remarks when you change segments, use the following steps.
-
Display the booking file.
-
Enter: *XRI
-
Type the entry RIR. then the itinerary remark number and then S and the new segment number.
Example: RIR.1S1
Unassociated remarks
Unassociated remarks are freeform remarks you create for an itinerary that does not apply to a specific segment. When you print an itinerary, unassociated remarks appear at the bottom of the itinerary. You can have up to 70 freeform characters per unassociated remark.
Unassociated remarks can be added from both the graphical and terminal windows.
Add an unassociated remark
Graphical view
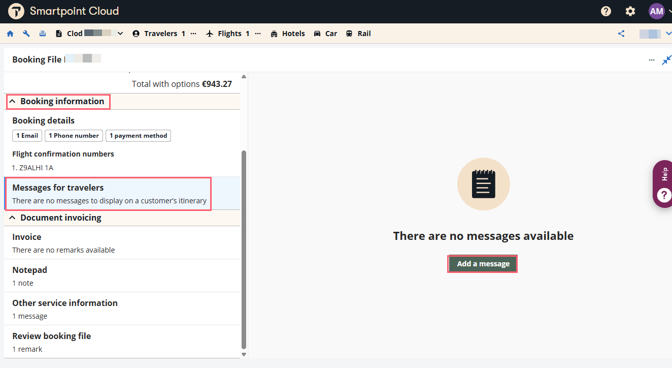
The remarks are added by choosing Messages for travelers in the Booking information section.
-
Select Add a message.
-
Enter the remark in the Message text box. For additional remarks, press +Add line.
-
Press Add.

Terminal view
Example: RI.HAVE A NICE TRIP
Additional formats for adding Associated and Unassociated remarks:
|
Format |
Explanation |
|---|---|
|
RI.TEXT+RI.TEXT |
Create multiple Unassociated remarks |
|
RI. (type 2 blank spaces) |
Create a blank line in the itinerary before or between Unassociated remarks |
|
RI.S4*TEXT-TEXT+RI.S5*TEXT-TEXT |
Add two lines of text associated to segment 4 and two lines associated to segment 5 |
|
RI.S1* |
Add a blank line after segment 1 or its Associated remarks |
|
RI.S1-3*TEXT |
Add same text to all stated segments |
Display itinerary remarks
Graphical view
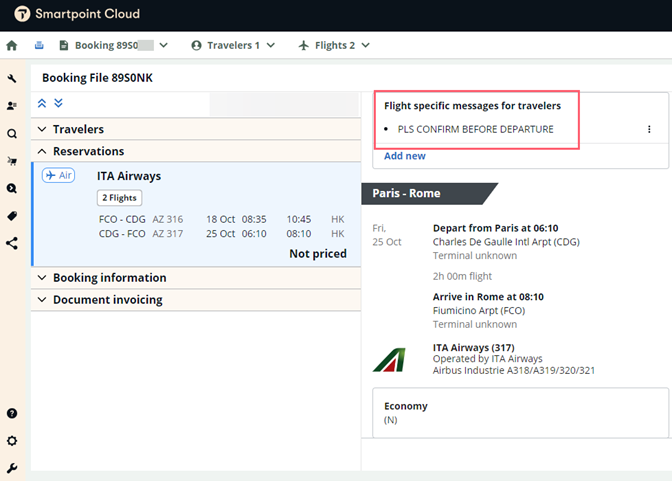
Press the *RI button to open the Remarks in the graphical view.
This information will be shown in the Reservations section:
Change or delete an unassociated remark in the graphical view
Change unassociated remarks
To edit an unassociated remark:
-
Select Messages for travelers in the Booking information section.
-
Check the box of the item you need to modify and press the options icon (3 dots) on the right.
-
Select Edit message. You can also choose to add a new message before or after the current row.

-
Make the necessary changes and press Save.

Delete unassociated remarks
-
Select Messages for travelers in the Booking information section.
-
Select the applicable message.
-
Press Remove messages.
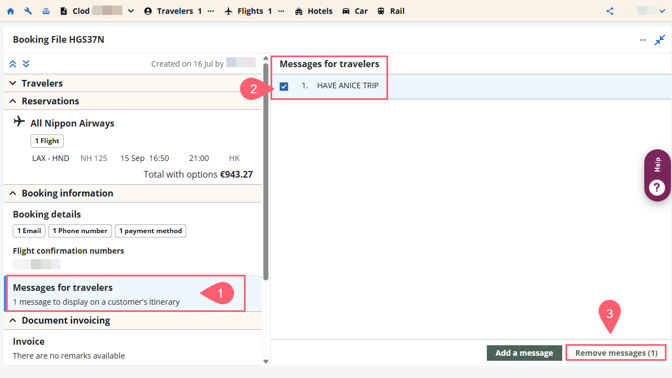
-
Press Remove message again in the confirmation window.
Terminal view
To view the Itinerary remarks added to the Smartpoint Cloud booking, press *RI in the REMARKS OSI SSR section of the terminal view.
Once itinerary remarks are displayed, you have the option to expand or collapse only the associated remarks by pressing *RIA, or only the unassociated *RIU.
Change itinerary remarks
|
Format |
Explanation |
|---|---|
|
RI.2@NEW TEXT |
Change the second Itinerary remark to new text |
|
RI.2@NEW TEXT+RI.3@NEXT TEXT |
Multiple remark change |
Delete itinerary remarks
|
Format |
Explanation |
|---|---|
|
RI.3@ |
Delete Itinerary remark 3 |
|
RI.3-6.8@ |
Delete Itinerary remarks 3 through 6 and 8 ed to segment 2 |
Insert itinerary remarks
|
Format |
Explanation |
|---|---|
|
RI./0*TEXT |
Insert first Unassociated remark |
|
RI./2S3*TEXT |
Insert after Itinerary remark 2 an Associated remark for segment three |
Note: Associated remarks appear in segment order and unassociated remarks appear in the order in which you entered them. For more information on how to display itinerary remarks, refer to H/ITDI.
Invoice remarks
HELP ITRM or H/ITRM
Invoice remarks are often known as ticketing remarks, and they transmit information from Travelport+ to the back-office accounting system and allow miscellaneous information to print on the itinerary/invoice. The agency uses this information for accounting, billing, and reporting.
Travelport+ accepts up to 99 invoice remarks per booking file. The maximum length of a remark is 65 freeform characters including the function identifier. Travelport+ does not edit any remark, except for field length.
Add invoice remarks
Graphical view
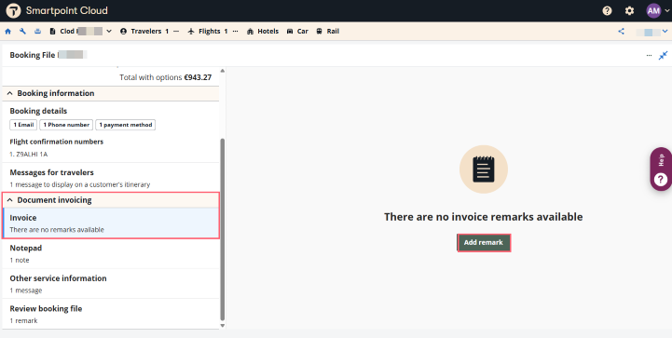
Invoice remarks are added by choosing Invoice in the Document invoicing section.
-
If no remarks exist, select the Add remark button.
-
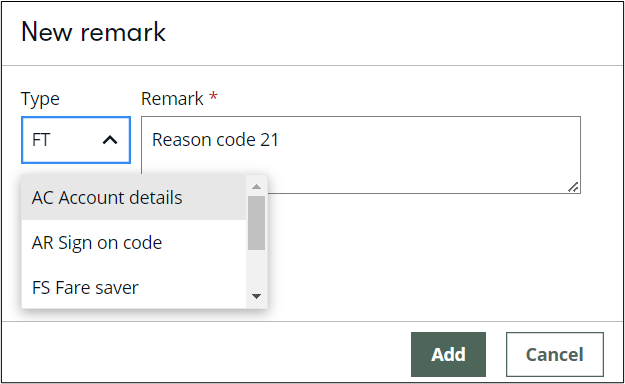
Select the invoice type code, the remark subtype as applicable, from the drop-down menu and add your free text into the box
-
AC - Account details (only 1 allowed)
-
AR - Replace original sign on code with new sign on, which will be used on the invoice/itinerary.
-
FS - Add a Fare Saver to the itinerary/invoice; do not enter decimals or currency codes.
-
FT - Up to 45 characters of free text, which is sent to the back office system (MIR).
-
TK - Add manual ticket numbers to the itinerary/invoice.
-
X* - Back office accounting field
-
CR - Copy up to 12 canned remark lines from the canned remark record and place them in the itinerary/invoice.
-
DYO - Use a DYO (design your own) format number for itinerary/invoice production
-
FP - New free text
-
-
Select Add line to add another note.
-
Select Add button to add notes to the booking file.
Terminal view
The function identifier to add an invoice remark is DI.
|
Format |
Description |
|---|---|
|
DI.DYO41 |
Use DYO format number 41 for itinerary/invoice production. |
|
DI.CR-6.8.14.21.25.37.40.61.64.65 |
Copy up to 12 canned remark lines from the canned remarks record and place them on the itinerary/invoice; the canned remarks can be in any order. |
|
DI.AR-1234DMF |
Replace original sign on code with 1234DMF to be printed on invoice/itinerary. |
|
DI.FS-2184-J |
Add a Fare Saver to the itinerary/invoice; no decimal or currency codes are used. |
|
DI.AC-ACCOUNTNAME |
Add account details (single item field). Maximum 42 characters. |
|
DI.FT-FREETEXT |
Add a maximum of 45 characters of accounting free text which is sent to the back-office system (MIR). |
|
DI.TK-2040805184-185 |
Add manual ticket numbers to itinerary/invoice. |
|
DI.AC-A53.IBM213.JAMES |
Add agency branch (A53), account details (IBM213) and override sign-on (JAMES) to an itinerary/invoice. |
Display invoice remarks
Graphical view
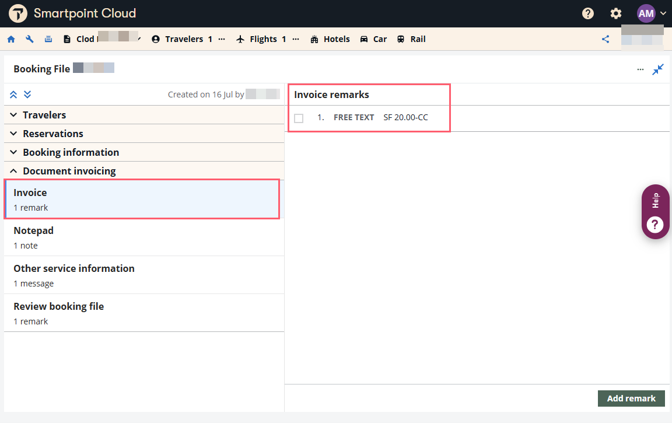
Invoice remarks are shown in the Document invoicing section:
Change or delete invoice remarks in the graphical view
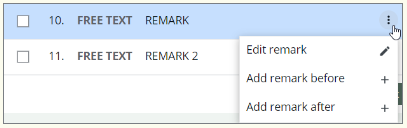
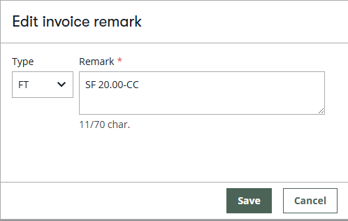
To edit an invoice remark:
-
Check the box of the item you need to modify and select the options (
 ) icon.
 -
Select Edit remark. You can also choose to add a new remark before or after the current row.
-
Modify the remark as needed and press Save.
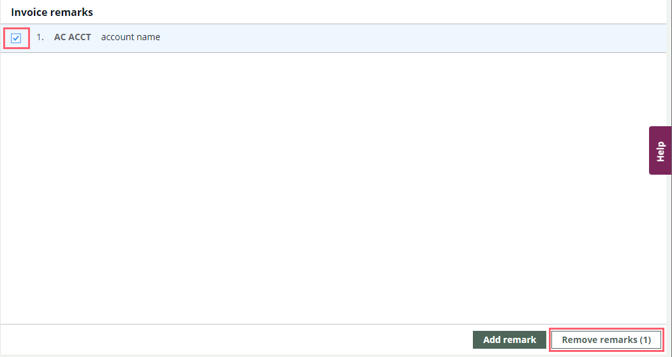
To delete invoice marks:
-
Check the box for each remark you want to delete.
-
Select the Remove remarks button.
Terminal view
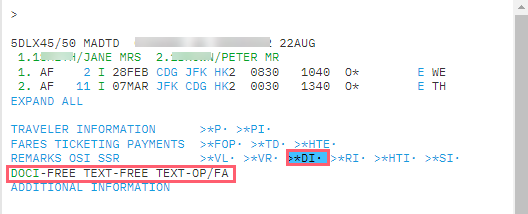
To view the Invoice remarks added to the Smartpoint Cloud booking, press *DI in the REMARKS OSI SSR section of the terminal view.
Change/Delete invoice remarks
|
Format |
Description |
|---|---|
|
DI.2@CR-1.2.3. |
Change document itinerary remark 2 to canned remarks numbers 1, 2, 3. |
|
DI.5@AR-ZGP5MB |
Change document itinerary remark 5 to agent reference ZGP5MB |
|
DI.2@ |
Delete document itinerary remark 2. |
|
DI.1-3.5@ |
Delete document itinerary remark 1 through 3 and 5 |
Vendor remarks
HELP V. or H/V.
Vendor remarks are used by agents and by car, hotel, and air providers to send messages to each other regarding the booking and can be added and viewed in the terminal view.
Vendor Outgoing (VO) remarks are sent from the agent to the provider and Vendor Incoming (VI) remarks are sent by the provider to the agent.
Add vendor remarks
Refer to the following example to send a message to Air France to query the cost of a kennel for a pet in a booking file.
Enter: V.AAF*PLEASE ADVISE COST OF KENNEL FOR DOG 10 KILOS
|
Item |
Explanation |
|---|---|
|
V. |
Function identifier |
|
AQF |
Airline QF (Qantas) |
|
*FREE TEXT |
Mandatory asterisk and free text message |
The system will display an asterisk when you have made the entry. The remark is identified as VO (outgoing) in the booking file.
Display vendor remarks
To view the vendor remarks added to the Smartpoint Cloud booking, press *VR in the REMARKS OSI SSR section of the terminal view.
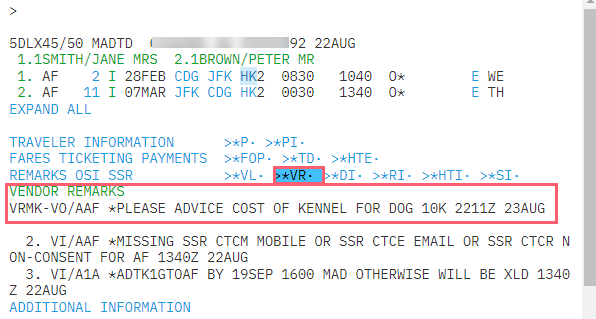
The message is generated to the airline when you end the booking file.
When a reply is received from the airline, it will be stored and identified in the booking file as VI (incoming).
Change vendor remarks
To change a remark, use the following example format:
V.1@AQF*PLEASE ADVISE COST OF KENNEL FOR CAT
|
Item |
Explanation |
|---|---|
|
V. |
Function identifier |
|
1@ |
Remark number and change symbol |
|
AQF |
Airline QF (Qantas) |
|
*FREE TEXT |
Mandatory asterisk and free text message |
Delete vendor remarks
To delete a remark (number 1), enter: V.1@
Note: Airlines may transmit a vendor remark to advise you that tickets must be issued for booking within a specific timeframe.
This is shown as an incoming remark in the booking file.

Canned remarks
HELP ITCA or H/ITCA
Canned remarks are frequently used remarks pre-stored in a file created and maintained by the agency secondary authorizer. You can choose remarks from the file and use them on a customer’s itinerary. A Canned remark is an Itinerary remark that is permanently stored in the system. A maximum of 12 Canned remarks can be selected to use with each booking file.
Canned remarks (identified by numbers) can only be created and displayed by a second level authorized user, possibly your office manager or supervisor.
Add canned remarks
Even though only a secondary authorizer can make changes to the canned remarks file, you can display the canned remarks file to see what canned remarks exist and how they are numbered.
To display canned remarks, enter: RPFD/RMKS
To add canned remarks, see the example below:
|
Format |
Description |
|---|---|
|
DI.CR-9.8.6 |
Add canned remarks 9, 8 and 6 (max. 12) to booking file. |
Change/delete canned remarks
To change or delete canned remarks see the examples below:
|
Format |
Description |
|---|---|
|
DI.2@CR-9.8.5 |
Change canned remarks (stored as DI item 2) to numbers 9, 8 and 5. |
|
DI.3@ |
Delete canned remarks (stored as DI item 3). |