Inserting Document Elements
This topic explains using the GlobalWare Word Processor function to insert symbols, images, today's date and time, data fields for mail merge purposes, and text from other compatible files into your documents.
Note: The procedures in this topic assume you have opened the GlobalWare Word Processor screen with a document already displayed. To access this screen, see Word Processing Overview.
Inserting a Symbol
To insert a symbol into your document, such as a bullet symbol or an accented character:
- In the document displayed on the GlobalWare Word Processor screen, position the cursor where you want to insert a symbol.
-
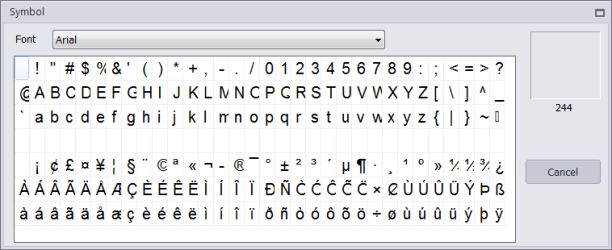
On the Insert menu, click Symbol.
The Symbol dialog box appears.
-
Click the desired symbol.
Note: You can select a different font for symbols in the Font field before you click the desired symbol. Special fonts, such as Webdings and Wingdings, have a greater variety of symbols.
GlobalWare inserts the symbol into your document.
Inserting an Image
To insert an image into your document, such as a bitmap, JPEG, or Windows metafile:
- In the document displayed on the GlobalWare Word Processor screen, position the cursor where you want to insert an image.
- On the Insert menu, click Image.
-
On the Open screen that appears, navigate to the desired image file, and then click Open.
GlobalWare inserts the image into your document.
Inserting Today's Date and Time
To insert today's date and current time into your document:
- In the document displayed on the GlobalWare Word Processor screen, position the cursor where you want to insert today's date and time.
-
On the Insert menu, click Date & Time.
GlobalWare inserts today's date and time into your document.
Inserting a Data Field
Inserting data fields into your document links the document to corresponding fields in tagged Account ID table records. This enables you to perform mail merges. For information about merging the document with targeted account information to produce direct mailings, see Working with Mail Merges and Labels.
To insert a data field into your document:
-
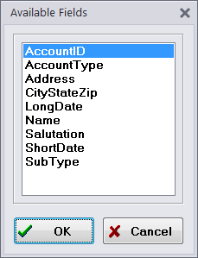
On the Insert menu, click Data Field.
The Available Fields dialog box appears
The following table describes the data fields listed in the Available Fields dialog box.
Data Field Description AccountID
Inserts the account IDs of records that are tagged for merging into the account ID.
AccountType
Inserts the account type for the merging records.
Address
Inserts the address from the Address field in the Account ID table.
CityStateZip
Inserts the city, state, and zip code from the City, State, and Zip fields in the Account ID table. For example, Denver, CO 80210-7789.
LongDate
Inserts the current date in long format. For example, January 1, 2010.
Name
Inserts the name from the Name field in the Account ID table.
Salutation
Inserts the salutation from the Salutation field in the Account ID table.
ShortDate
Inserts the current date in short format. For example, 1/1/10.
SubType
Inserts the customer type for customers and the travel/revenue type for providers.
-
Select the desired data field, and then click OK.
GlobalWare inserts the data field into your document.
Inserting Text from a File
You can import text from the following types of files into your document:
- Rich Text Format (.rtf)
- Hypertext Markup Language (.htm and .html)
- Text (.txt)
Note: Not all file types import successfully.
To insert text from another file into your document:
- In the document displayed on the GlobalWare Word Processor screen, position the cursor where you want to insert the text.
- On the Insert menu, click File.
-
On the Open screen that appears, navigate to the desired file, and then click Open.
GlobalWare inserts the text into your document.