Customizing the Laser Check Format
You can customize the format of laser checks in GlobalWare. GlobalWare provides a standard check format, with each field’s position denoted by an X and Y coordinate. You can move any field left and right by changing the X position, and you can move any field up and down by changing its Y position.
-
To customize the check format, on the System submenu, click Preferences.
The Preferences screen appears. For information about this screen, see Preferences.
-
Click CHECK FORMAT.
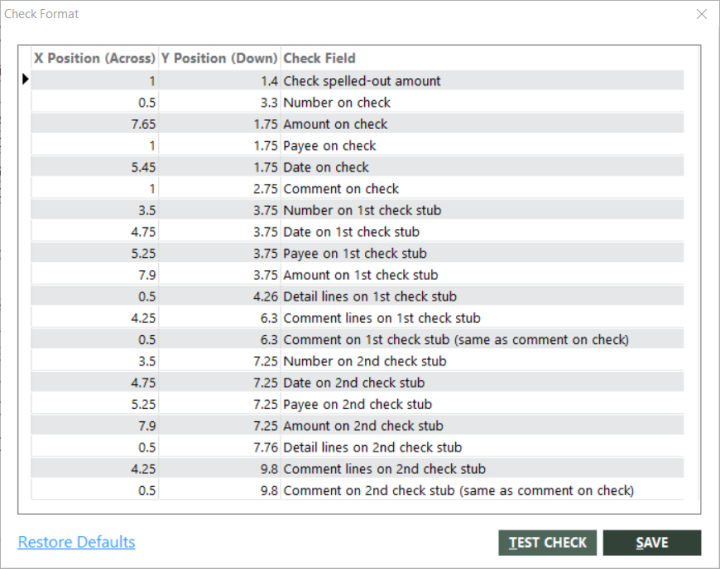
The Check Format dialog box appears.
- Edit the field positions as necessary by double-clicking a value and entering the new value.
- Click SAVE.
The check fields are as follows:
| Check/Stub | Check Fields |
|---|---|
|
Main Check |
Check
spelled-out amount |
|
First Check Stub |
(Check)
Number on first check stub |
|
Second Check Stub |
(Check)
Number on second check stub |
Generally, you will make the same changes to Stub 2 fields that you do to Stub 1 (for example, move the Stub 1 and Stub 2 comment lines over .5"). You could, however, move all Stub 1 fields and all Main Check fields so that Stub 1 prints first, the main check in the middle, followed by Stub 2.
Notes:
- Positions might not be absolute positions; for example, a position might be relative to the margin (rather than the edge of the page), and some positions depend on whether the field is right- or left-justified. It is probably easiest to move fields relative to where the field is currently (for example, add .5" to the current position) rather than determine the desired absolute position on the page.
- If you do not want a field to print at all, enter zero for both the X and Y positions. (For example, some agencies do not want the check number to print on the main check at all.)
- The address on the check always prints immediately below the Payee on check. If you move the Payee down, the address moves down also, and if you move the Payee over, the address also moves over.
- The Detail lines field on each stub comprises the headings for all fields and all of the detail lines. Changing the position moves this entire group of data. GlobalWare always prints the same number of detail lines (maximum 14), even if you move the Y position up or down.
- The Restore Defaults option changes all positions to their original, standard format (including adjusting for windowed envelopes for upgrading customers).
Click SAVE after changing any position, including using the Restore Defaults option. Clicking Exit discards all changes, including those made by the Restore Defaults option.